On-Prem or Cloud Agnostic Kubernetes
- This part of the course assumes you know how to run applications on Kubernetes and how the tooling around this works
Course Overview
| Kubernetes topic | Technologies |
| Installing Kubernetes on prem | kubeadm, RKE |
| File, Block and Object storage | Kubernetes Operators, Rook with Ceph |
| Managing SSL (HTTPS apps & endpoints | cert-manager |
| LDAP authentication | Dex with LDAP |
| Service Mesh, LB and Proxy | Envoy, Istio |
| Networking | Calico |
| Secret store | Vault |
| PaaS | OpenShift Origin |
Course objectives
- To be able to use Kubernetes on-prem or in a cloud agnostic way
- This allows you to use Kubernetes in an enterprise environment
- After this course you should be able to deploy Kubernetes anywhere
- using your own integrations
- like storage, certificates, authentication and so on
kubeadm
- kubeadm is a toolkit by Kubernetes to create a cluster
- It works on any deb/rpm compatible Linux OS, for example Ubuntu, Debian, RedHat or CentOS
- This is the main advantage of kubeadm, because a lot of tools are OS / Cloud specific
- It’s very easy to use and lets you spin up your Kubernetes cluster in just a couple of minutes
- kubeadm supports bootstrap tokens
- Those are simple tokens that can be used to create a cluster or to join nodes later on
- The tokens are in the format abcdef.0123456789abcdef
- kubeadm supports upgrading / downgrading clusters
- It does not install a networking solution
- You’ll have to install a Container Network Interface - compliant network solution yourself using kubectl apply
Prerequisites
- deb / rpm compatible system (or CoreOS Container Linux)
- 2 GB of RAM
- 2 CPUs for the master node
- Network connectivity between the nodes
- Can be private network
- Or public routable internet addresses
- Typically you need minimal 2 nodes, one master node and one to schedule pods on
Operators
- An operator is a method of packaging, deploying and managing a Kubernetes application
- It puts operational knowledge in an application
- it brings the user closer to the experience of managed cloud services, rather than having to know all the specifics of an application deployed to Kubernetes
- Once an operator is deployed it can be managed using Custom Resource Definitions (arbitrary types that extend the
- Kubernetes API)
- It also provides a great way to deploy Stateful services on Kubernetes (because a lot of complexities can be hidden
- from the end-user)
- Custom Resource Definitions (CRDs) are extensions to the Kubernetes API
- It allows the Kubernetes user to use custom objects (the objects you use in yaml files) and create / modify /
delete those objects on the cluster
- For example: you could run a kubectl create on a yaml file containing a custom database object to spin up a database on your cluster
- The custom objects are not necessarily available on all clusters
- they can be dynamically registered / deregistered
- Operators include CRDs
- By adding an operator, you’ll register these custom resource definitions
Examples
- etcd, Rook, Prometheus and Vault are examples of technologies that can be deployed as an Operator
- Let’s use etcd as an example (etcd is a distributed key/value store)
- Once the etcd operator is deployed, a new etcd cluster can be created by using the following yaml file:
apiversion: "etcd.database.coreos.com/v1beta2"
kind: "EtcdCluster"
metadata:
    name: "example-etcd-cluster"
spec:
    size: 3
    version: "3.2.13"
- Resizing the cluster is now just a matter of changing the yaml file:
apiversion: "etcd.database.coreos.com/v1beta2"
kind: "EtcdCluster"
metadata:
    name: "example-etcd-cluster"
spec:
    size: 5 # was 3 previously
    version: "3.2.13"
- After making the edit the changes can be applied using kubectl apply
- The same is true for the version number. To upgrade the etcd cluster you just change the version, enter kubectl apply and the etcd cluster will be upgraded
- Using operators simplifies deployment and management a lot
- This example used an etcd cluster but more software is being release using operators for Kubernetes
- For example the PostgreSQL operator by Zalando (https://github.com/zalando-incubator/postgres-operator)
- Or the MySQL operator, providing you with a simple API to create a MySQL database (https://github.com/oracle/mysql-operator)
apiVersion: mysql.oracle.com/v1
kind: MySQLCluster
metadata:
    name: myappdb
- You can also build your own operators, using the following tools (source: https://coreos.com/operators/):
- The Operator SDK: makes it easy to build an operator, rather than having to learn the Kubernetes API specifics
- Operator Lifecycle Manager: oversees installation, updates, and management of the lifecycle of all the operators
- Operator Metering: Usage reporting
- I’ll be using Operators in this course
- The next lectures will be about Rook, which will be deployed using Operators
Introduction to Rook
- Rook is an open source orchestrator for distributed storage systems running in Kubernetes. (definition: https://rook.io/docs/rook/master/)
- Rook allows you to use storage systems on Kubernetes clusters (that cannot use public cloud storage, or want to be cloud agnostic)
- If you’re on the public cloud, it’s very easy to attach a storage volume to a pod, to allow your app to persist its data, even when the pod or node shuts down
- It’s not that easy when you’re not on the major cloud providers like AWS / Azure / Google Cloud
- Rook wants to make it easy for you to use a storage system, even when you’re not on one of those major cloud providers, or using an on-prem cluster
- Rook automates the configuration, deployment, maintenance of distributed storage software
- This way, you don’t need to worry about the difficulties of setting up storage systems
- Rook will orchestrate all this management for you
- Rook is currently (early 2018) in alpha, but Rook already looks very promising and will sure be stable at some point soon
- Currently Rook uses Ceph as underlying storage, but Minio and CockroachDB are also available
- More storage engines will be added in future releases
Ceph
- Ceph is software that provides object, file, and block storage
- It’s open source
- It’s distributed without a single point of failure
- Ceph replicates its data to make it fault tolerant (a node can fail, and you still have your data available)
- It’s self-healing and self-managing
- Scalable to exabyte level
- Ceph provides 3 different types of storage:
- File Storage: to store files and directories, similar to accessing files over Networking File System (NFS), or using a Network Attached Storage (NAS), or EFS (Elastic File System) on AWS
- Block Storage: like a hard drive, to store data using a filesystem. A database needs block storage. Examples are a
SAN (Storage Area Network, which can provide block storage to servers), or EBS (Elastic Block Storage) on AWS
- Typical use case is to store files for your OS, storage for databases, etc
- Object Storage: To store any type of data as an object, identified by a key, with the possibility to add metadata.
This type of storage lends itself to be distributed and scalable. For example, AWS S3 provides Object Storage
- Can be used to store unstructured data like pictures, website assets, videos, log files, etc
Ceph components
- Ceph has multiple components:
- Ceph Monitor (min 3): maintains a map of the cluster state for the other ceph components (the daemons) to communicate. Also responsible for authentication between daemons and clients
- Ceph Manager daemon: responsible to keep track of runtime metrics and the cluster state
- Ceph OSDs (Object Storage Daemon, min 3): stores the data, is responsible for replication, recovery, rebalancing and provides information for the monitoring daemons
- MDSs (Ceph Metadata Server): stores metadata for the Ceph FileSystem storage type (not for block/object storage types)
- Ceph stores data as objects within logical storage pools
- It uses the CRUSH algorithm (Controlled Replication Under Scalable Hashing), which allows Ceph to be scalable
- Object storage in Ceph is provided by the distributed object storage mechanism within Ceph
- Ceph software libraries (librados) provides clients access to the “Reliable Autonomic Distributed Object Store”
(RADOS)
- RADOS provides a reliable, autonomous, distributed object store comprised of self-healing, self-managing, intelligent storage nodes (definition source: http://docs.ceph.com/docs/master/architecture/)
- There is also a RESTful interface that can provide an AWS S3 compatible interface to this object store
- Ceph block storage is provided by Ceph’s RADOS Block Device (RBD)
- RBD is built on top of the same Ceph Object Storage
- Ceph stores the block images as objects in the object store
- It’s also built on librados, the software library

- Data can come in from Ceph’s file storage, block storage, or object storage, and Ceph will store this data as an object in Ceph
- Each object is stored within the Object Storage Device (OSD)
- The OSDs will run on multiple nodes
- They will handle the read/write operations to their underlying storage File storage Block storage Object storage Ceph’s RADOS(the object store) OSDs Monitors data
Ceph with Rook
- Ceph on Rook
Source: https://rook.io/docs/rook/master/ • Rook supports all 3 types of storage: block, file and object storage • I will use in the demo Ceph for all these types, but other backends are also a possibility
- Rook will do a good job to abstract this away from you, so most of the configuration is nicely hidden from you
- You ‘ll be able to use the kubernetes yaml files to set configuration options
- First, you’ll need to deploy the rook operator
- Using the provided yaml files
- Using the helm chart
- Then, you can create the rook cluster
- Also using yaml definitions (this time using: apiVersion: rook.io/v1alpha1)
- This will use the rook operator rather than the Kubernetes API
- After that, block / file / object storage can be configured
- Using the rook API and Kubernetes storage API - using this storage API means using rook storage will become as easy as using for example AWS EBS or NFS
Demo Ceph with Rook
- First we need to start with the Rook operator.
rook-operator.yml
apiVersion: v1
kind: Namespace
metadata:
  name: rook-system
---
kind: ClusterRole
apiVersion: rbac.authorization.k8s.io/v1beta1
metadata:
  name: rook-operator
rules:
- apiGroups:
  - ""
  resources:
  - namespaces
  - serviceaccounts
  - secrets
  - pods
  - services
  - nodes
  - nodes/proxy
  - configmaps
  - events
  - persistentvolumes
  - persistentvolumeclaims
  verbs:
  - get
  - list
  - watch
  - patch
  - create
  - update
  - delete
- apiGroups:
  - extensions
  resources:
  - thirdpartyresources
  - deployments
  - daemonsets
  - replicasets
  verbs:
  - get
  - list
  - watch
  - create
  - update
  - delete
- apiGroups:
  - apiextensions.k8s.io
  resources:
  - customresourcedefinitions
  verbs:
  - get
  - list
  - watch
  - create
  - delete
- apiGroups:
  - rbac.authorization.k8s.io
  resources:
  - clusterroles
  - clusterrolebindings
  - roles
  - rolebindings
  verbs:
  - get
  - list
  - watch
  - create
  - update
  - delete
- apiGroups:
  - storage.k8s.io
  resources:
  - storageclasses
  verbs:
  - get
  - list
  - watch
  - delete
- apiGroups:
  - rook.io
  resources:
  - "*"
  verbs:
  - "*"
---
apiVersion: v1
kind: ServiceAccount
metadata:
  name: rook-operator
  namespace: rook-system
---
kind: ClusterRoleBinding
apiVersion: rbac.authorization.k8s.io/v1beta1
metadata:
  name: rook-operator
  namespace: rook-system
roleRef:
  apiGroup: rbac.authorization.k8s.io
  kind: ClusterRole
  name: rook-operator
subjects:
- kind: ServiceAccount
  name: rook-operator
  namespace: rook-system
---
apiVersion: apps/v1beta1
kind: Deployment
metadata:
  name: rook-operator
  namespace: rook-system
spec:
  replicas: 1
  template:
    metadata:
      labels:
        app: rook-operator
    spec:
      serviceAccountName: rook-operator
      containers:
      - name: rook-operator
        image: rook/rook:v0.7.1
        args: ["operator"]
        env:
        # To disable RBAC, uncomment the following:
        # - name: RBAC_ENABLED
        #  value: "false"
        # Rook Agent toleration. Will tolerate all taints with all keys.
        # Choose between NoSchedule, PreferNoSchedule and NoExecute:
        # - name: AGENT_TOLERATION
        #  value: "NoSchedule"
        # (Optional) Rook Agent toleration key. Set this to the key of the taint you want to tolerate
        # - name: AGENT_TOLERATION_KEY
        #  value: "<KeyOfTheTaintToTolerate>"
        # Set the path where the Rook agent can find the flex volumes
        # - name: FLEXVOLUME_DIR_PATH
        #  value: "<PathToFlexVolumes>"
        # The interval to check if every mon is in the quorum.
        - name: ROOK_MON_HEALTHCHECK_INTERVAL
          value: "45s"
        # The duration to wait before trying to failover or remove/replace the
        # current mon with a new mon (useful for compensating flapping network).
        - name: ROOK_MON_OUT_TIMEOUT
          value: "300s"
        - name: NODE_NAME
          valueFrom:
            fieldRef:
              fieldPath: spec.nodeName
        - name: POD_NAME
          valueFrom:
            fieldRef:
              fieldPath: metadata.name
        - name: POD_NAMESPACE
          valueFrom:
            fieldRef:
              fieldPath: metadata.namespace
kubectl create -f rook-operator.yml
- Next configure the Rook cluster
rook-cluster.yml
apiVersion: v1
kind: Namespace
metadata:
  name: rook
---
apiVersion: rook.io/v1alpha1
kind: Cluster
metadata:
  name: rook
  namespace: rook
spec:
  # the storage backend (only ceph is currently implemented)
  backend: ceph
  # The path on the host where configuration files will be persisted. If not specified, a kubernetes emptyDir will be created (not recommended).
  # Important: if you reinstall the cluster, make sure you delete this directory from each host or else the mons will fail to start on the new cluster.
  # In Minikube, the '/data' directory is configured to persist across reboots. Use "/data/rook" in Minikube environment.
  dataDirHostPath: /var/lib/rook
  # toggle to use hostNetwork
  hostNetwork: false
  # set the amount of mons to be started
  monCount: 3
# To control where various services will be scheduled by kubernetes, use the placement configuration sections below.
# The example under 'all' would have all services scheduled on kubernetes nodes labeled with 'role=storage' and
# tolerate taints with a key of 'storage-node'.
#  placement:
#    all:
#      nodeAffinity:
#        requiredDuringSchedulingIgnoredDuringExecution:
#          nodeSelectorTerms:
#          - matchExpressions:
#            - key: role
#              operator: In
#              values:
#              - storage-node
#      podAffinity:
#      podAntiAffinity:
#      tolerations:
#      - key: storage-node
#        operator: Exists
#    api:
#      nodeAffinity:
#      podAffinity:
#      podAntiAffinity:
#      tolerations:
#    mgr:
#      nodeAffinity:
#      podAffinity:
#      podAntiAffinity:
#      tolerations:
#    mon:
#      nodeAffinity:
#      tolerations:
#    osd:
#      nodeAffinity:
#      podAffinity:
#      podAntiAffinity:
#      tolerations:
  resources:
#    api:
# The requests and limits set here, allow the api Pod to use half of one CPU core and 1 gigabyte of memory
#      limits:
#        cpu: "500m"
#        memory: "1024Mi"
#      requests:
#        cpu: "500m"
#        memory: "1024Mi"
# the above example requests/limits can also be added to the other components too
#    mgr:
#    mon:
#    osd:
  storage: # cluster level storage configuration and selection
    useAllNodes: true
    useAllDevices: false
    deviceFilter:
    metadataDevice:
    location:
    storeConfig:
      storeType: bluestore
      databaseSizeMB: 1024 # this value can be removed for environments with normal sized disks (100 GB or larger)
      journalSizeMB: 1024  # this value can be removed for environments with normal sized disks (20 GB or larger)
# Cluster level list of directories to use for storage. These values will be set for all nodes that have no `directories` set.
#    directories:
#    - path: /rook/storage-dir
# Individual nodes and their config can be specified as well, but 'useAllNodes' above must be set to false. Then, only the named
# nodes below will be used as storage resources.  Each node's 'name' field should match their 'kubernetes.io/hostname' label.
#    nodes:
#    - name: "172.17.4.101"
#      directories: # specific directories to use for storage can be specified for each node
#      - path: "/rook/storage-dir"
# you can override the cluster wide resource requests/limits per node, but only
# when using `useAllNodes: false`!
#      resources:
#        limits:
#          cpu: "500m"
#          memory: "1024Mi"
#        requests:
#          cpu: "500m"
#          memory: "1024Mi"
#    - name: "172.17.4.201"
#      devices: # specific devices to use for storage can be specified for each node
#      - name: "sdb"
#      - name: "sdc"
#      storeConfig: # configuration can be specified at the node level which overrides the cluster level config
#        storeType: bluestore
#    - name: "172.17.4.301"
#      deviceFilter: "^sd."
kubectl create -f rook-cluster.yml
- Enable the StorageClass
root-storageclass.yml
apiVersion: rook.io/v1alpha1
kind: Pool
metadata:
  name: replicapool
  namespace: rook
spec:
  replicated:
    size: 2
  # For an erasure-coded pool, comment out the replication size above and uncomment the following settings.
  # Make sure you have enough OSDs to support the replica size or erasure code chunks.
  #erasureCoded:
  #  dataChunks: 2
  #  codingChunks: 1
---
apiVersion: storage.k8s.io/v1
kind: StorageClass
metadata:
   name: rook-block
provisioner: rook.io/block
parameters:
  pool: replicapool
  # Specify the Rook cluster from which to create volumes.
  # If not specified, it will use `rook` as the name of the cluster.
  # This is also the namespace where the cluster will be
  clusterName: rook
  # Specify the filesystem type of the volume. If not specified, it will use `ext4`.
  # fstype: ext4
kubectl create -f root-storageclass.yml
- Install the Rook toolset
rook-tools.yml
apiVersion: v1
kind: Pod
metadata:
  name: rook-tools
  namespace: rook
spec:
  dnsPolicy: ClusterFirstWithHostNet
  containers:
  - name: rook-tools
    image: rook/toolbox:v0.7.1
    imagePullPolicy: IfNotPresent
    env:
      - name: ROOK_ADMIN_SECRET
        valueFrom:
          secretKeyRef:
            name: rook-ceph-mon
            key: admin-secret
    securityContext:
      privileged: true
    volumeMounts:
      - mountPath: /dev
        name: dev
      - mountPath: /sys/bus
        name: sysbus
      - mountPath: /lib/modules
        name: libmodules
      - name: mon-endpoint-volume
        mountPath: /etc/rook
  hostNetwork: false
  volumes:
    - name: dev
      hostPath:
        path: /dev
    - name: sysbus
      hostPath:
        path: /sys/bus
    - name: libmodules
      hostPath:
        path: /lib/modules
    - name: mon-endpoint-volume
      configMap:
        name: rook-ceph-mon-endpoints
        items:
        - key: data
          path: mon-endpoints
- Exec into the Toolbox to run commands
kubectl exec -it rook-tools -n rook -- bash
rookctl status
- Test Rook with MySQL
mysql-demo.yml
apiVersion: v1
kind: Service
metadata:
  name: demo-mysql
  labels:
    app: demo
spec:
  ports:
    - port: 3306
  selector:
    app: demo
    tier: mysql
  clusterIP: None
---
apiVersion: v1
kind: PersistentVolumeClaim
metadata:
  name: mysql-pv-claim
  labels:
    app: demo
spec:
  storageClassName: rook-block
  accessModes:
  - ReadWriteOnce
  resources:
    requests:
      storage: 10Gi
---
apiVersion: apps/v1beta1
kind: Deployment
metadata:
  name: demo-mysql
  labels:
    app: demo
spec:
  strategy:
    type: Recreate
  template:
    metadata:
      labels:
        app: demo
        tier: mysql
    spec:
      containers:
      - image: mysql:5.6
        name: mysql
        env:
        - name: MYSQL_ROOT_PASSWORD
          value: changeme
        ports:
        - containerPort: 3306
          name: mysql
        volumeMounts:
        - name: mysql-persistent-storage
          mountPath: /var/lib/mysql
      volumes:
      - name: mysql-persistent-storage
        persistentVolumeClaim:
          claimName: mysql-pv-claim
kubectl create -f mysql-demo.yml
kubectl get pv # list the PVs that have been created
Demo Rook Object Storage
- Create a storageClass for the Object Store.
rook-storageclass-objectstore.yml
apiVersion: rook.io/v1alpha1
kind: ObjectStore
metadata:
  name: my-store
  namespace: rook
spec:
  metadataPool:
    replicated:
      size: 3
  dataPool:
    erasureCoded:
      dataChunks: 2
      codingChunks: 1
  gateway:
    type: s3
    sslCertificateRef:
    port: 80
    securePort:
    instances: 1
    allNodes: false
kubectl create -f rook-storageclass-objectstore.yml
kubectl exec rook-tools -n rook -- bash  # log in on the Rook tools container
radosgw-admin user create --uid rook-user --display-name "A Rook rgw user" --rgw-realm=my-store  --rgw-zonegroup=my-store
AWS_HOST=rook-ceph-rgw-my-store.rook
AWS_ENDPOINT=<IP ADDRESS OF AWS_HOST>
AWS_ACCESS_KEY_ID=<ACCESS KEY PROVIDED WHEN CREATING USER>
AWS_SECRET_ACCESS_KEY=<SECRET KEY PROVIDED WHEN CREATING USER>
s3cmd mb --no-ssl --host=${AWS_HOST} --host-bucket= s3://demobucket #Create the bucket through Rook
echo 'hello world' > test #create test file
s3cmd put test --no-ssl --host=${AWS_HOST} --host-bucket= s3://demobucket # copy the test file into the object store
cert-manager
- If you want to use a secure http connection (https), you need to have certificates
- Those certificates can be bought, or can be issued by some public cloud providers, like AWS’s Certificate Manager
- Managing SSL / TLS certificates yourself often takes a lot of time and are time consuming to install and extend
- You also cannot issue your own certificates for production websites, as they are not trusted by the common internet browsers (Chrome, IE, …)
- Cert-manager can ease the issuing of certificates and the management of it
- Cert-manager can use letsencrypt
- Let’s encrypt is a free, automated and open Certificate Authority
- Let’s encrypt can issue certificates for free for your app or website
- You’ll need to prove to let’s encrypt that you are the owner of a domain
- After that, they’ll issue a certificate for you
- The certificate is recognized by major software vendors and browsers
- Cert-manager can automate the verification process for let’s encrypt
- With Let’s encrypt you’ll also have to renew certificates every couple of months
- Cert-Manager will periodically check the validity of the certificates and will start the renewal process if necessary
- Let’s encrypt in combination with cert-manager takes away a lot of hassle to deal with certificates, allowing you to secure your endpoints in an easy, affordable way
- You can only issue certificates for a domain name you own
- You’ll need to have a domain name like xyz.com
- You can get one for free from www.dot.tk or other providers
- Or, you can buy one through namecheap.com / AWS route53 / any other provider that sells domain names
- Less popular extensions only cost a few dollars
From: https://cert-manager.readthedocs.io/en/latest/index.html
Demo cert-manager
- Make sure Helm is installed on your system and the your cluster has been initialized.
- Before you can use the cert-manager you’ll need an Ingress controller because we’ll need to access our cluster on HTTP (80) or HTTPS (443)
helm install --name my-ingress stable/nginx-ingress \
--set controller.kind=DaemonSet \
--set controller.service.type=NodePort \
--set controller.hostNetwork=true
- Make sure that you can access all the nodes in your cluster on port 80 and 443 (firewall) since LetsEncrypt verifies connectivity to your hosts when a certificate is issued
- Create a small application (Hello World)
myapp.yml
apiVersion: extensions/v1beta1
kind: Deployment
metadata:
  name: myapp
spec:
  replicas: 1
  template:
    metadata:
      labels:
        app: myapp
    spec:
      containers:
      - name: k8s-demo
        image: wardviaene/k8s-demo
        ports:
        - containerPort: 3000
---
apiVersion: v1
kind: Service
metadata:
  name: myapp
spec:
  ports:
  - port: 3000
    targetPort: 3000
    protocol: TCP
  selector:
    app: myapp
- and an ingress for it
myapp-ingress.yml
apiVersion: extensions/v1beta1
kind: Ingress
metadata:
  annotations:
    kubernetes.io/ingress.class: nginx
  name: myapp
  namespace: default
spec:
  #tls:
  #- secretName: myapp-tls-staging
  #  hosts:
  #  - myapp.newtech.academy
  rules:
    - host: myapp.newtech.academy
      http:
        paths:
          - backend:
              serviceName: myapp
              servicePort: 3000
            path: /
- Add the public IP of a node to your DNS
- Install the cert-manager
helm install --name cert-manager --namespace kube-system stable/cert-manager
- Create an issuer for staging
issuer-staging.yml
apiVersion: certmanager.k8s.io/v1alpha1
kind: Issuer
metadata:
  name: myapp-letsncrypt-staging
  namespace: default
spec:
  acme:
    # The ACME server URL
    server: https://acme-staging-v02.api.letsencrypt.org/directory
    # Email address used for ACME registration
    email: your@email.inv
    # Name of a secret used to store the ACME account private key
    privateKeySecretRef:
      name: myapp-letsncrypt-staging
    # Enable HTTP01 validations
    http01: {}
kubectl create -f issuer-staging.yml
- Create an issuer for production
issuer-production.yml
apiVersion: certmanager.k8s.io/v1alpha1
kind: Issuer
metadata:
  name: myapp-letsncrypt-prod
spec:
  acme:
    # The ACME server URL
    server: https://acme-v02.api.letsencrypt.org/directory
    # Email address used for ACME registration
    email: your@email.inv
    # Name of a secret used to store the ACME account private key
    privateKeySecretRef:
      name: myapp-letsncrypt-prod
    # Enable HTTP01 validations
    http01: {}
kubectl create -f issuer-production.yml
- Store the certificate for staging and production in Kubernetes
certificate-staging.yml
apiVersion: certmanager.k8s.io/v1alpha1
kind: Certificate
metadata:
  name: myapp
  namespace: default
spec:
  secretName: myapp-tls-staging
  issuerRef:
    name: myapp-letsncrypt-staging
  commonName: myapp.newtech.academy
  #dnsNames:
  #- www.myapp.newtech.academy
  acme:
    config:
    - http01:
        ingress: myapp
      domains:
      - myapp.newtech.academy
      #- www.myapp.newtech.academy
kubectl create -f certificate-staging.yml
kubectl get certificates
kubectl describe certificates myapp # to review the process of creating cert
kubectl describe ingress # to review the rule that has automatically been injected
- To enable a certificate edit the ingress and comment out the TLS section
myapp-ingress.yml
apiVersion: extensions/v1beta1
kind: Ingress
metadata:
  annotations:
    kubernetes.io/ingress.class: nginx
  name: myapp
  namespace: default
spec:
  tls:
  - secretName: myapp-tls-staging
    hosts:
    - myapp.newtech.academy
  rules:
    - host: myapp.newtech.academy
      http:
        paths:
          - backend:
              serviceName: myapp
              servicePort: 3000
            path: /
kubectl apply -f myapp-ingress.yml
- Test in a browser but remember that this is the ‘staging’ certificate, hence not verified = insecure. For an secure use the prod one
certificate-prod.yml
apiVersion: certmanager.k8s.io/v1alpha1
kind: Certificate
metadata:
  name: myapp
  namespace: default
spec:
  secretName: myapp-tls-prod
  issuerRef:
    name: myapp-letsncrypt-prod
  commonName: myapp.newtech.academy
  #dnsNames:
  #- www.myapp.newtech.academy
  acme:
    config:
    - http01:
        ingress: myapp
      domains:
      - myapp.newtech.academy
      #- www.myapp.newtech.academy
kubectl create -f certificate-prod.yml
Dex
- Dex is Identity Service
- It uses OpenID Connect (OIDC)
- Kubernetes can use Dex to authenticate its users (using OIDC)
- Dex uses connectors to authenticate a user using another Identity Provider
- This allows you to use Dex to authenticate users in Kubernetes using LDAP, SAML, GitHub, Microsoft, and others
Dex Architecture

- Most companies already have a user directory, using OpenLDAP, Microsoft Active Directory (which is LDAP compatible),
or similar products
- LDAP stands for Lightweight Directory Access Protocol
- It’s less common for companies to already have an OpenID Connect (OIDC) implementation that you can use
- That’s why you have to use software like Dex, that will act as a bridge between what enterprises offer for authentication, and what Kubernetes can use today
- Dex can use LDAP, but there are also other connectors you could use if your company doesn’t use LDAP
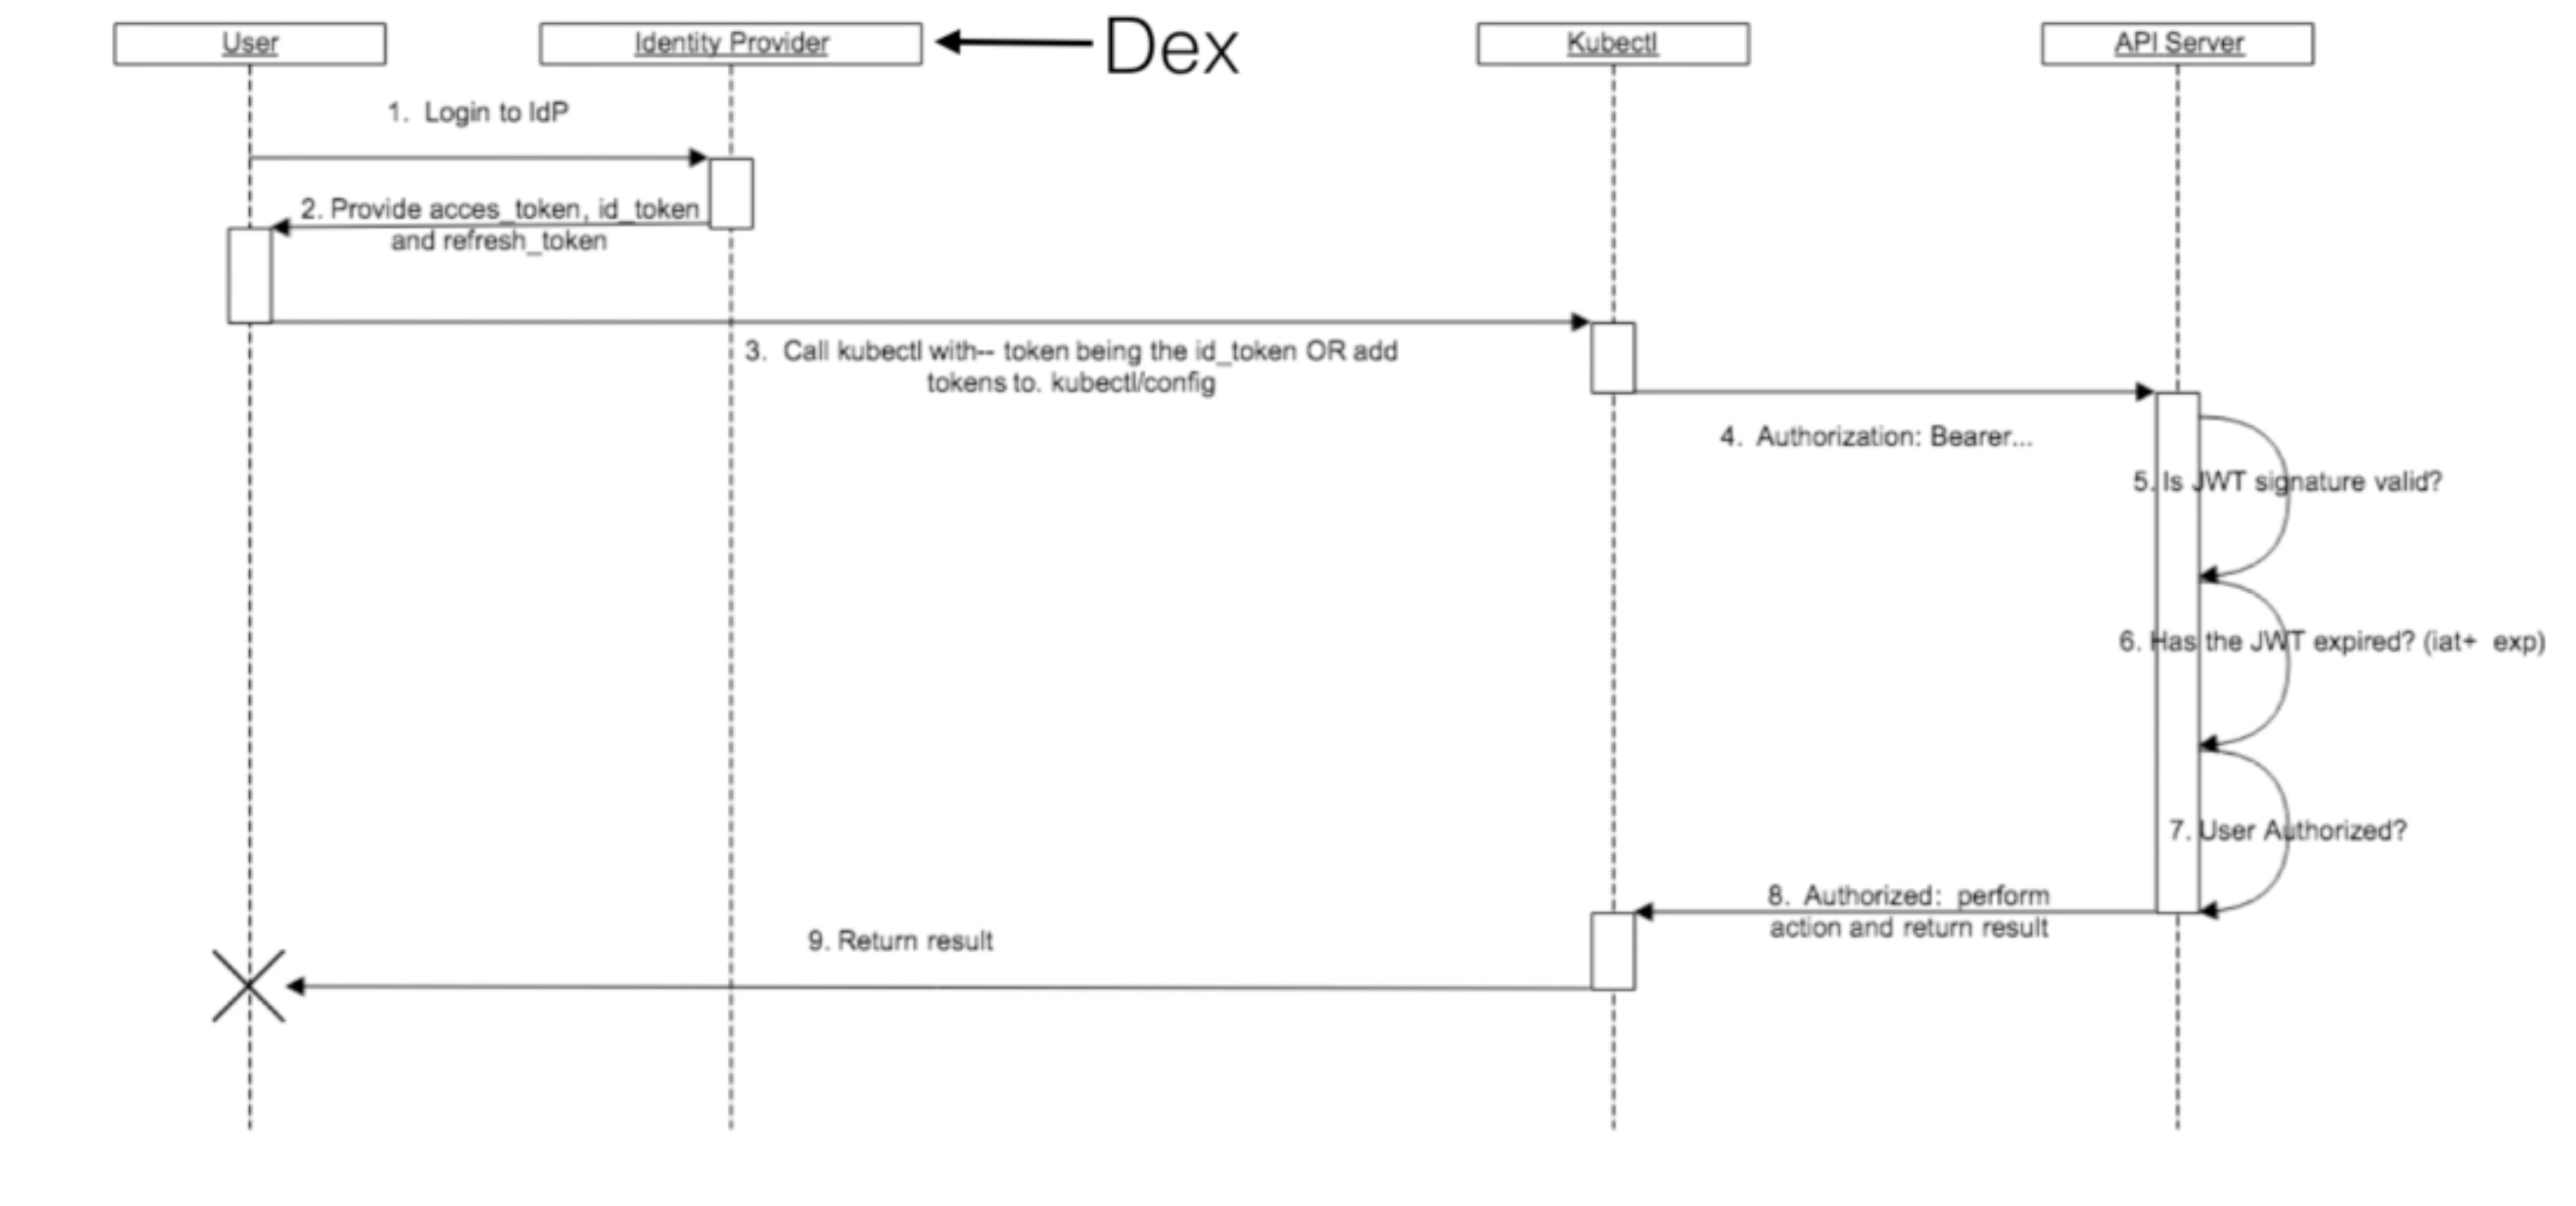
Source: https://kubernetes.io/docs/reference/access-authn-authz/authentication/Dex
Dex installation and configuration
- Create certificate
gencert.sh
#!/bin/bash

mkdir -p ssl

cat << EOF > ssl/req.cnf
[req]
req_extensions = v3_req
distinguished_name = req_distinguished_name

[req_distinguished_name]

[ v3_req ]
basicConstraints = CA:FALSE
keyUsage = nonRepudiation, digitalSignature, keyEncipherment
subjectAltName = @alt_names

[alt_names]
DNS.1 = dex.newtech.academy
EOF

openssl genrsa -out ssl/ca-key.pem 2048
openssl req -x509 -new -nodes -key ssl/ca-key.pem -days 10 -out ssl/ca.pem -subj "/CN=kube-ca"

openssl genrsa -out ssl/key.pem 2048
openssl req -new -key ssl/key.pem -out ssl/csr.pem -subj "/CN=kube-ca" -config ssl/req.cnf
openssl x509 -req -in ssl/csr.pem -CA ssl/ca.pem -CAkey ssl/ca-key.pem -CAcreateserial -out ssl/cert.pem -days 10 -extensions v3_req -extfile ssl/req.cnf
dex-ns.yml
apiVersion: v1
kind: Namespace
metadata:
  name: dex
./gencert.sh
kubectl create -f dex-ns.yaml
kubectl create secret tls dex.newtech.academy.tls -n dex --cert=ssl/cert.pem --key=ssl/key.pem
sudo cp ssl/ca.pem /etc/kubernetes/pki/openid-ca.pem
- Create secret
kubectl create secret \
    generic github-client \
    -n dex \
    --from-literal=client-id=$GITHUB_CLIENT_ID \
    --from-literal=client-secret=$GITHUB_CLIENT_SECRET
- kube-apiserver manifest file changes ( /etc/kubernetes/manifests/kube-apiserver.yaml)
- --oidc-issuer-url=https://dex.newtech.academy:32000
- --oidc-client-id=example-app
- --oidc-ca-file=/etc/kubernetes/pki/openid-ca.pem
- --oidc-username-claim=email
- --oidc-groups-claim=groups
- deploy
dex.yml
apiVersion: v1
kind: ServiceAccount
metadata:
  name: dex
  namespace: dex
---
apiVersion: rbac.authorization.k8s.io/v1beta1
kind: ClusterRole
metadata:
  name: dex
  namespace: dex
rules:
- apiGroups: ["dex.coreos.com"] # API group created by dex
  resources: ["*"]
  verbs: ["*"]
- apiGroups: ["apiextensions.k8s.io"]
  resources: ["customresourcedefinitions"]
  verbs: ["create"] # To manage its own resources identity must be able to create customresourcedefinitions.
---
apiVersion: rbac.authorization.k8s.io/v1beta1
kind: ClusterRoleBinding
metadata:
  name: dex
roleRef:
  apiGroup: rbac.authorization.k8s.io
  kind: ClusterRole
  name: dex
subjects:
- kind: ServiceAccount
  name: dex                 # Service account assigned to the dex pod.
  namespace: dex  # The namespace dex is running in.
---
apiVersion: extensions/v1beta1
kind: Deployment
metadata:
  labels:
    app: dex
  name: dex
  namespace: dex
spec:
  replicas: 3
  template:
    metadata:
      labels:
        app: dex
    spec:
      serviceAccountName: dex
      hostAliases:
      - ip: "127.1.2.3"
        hostnames:
        - "ldap01.example.com"
      containers:
      - image: quay.io/coreos/dex:v2.10.0
        name: dex
        command: ["/usr/local/bin/dex", "serve", "/etc/dex/cfg/config.yaml"]

        ports:
        - name: https
          containerPort: 5556

        volumeMounts:
        - name: config
          mountPath: /etc/dex/cfg
        - name: tls
          mountPath: /etc/dex/tls
        - name: ldap-tls
          mountPath: /etc/dex/ldap-tls

        env:
        - name: GITHUB_CLIENT_ID
          valueFrom:
            secretKeyRef:
              name: github-client
              key: client-id
        - name: GITHUB_CLIENT_SECRET
          valueFrom:
            secretKeyRef:
              name: github-client
              key: client-secret
      volumes:
      - name: config
        configMap:
          name: dex
          items:
          - key: config.yaml
            path: config.yaml
      - name: tls
        secret:
          secretName: dex.newtech.academy.tls
      - name: ldap-tls
        configMap:
          name: ldap-tls
          items:
          - key: cacert.pem
            path: cacert.pem
---
kind: ConfigMap
apiVersion: v1
metadata:
  name: ldap-tls
  namespace: dex
data:
  cacert.pem: |
    empty
---
kind: ConfigMap
apiVersion: v1
metadata:
  name: dex
  namespace: dex
data:
  config.yaml: |
    issuer: https://dex.newtech.academy:32000
    storage:
      type: kubernetes
      config:
        inCluster: true
    web:
      https: 0.0.0.0:5556
      tlsCert: /etc/dex/tls/tls.crt
      tlsKey: /etc/dex/tls/tls.key
    connectors:
    - type: github
      id: github
      name: GitHub
      config:
        clientID: $GITHUB_CLIENT_ID
        clientSecret: $GITHUB_CLIENT_SECRET
        redirectURI: https://dex.newtech.academy:32000/callback
        org: kubernetes
    oauth2:
      skipApprovalScreen: true

    staticClients:
    - id: example-app
      redirectURIs:
      - 'https://dex.newtech.academy:32000/callback'
      - 'http://178.62.90.238:5555/callback'
      name: 'Example App'
      secret: ZXhhbXBsZS1hcHAtc2VjcmV0
    enablePasswordDB: false
---
apiVersion: v1
kind: Service
metadata:
  name: dex
  namespace: dex
spec:
  type: NodePort
  ports:
  - name: dex
    port: 5556
    protocol: TCP
    targetPort: 5556
    nodePort: 32000
  selector:
    app: dex
kubectl create -f dex.yaml
- deploy example app
sudo yum install make golang-1.9
git clone https://github.com/coreos/dex.git
cd dex
git checkout v2.10.0
export PATH=$PATH:/usr/lib/go-1.9/bin
go get github.com/coreos/dex
make bin/example-app
export MY_IP=$(curl -s ifconfig.co)
./bin/example-app --issuer https://dex.newtech.academy:32000 --issuer-root-ca /etc/kubernetes/pki/openid-ca.pem --listen http://${MY_IP}:5555 --redirect-uri http://${MY_IP}:5555/callback
- Add user
user.yml
apiVersion: rbac.authorization.k8s.io/v1beta1
kind: Role
metadata:
  name: exampleUser
  namespace: default
rules:
- apiGroups: [""] # "" indicates the core API group
  resources: ["pods"]
  verbs: ["get", "watch", "list"]
---
apiVersion: rbac.authorization.k8s.io/v1beta1
kind: RoleBinding
metadata:
  name: exampleUser
roleRef:
  apiGroup: rbac.authorization.k8s.io
  kind: Role
  name: exampleUser
subjects:
- kind: User
  name: your@email.inv
  namespace: default
kubectl create -f user.yaml
#kubectl config set-credentials developer --token ${TOKEN}
kubectl config set-credentials developer --auth-provider=oidc \
  --auth-provider-arg=idp-issuer-url=https://dex.newtech.academy:32000 \
  --auth-provider-arg=client-id=example-app \
  --auth-provider-arg=idp-certificate-authority=/etc/kubernetes/pki/openid-ca.pem \
  --auth-provider-arg=id-token=${TOKEN}
kubectl config set-context dev-default --cluster=kubernetes --namespace=default --user=developer
kubectl config use-context dev-default
- Auto-renewal of token. For autorenewal, you need to share the client secret with the end-user (not recommended)
kubectl config set-credentials developer --auth-provider=oidc \
  --auth-provider-arg=idp-issuer-url=https://dex.newtech.academy:32000 --auth-provider-arg=client-id=example-app\
  --auth-provider-arg=idp-certificate-authority=/etc/kubernetes/pki/openid-ca.pem \
  --auth-provider-arg=id-token=${TOKEN} --auth-provider-arg=refresh-token=${REFRESH_TOKEN} \
  --auth-provider-arg=client-secret=${CLIENT_SECRET}
Demo dex - LDAP
- On the Kubernetes master, configure LDAP
gencert-ldap.sh
#!/bin/bash

set -x

sudo sh -c "certtool --generate-privkey > /etc/ssl/private/cakey.pem"

echo 'cn = Example Company
ca
cert_signing_key
' > /tmp/ca.info

sudo mv /tmp/ca.info /etc/ssl/ca.info

sudo certtool --generate-self-signed \
--load-privkey /etc/ssl/private/cakey.pem \
--template /etc/ssl/ca.info \
--outfile /etc/ssl/certs/cacert.pem

sudo certtool --generate-privkey \
--bits 1024 \
--outfile /etc/ssl/private/ldap01_slapd_key.pem

echo 'organization = Example Company
cn = ldap01.example.com
tls_www_server
encryption_key
signing_key
expiration_days = 3650' > /tmp/ldap01.info

sudo mv /tmp/ldap01.info /etc/ssl/ldap01.info

sudo certtool --generate-certificate \
--load-privkey /etc/ssl/private/ldap01_slapd_key.pem \
--load-ca-certificate /etc/ssl/certs/cacert.pem \
--load-ca-privkey /etc/ssl/private/cakey.pem \
--template /etc/ssl/ldap01.info \
--outfile /etc/ssl/certs/ldap01_slapd_cert.pem

sudo chgrp openldap /etc/ssl/private/ldap01_slapd_key.pem
sudo chmod 0640 /etc/ssl/private/ldap01_slapd_key.pem
sudo passwd -a openldap ssl-cert

sudo sh -c "cat /etc/ssl/certs/cacert.pem >> /etc/ssl/certs/ca-certificates.crt"

sudo systemctl restart slapd.service
certinfo.ldif
dn: cn=config
add: olcTLSCACertificateFile
olcTLSCACertificateFile: /etc/ssl/certs/cacert.pem
-
add: olcTLSCertificateFile
olcTLSCertificateFile: /etc/ssl/certs/ldap01_slapd_cert.pem
-
add: olcTLSCertificateKeyFile
olcTLSCertificateKeyFile: /etc/ssl/private/ldap01_slapd_key.pem
users.ldif
dn: ou=People,dc=example,dc=com
objectClass: organizationalUnit
ou: People

dn: ou=Groups,dc=example,dc=com
objectClass: organizationalUnit
ou: Groups

dn: cn=miners,ou=Groups,dc=example,dc=com
objectClass: posixGroup
cn: miners
gidNumber: 5000

dn: uid=john,ou=People,dc=example,dc=com
objectClass: inetOrgPerson
objectClass: posixAccount
objectClass: shadowAccount
uid: john
sn: Doe
givenName: John
cn: John Doe
displayName: John Doe
uidNumber: 10000
gidNumber: 5000
userPassword: johnldap
gecos: John Doe
mail: john@doe.inv
loginShell: /bin/bash
homeDirectory: /home/john

dn: uid=serviceaccount,ou=People,dc=example,dc=com
objectClass: inetOrgPerson
objectClass: posixAccount
objectClass: shadowAccount
uid: serviceaccount
sn: serviceaccount
givenName: serviceaccount
cn: service account
displayName: service account
uidNumber: 99999
gidNumber: 9999
userPassword: serviceaccountldap
gecos: Service Account
loginShell: /bin/false
homeDirectory: /home/serviceaccount
yum -y install slapd ldap-utils gnutls-bin ssl-cert
systemctl start slapd
slappasswd -h {SSHA} -s ldppassword
vi /etc/openldap/slapd.d/db.ldif #replace encrypted password for the one you generated
ldapmodify -Y EXTERNAL -H ldapi:/// -f db.ldif # apply change to LDAP
## Configure LDAP with your domain details
./gencert-ldap.sh # Generate certificates for LDAP
ldapmodify -H ldapi:// -Y EXTERNAL -f ldap/certinfo.ldif
ldapadd -x -D cn=admin,dc=example,dc=com -W -f ldap/users.ldif
Istio - Envoy
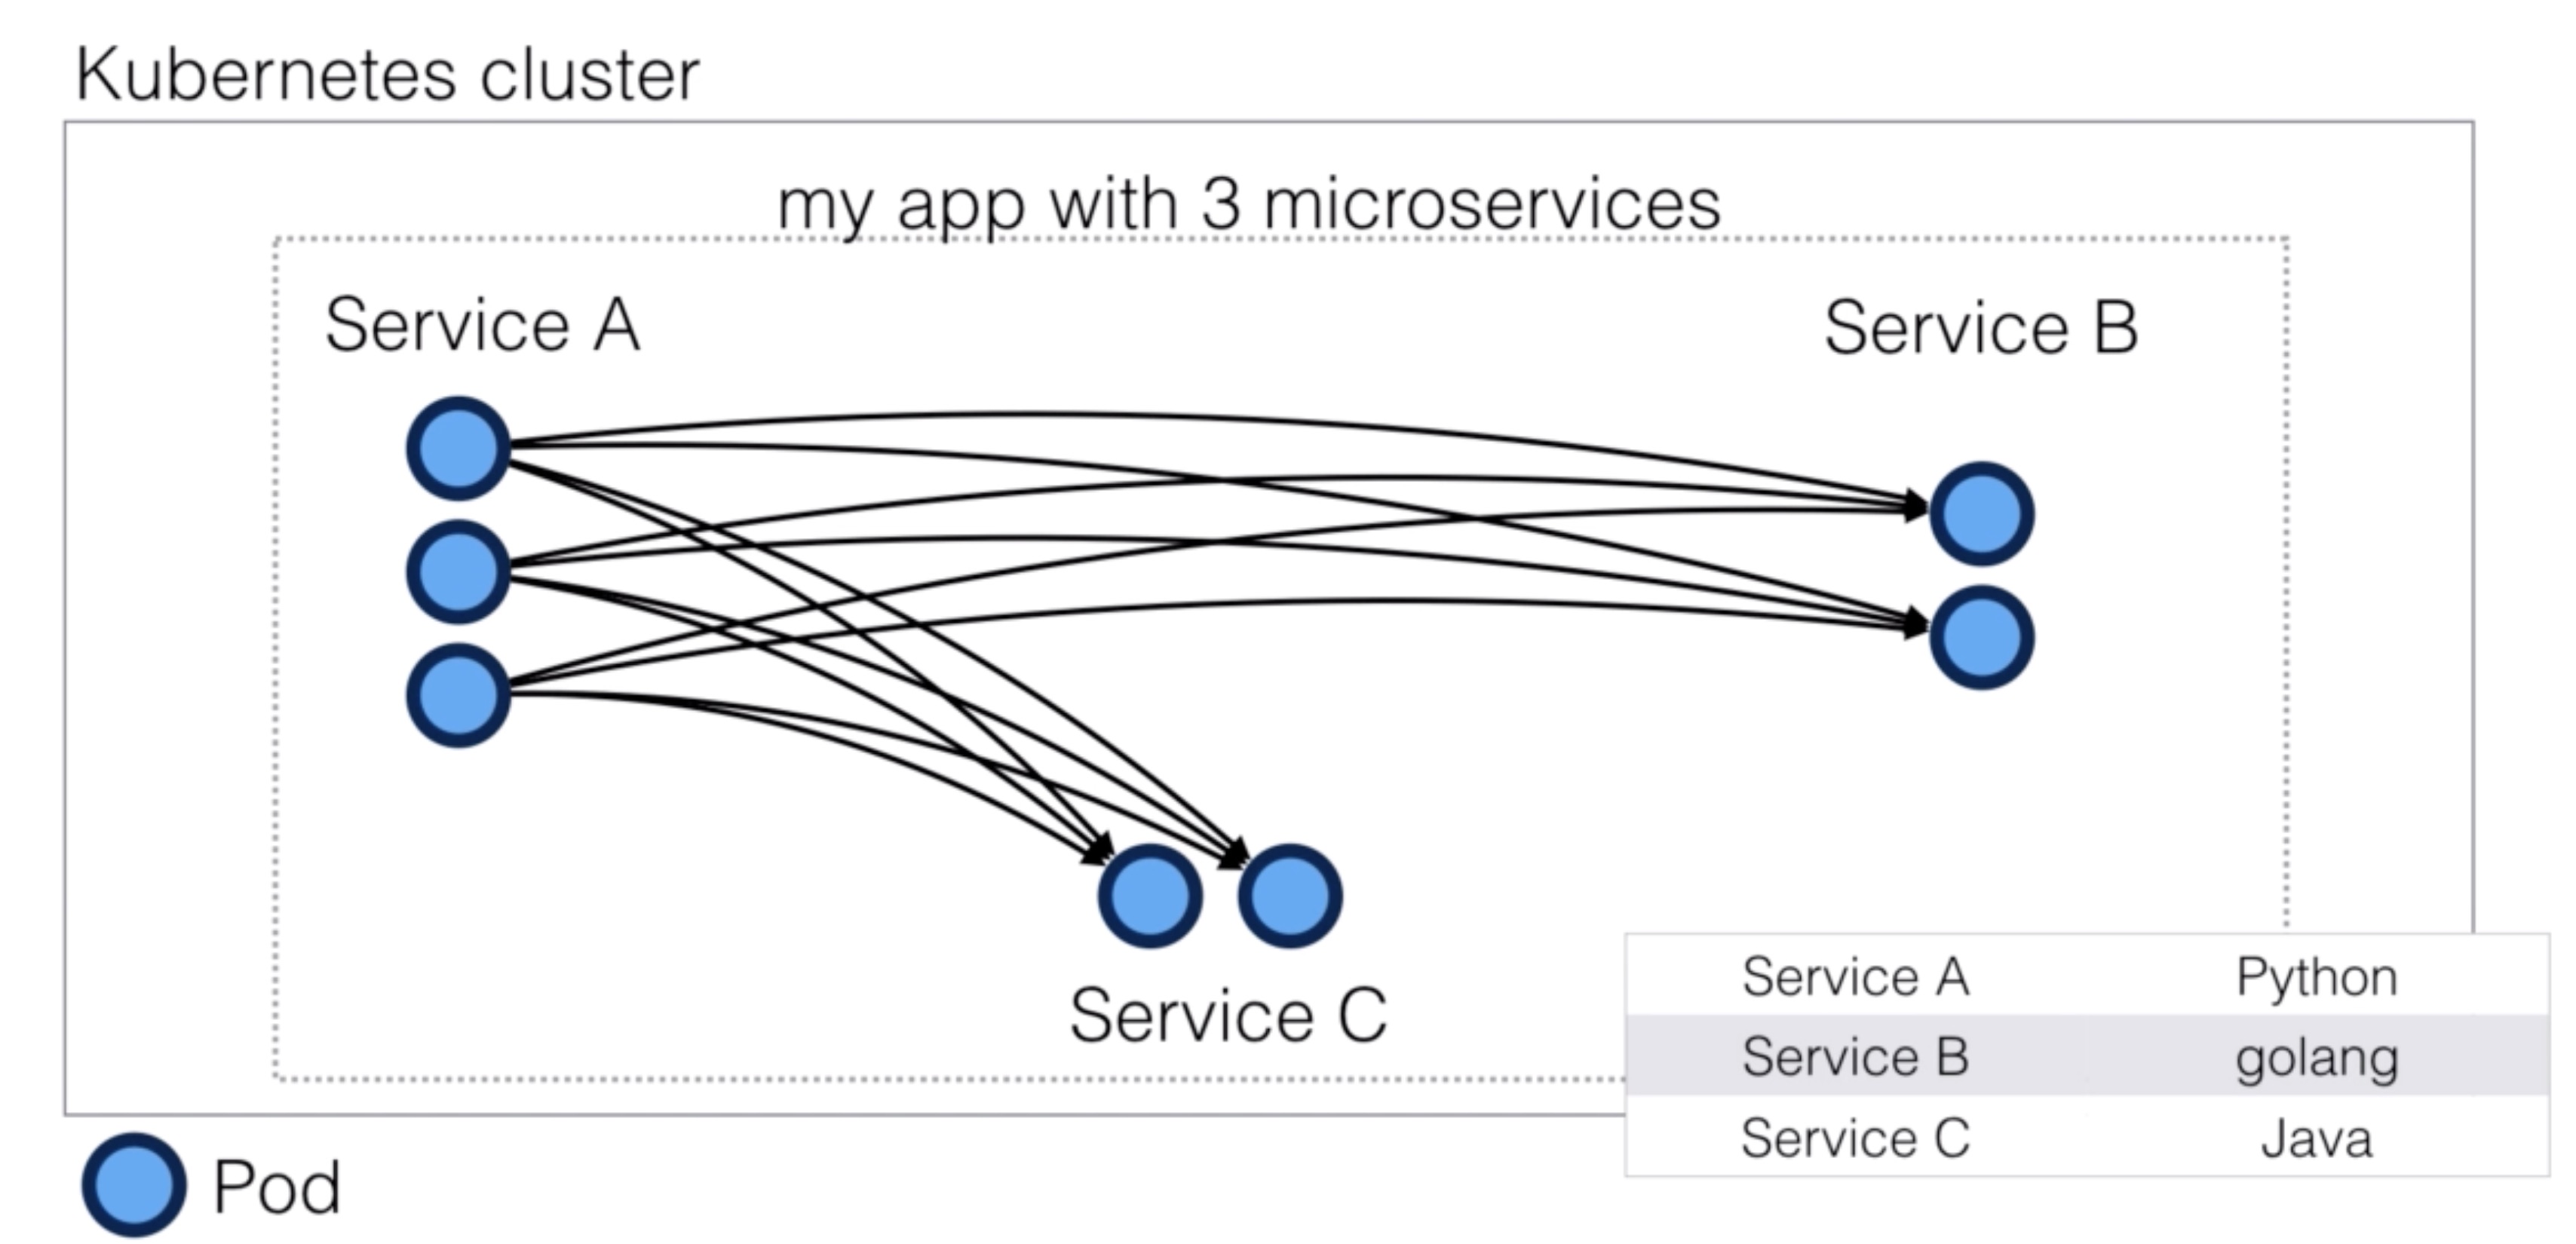
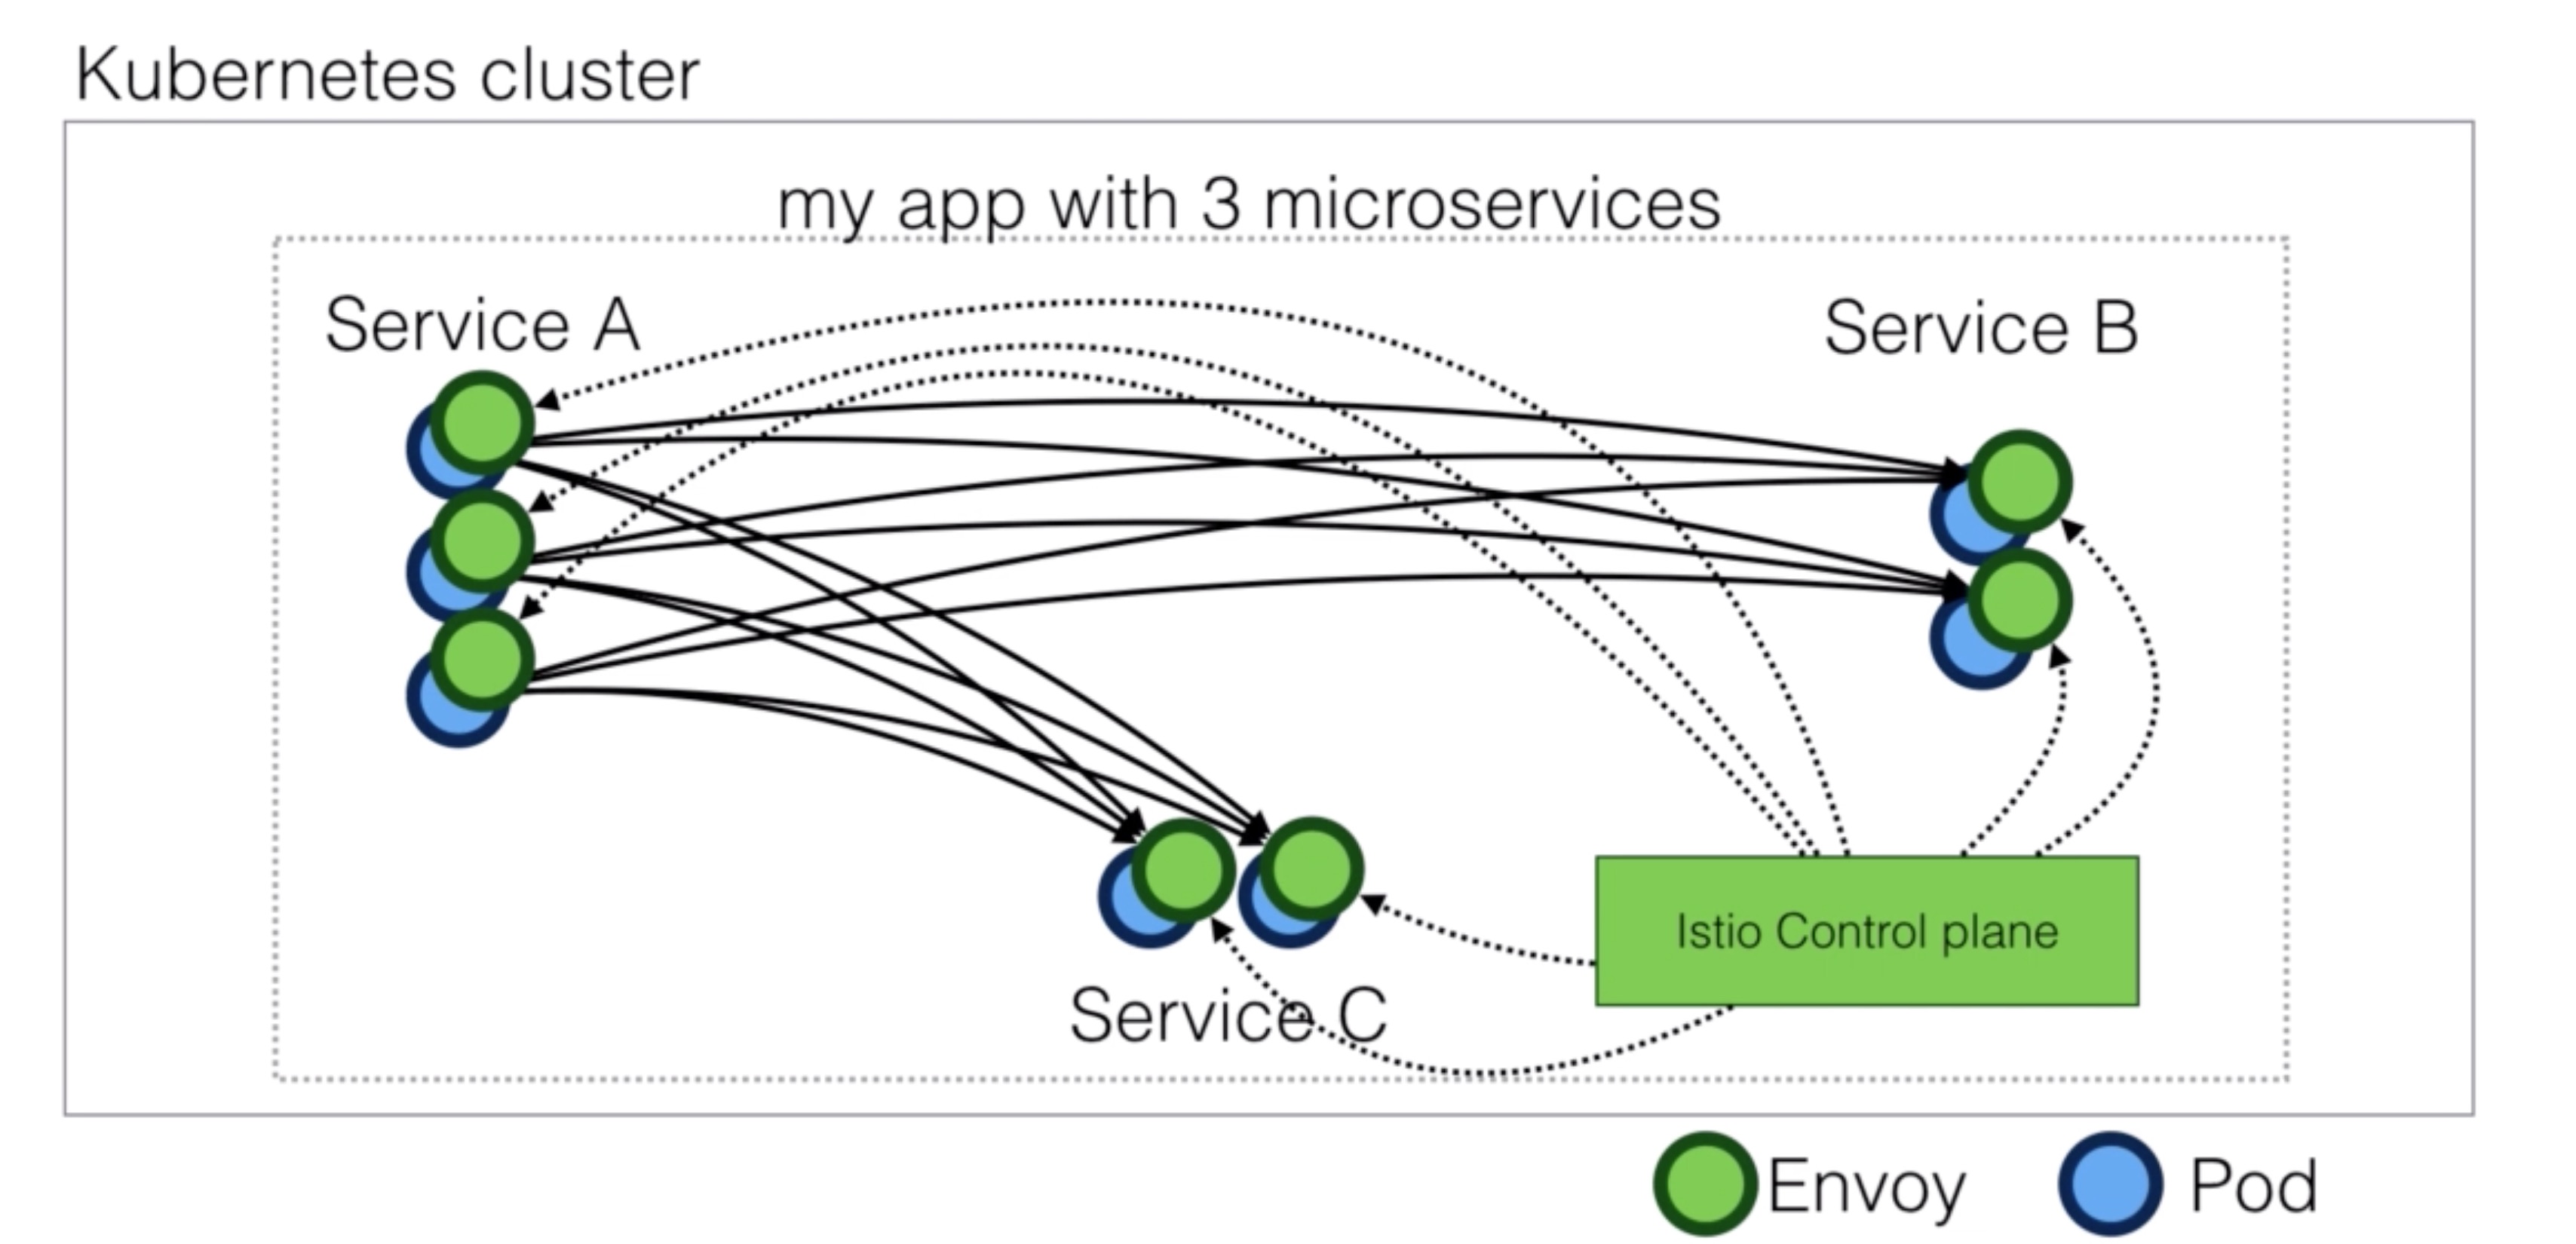
- When you break up a monolith application (1 codebase), into micro-services (multiple codebases), you end up with lots of services that need to be able to communicate with each other
- These communications between services need to be able to be fast, reliable and flexible
- To be able to implement this, you need a service mesh
- A service mesh is an infrastructure layer for handling these service-to-service communications
- This is usually implemented using proxies
- Proxies manage these communications and ensure they’re fast, reliable and flexible
- Envoy is a such a proxy
- It is designed for cloud native applications
- Was originally built at Lyft
- Envoy is a High Performance distributed proxy written in C++
- You can see it as an iteration of the NGINX, HAProxy, hardware / cloud load balancers
- It’s comparable with Linkerd
- While there’s a lot of overlap, each solution has its own distinct features
Envoy Features
- Small memory footprint
- HTTP/2 and gRPC support
- It’s a transparent HTTP/1.1 to HTTP/2 proxy
- Not all browsers support HTTP/2 yet, so incoming requests can be HTTP/ 1.1, but internally requests can be HTTP/2
- It’s a transparent HTTP/1.1 to HTTP/2 proxy
- Advanced Loadbalancer Features (automatic retries, circuit braking, rate limiting, request shadowing, zone load balancing, …)
- Configuration can be dynamically managed using an API
- Native support for distributed tracing
Comparison to linkerd
- Linkerd has more features, but that comes at a price of higher cpu and memory footprint
- Linkerd is built on top of Netty and Finagle (JVM based), whereas Envoy is written in C++
- If you’re looking for more features, you might want to look at Linkerd, if you’re looking for speed and low
resource utilization, Envoy wins
- Istio, discussed next, can give you the best of both worlds
- Linkerd integrates with Consul and Zookeeper for service discovery
- Envoy supports hot reloading using an API, Linkerd does not (by design)
Istio
- Istio is an open platform to connect, manage, and secure microservices (Definition: https://istio.io/docs/concepts/what-is-istio/overview.html)
- Key capabilities include:
- It supports Kubernetes
- Can control traffic between services, can make it more robust and reliable
- Can show you dependencies and the flow between services
- Provides access policies and authentication within your service mesh
Istio Components
- Envoy (data plane)
- Istio uses the Envoy proxy in its data plane
- It uses a sidecar deployment, which means a deployment along the application (a one to one relation between app/pod and proxy)
- Mixer (control plane)
- Responsible for enforcing access control and usage policies
- Collects telemetry data from Envoy
- Pilot (control plane)
- Responsible for service discovery, traffic management and resiliency
- A/B tests and canary deployments
- Timeouts, retries, circuit brakers
- It does this by converting Istio rules to Envoy configurations
- Responsible for service discovery, traffic management and resiliency
- Istio Auth (control plane)
- Service-to-service and end-user authentication using mutual TLS
Demo Istio demo
- Download Istio
wget https://github.com/istio/istio/releases/download/1.0.4/istio-1.0.4-linux.tar.gz
tar -xzvf istio-1.0.4-linux.tar.gz
cd istio-1.0.4
echo 'export PATH="$PATH:~/istio-1.0.4/bin"' >> ~/.profile
- Install Istio
with no mutual TLS authentication
istio.yaml For contents look at the file from the tarball. It’s approximately 15.000 lines so not including it here.
kubectl apply -f install/kubernetes/istio-demo.yaml
or with mutual TLS authentication
kubectl apply -f install/kubernetes/istio-demo-auth.yaml
- Deploy example application
Documentation for the example application can be found here: https://istio.io/docs/examples/bookinfo/
kubectl edit svc istio-ingress -n istio-system # change loadbalancer to nodeport (or use hostport)
export PATH="$PATH:/home/ubuntu/istio-0.7.1/bin"
kubectl apply -f <(istioctl kube-inject --debug -f samples/bookinfo/platform/kube/bookinfo.yaml)
Demo Istio demo - traffic management
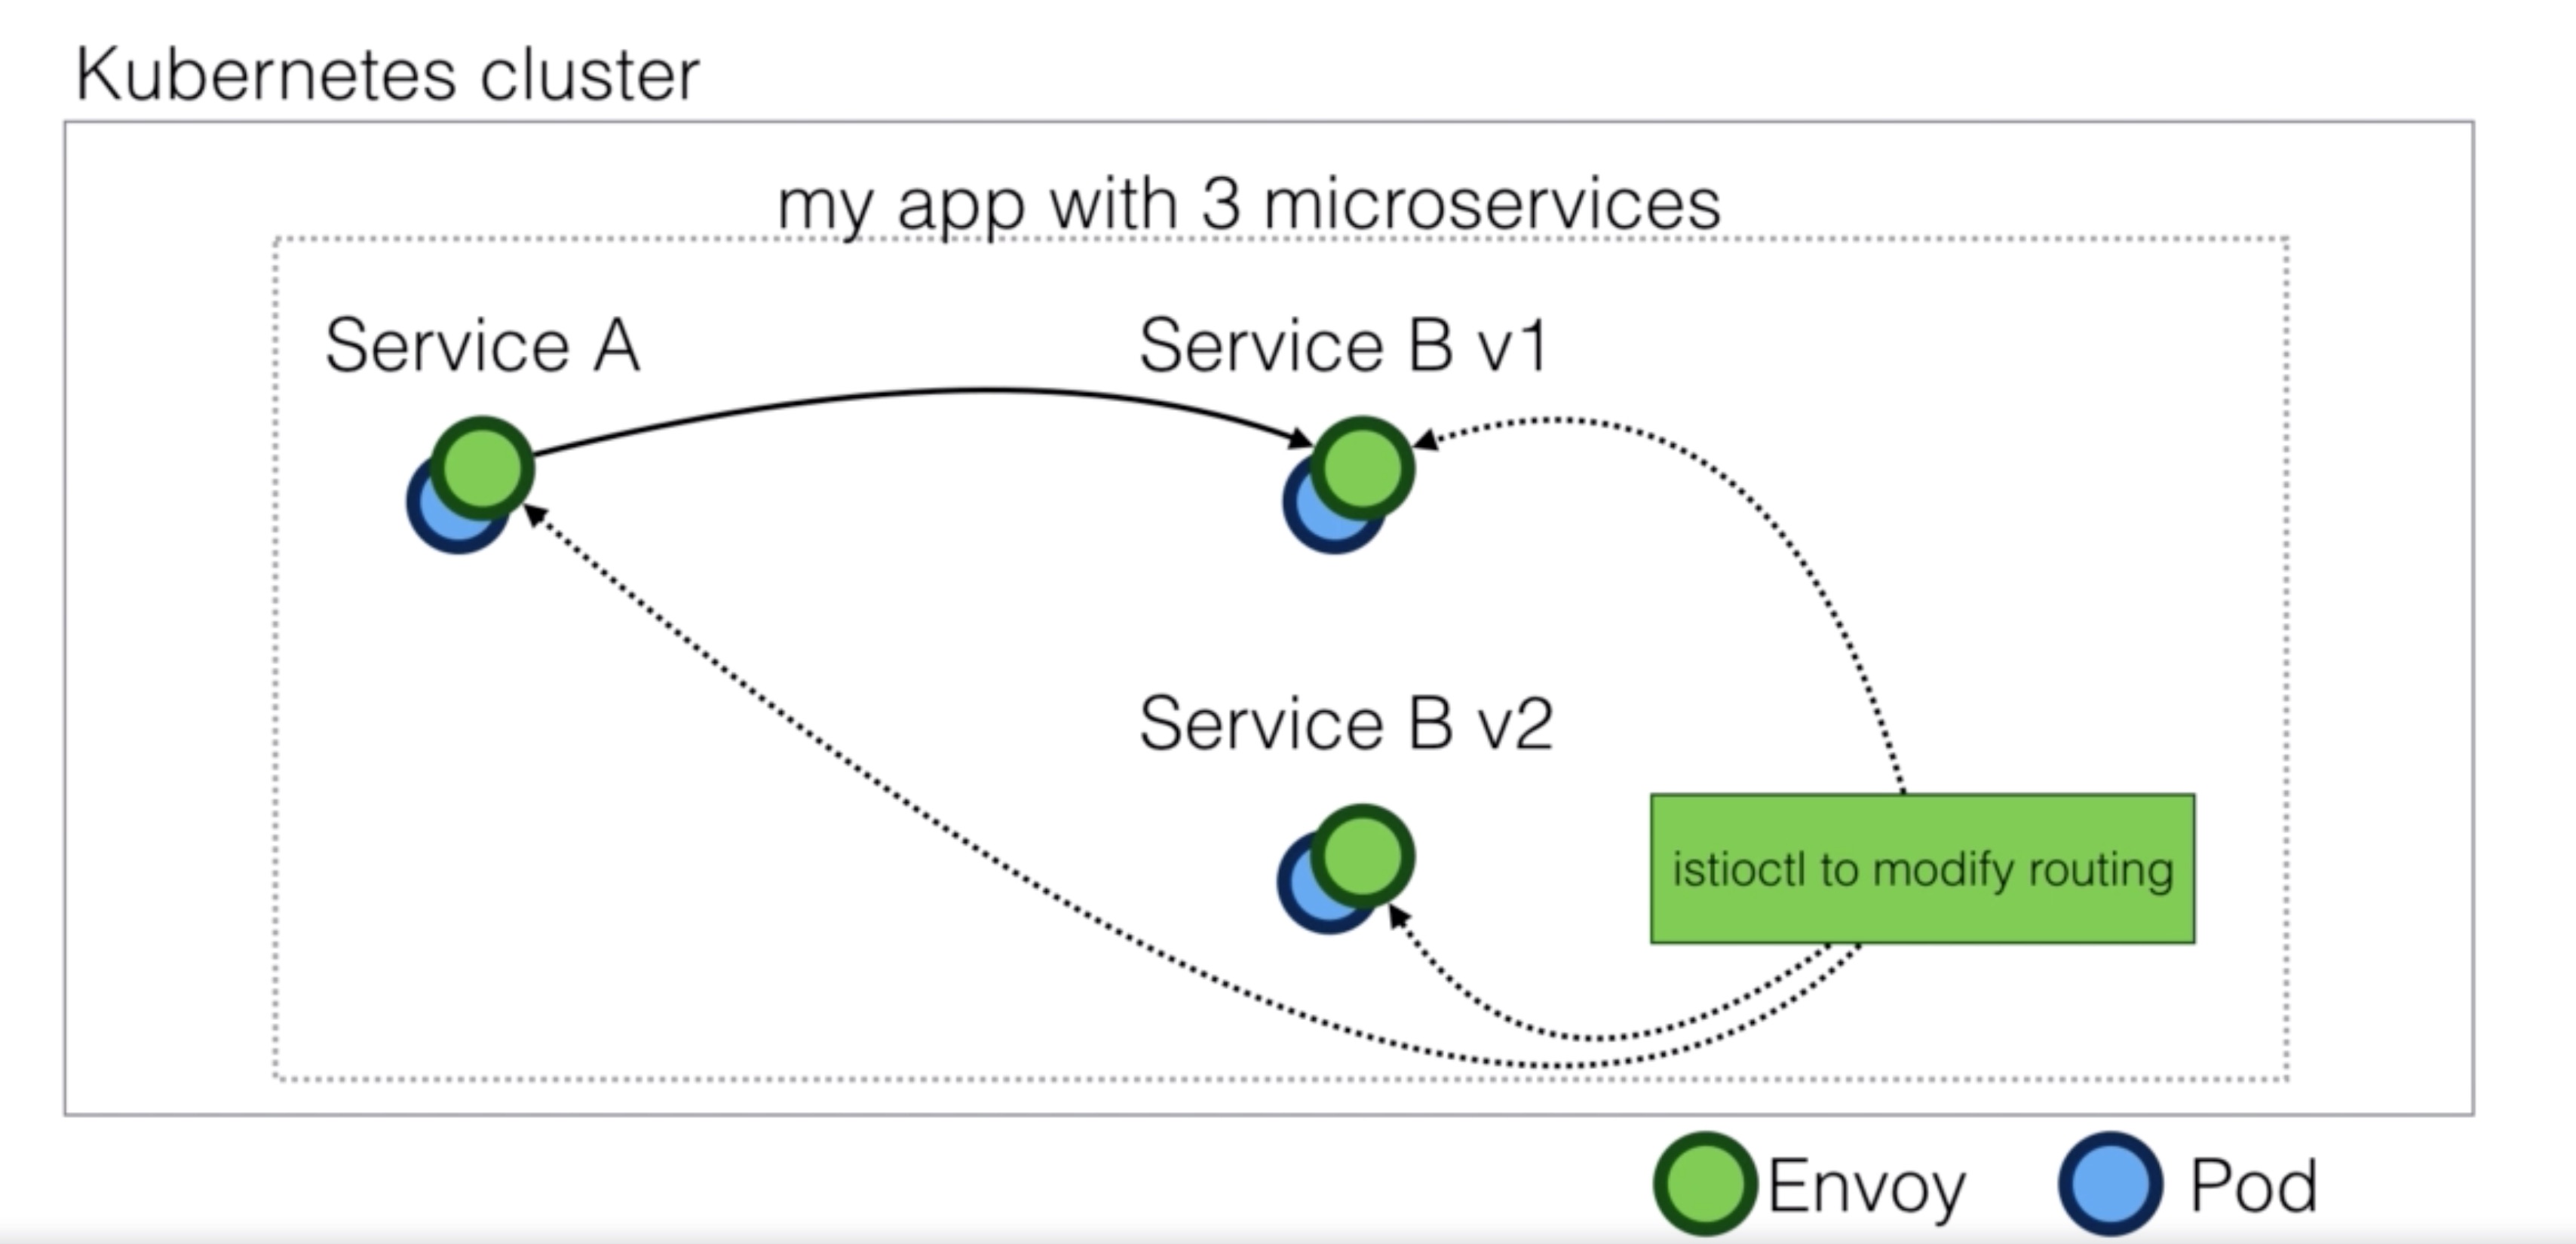
- Add default route to v1 of the bookinfo application
virtual-service-all-v1.yaml
apiVersion: networking.istio.io/v1alpha3
kind: VirtualService
metadata:
  name: productpage
spec:
  hosts:
  - productpage
  http:
  - route:
    - destination:
        host: productpage
        subset: v1
---
apiVersion: networking.istio.io/v1alpha3
kind: VirtualService
metadata:
  name: reviews
spec:
  hosts:
  - reviews
  http:
  - route:
    - destination:
        host: reviews
        subset: v1
---
apiVersion: networking.istio.io/v1alpha3
kind: VirtualService
metadata:
  name: ratings
spec:
  hosts:
  - ratings
  http:
  - route:
    - destination:
        host: ratings
        subset: v1
---
apiVersion: networking.istio.io/v1alpha3
kind: VirtualService
metadata:
  name: details
spec:
  hosts:
  - details
  http:
  - route:
    - destination:
        host: details
        subset: v1
istioctl create -f virtual-service-all-v1.yaml
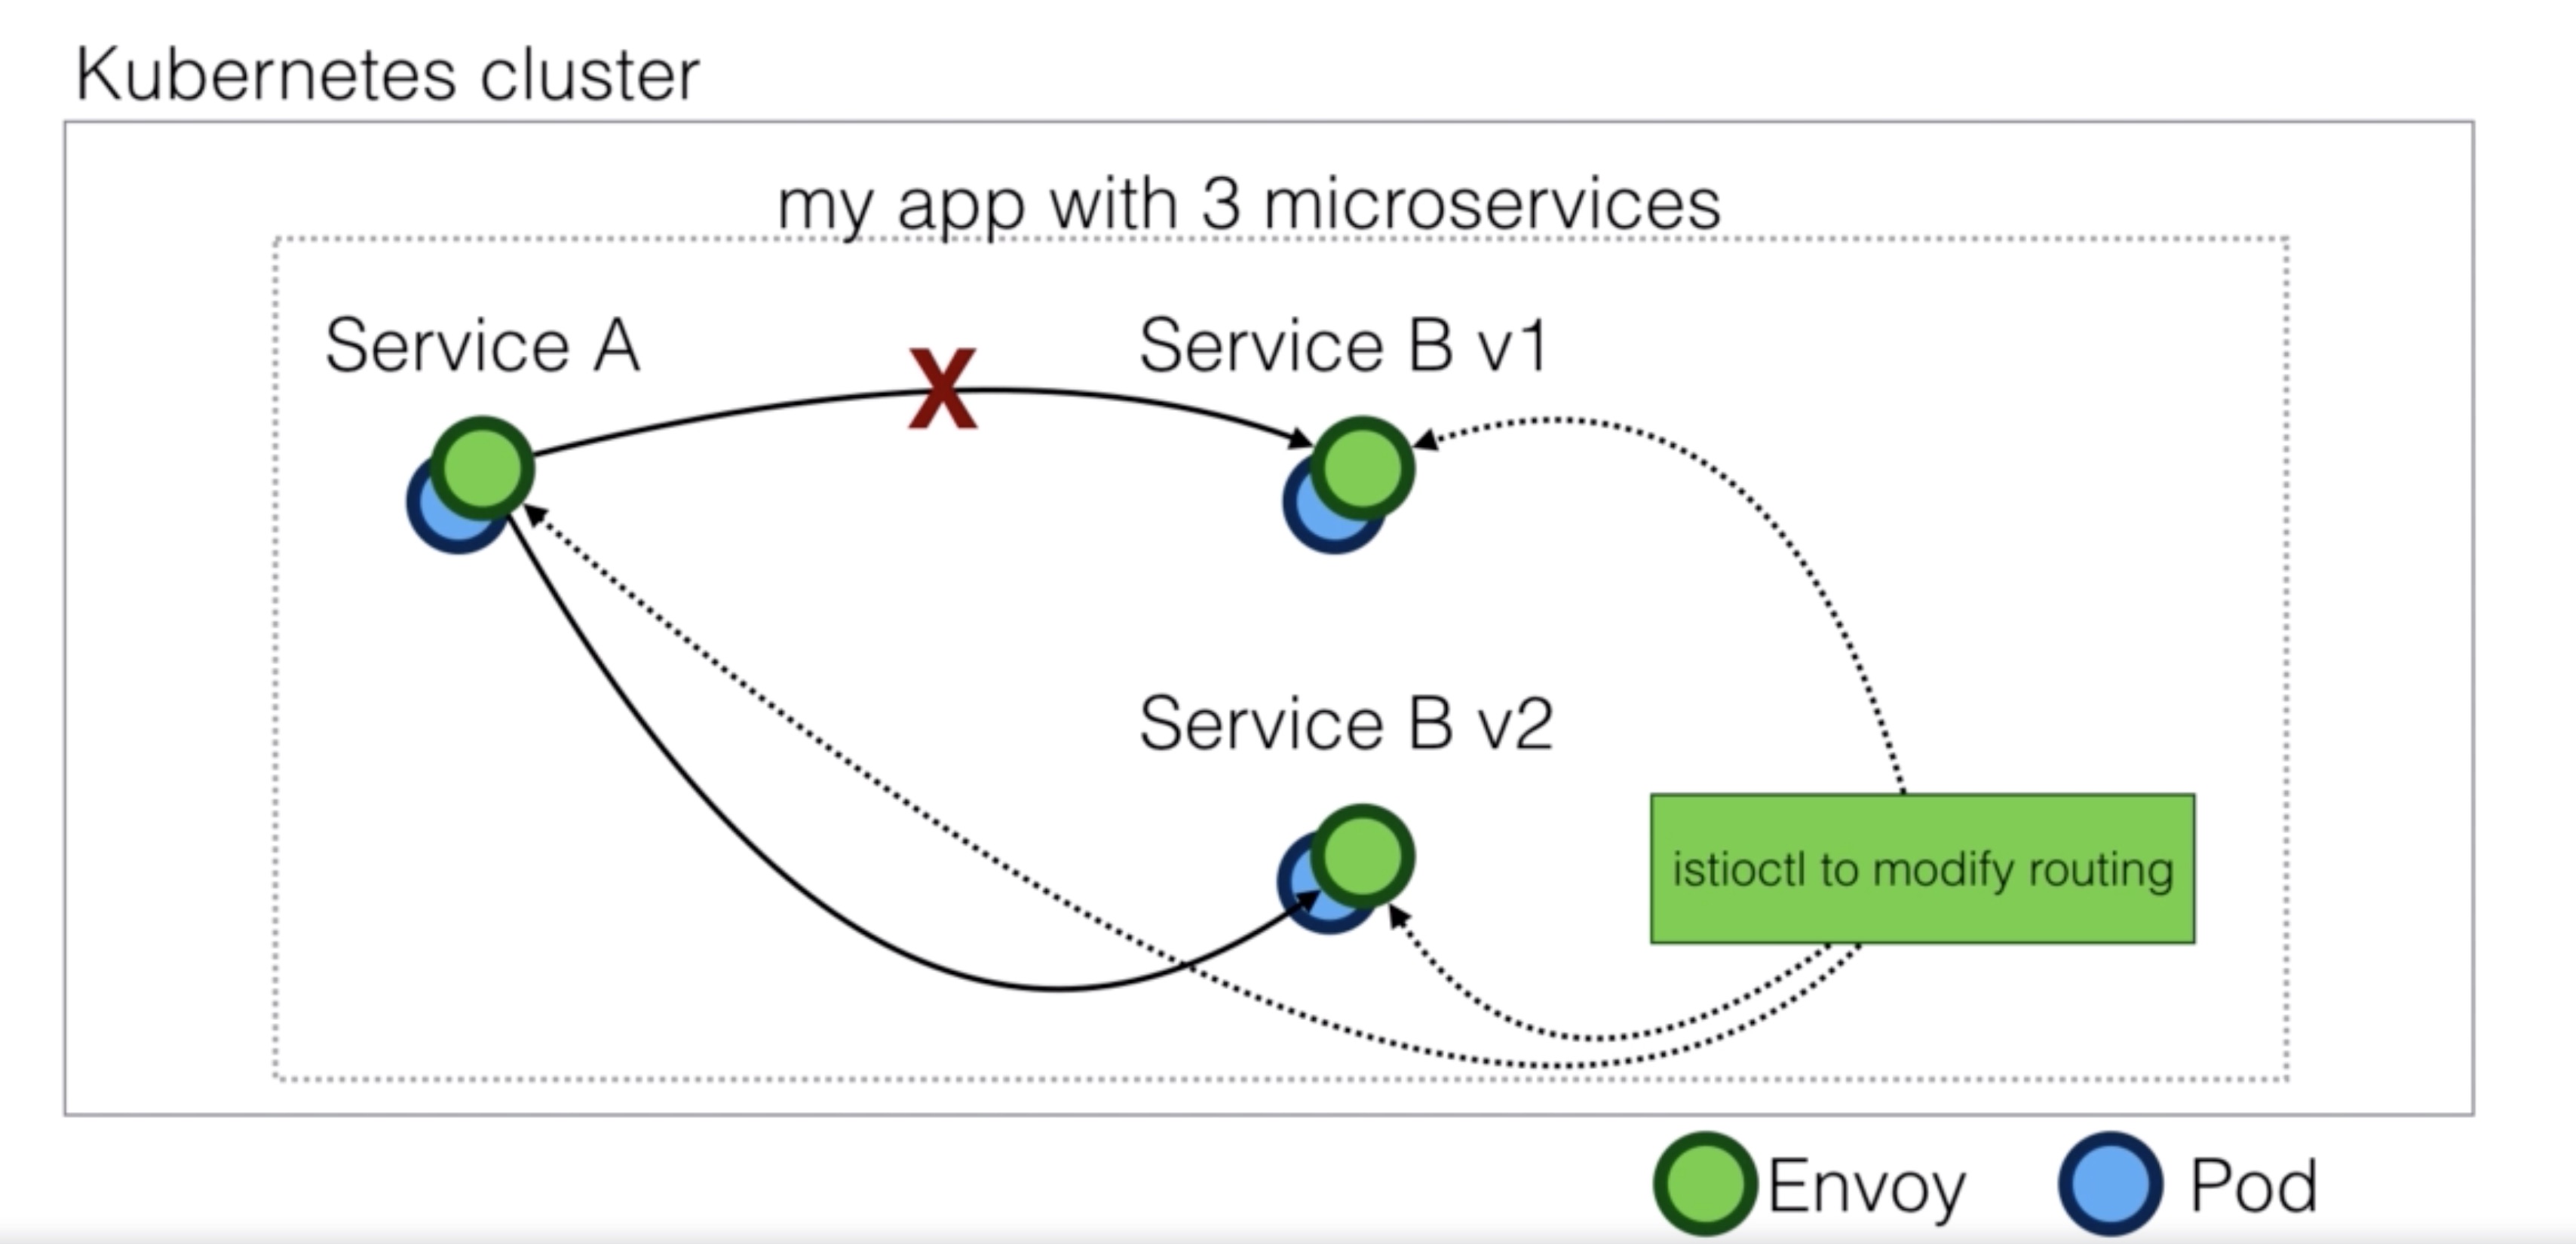
- Route traffic to v2 if rule matches
virtual-service-reviews-test-v2.yaml
apiVersion: networking.istio.io/v1alpha3
kind: VirtualService
metadata:
  name: reviews
spec:
  hosts:
    - reviews
  http:
  - match:
    - headers:
        end-user:
          exact: jason
    route:
    - destination:
        host: reviews
        subset: v2
  - route:
    - destination:
        host: reviews
        subset: v1
istioctl replace -f virtual-service-reviews-test-v2.yaml
- Route 50% of traffic between v1 and v3
virtual-service-reviews-50-v3.yaml
apiVersion: networking.istio.io/v1alpha3
kind: VirtualService
metadata:
  name: reviews
spec:
  hosts:
    - reviews
  http:
  - route:
    - destination:
        host: reviews
        subset: v1
      weight: 50
    - destination:
        host: reviews
        subset: v3
      weight: 50
istioctl replace -f virtual-service-reviews-50-v3.yaml
Demo Istio demo - distributed tracing
- Enable Jaeger
jaeger-all-in-one-template.yml
#
# Copyright 2017-2018 The Jaeger Authors
#
# Licensed under the Apache License, Version 2.0 (the "License"); you may not use this file except
# in compliance with the License. You may obtain a copy of the License at
#
# http://www.apache.org/licenses/LICENSE-2.0
#
# Unless required by applicable law or agreed to in writing, software distributed under the License
# is distributed on an "AS IS" BASIS, WITHOUT WARRANTIES OR CONDITIONS OF ANY KIND, either express
# or implied. See the License for the specific language governing permissions and limitations under
# the License.
#

apiVersion: v1
kind: List
items:
- apiVersion: extensions/v1beta1
  kind: Deployment
  metadata:
    name: jaeger-deployment
    labels:
      app: jaeger
      jaeger-infra: jaeger-deployment
  spec:
    replicas: 1
    strategy:
      type: Recreate
    template:
      metadata:
        labels:
          app: jaeger
          jaeger-infra: jaeger-pod
        annotations:
          prometheus.io/scrape: "true"
          prometheus.io/port: "16686"
      spec:
          containers:
          -   env:
              - name: COLLECTOR_ZIPKIN_HTTP_PORT
                value: "9411"
              image: jaegertracing/all-in-one
              name: jaeger
              ports:
                - containerPort: 5775
                  protocol: UDP
                - containerPort: 6831
                  protocol: UDP
                - containerPort: 6832
                  protocol: UDP
                - containerPort: 5778
                  protocol: TCP
                - containerPort: 16686
                  protocol: TCP
                - containerPort: 9411
                  protocol: TCP
              readinessProbe:
                httpGet:
                  path: "/"
                  port: 14269
                initialDelaySeconds: 5
- apiVersion: v1
  kind: Service
  metadata:
    name: jaeger-query
    labels:
      app: jaeger
      jaeger-infra: jaeger-service
  spec:
    ports:
      - name: query-http
        port: 80
        protocol: TCP
        targetPort: 16686
    selector:
      jaeger-infra: jaeger-pod
    type: LoadBalancer
- apiVersion: v1
  kind: Service
  metadata:
    name: jaeger-collector
    labels:
      app: jaeger
      jaeger-infra: collector-service
  spec:
    ports:
    - name: jaeger-collector-tchannel
      port: 14267
      protocol: TCP
      targetPort: 14267
    - name: jaeger-collector-http
      port: 14268
      protocol: TCP
      targetPort: 14268
    - name: jaeger-collector-zipkin
      port: 9411
      protocol: TCP
      targetPort: 9411
    selector:
      jaeger-infra: jaeger-pod
    type: ClusterIP
- apiVersion: v1
  kind: Service
  metadata:
    name: jaeger-agent
    labels:
      app: jaeger
      jaeger-infra: agent-service
  spec:
    ports:
    - name: agent-zipkin-thrift
      port: 5775
      protocol: UDP
      targetPort: 5775
    - name: agent-compact
      port: 6831
      protocol: UDP
      targetPort: 6831
    - name: agent-binary
      port: 6832
      protocol: UDP
      targetPort: 6832
    - name: agent-configs
      port: 5778
      protocol: TCP
      targetPort: 5778
    clusterIP: None
    selector:
      jaeger-infra: jaeger-pod
- apiVersion: v1
  kind: Service
  metadata:
    name: zipkin
    labels:
      app: jaeger
      jaeger-infra: zipkin-service
  spec:
    ports:
    - name: jaeger-collector-zipkin
      port: 9411
      protocol: TCP
      targetPort: 9411
    clusterIP: None
    selector:
      jaeger-infra: jaeger-pod
kubectl apply -n istio-system -f jaeger-all-in-one-template.yml
Calico
- Calico provides secure network connectivity for containers and virtual machine workloads. (Definition: https://docs.projectcalico.org/v3.1/introduction/)
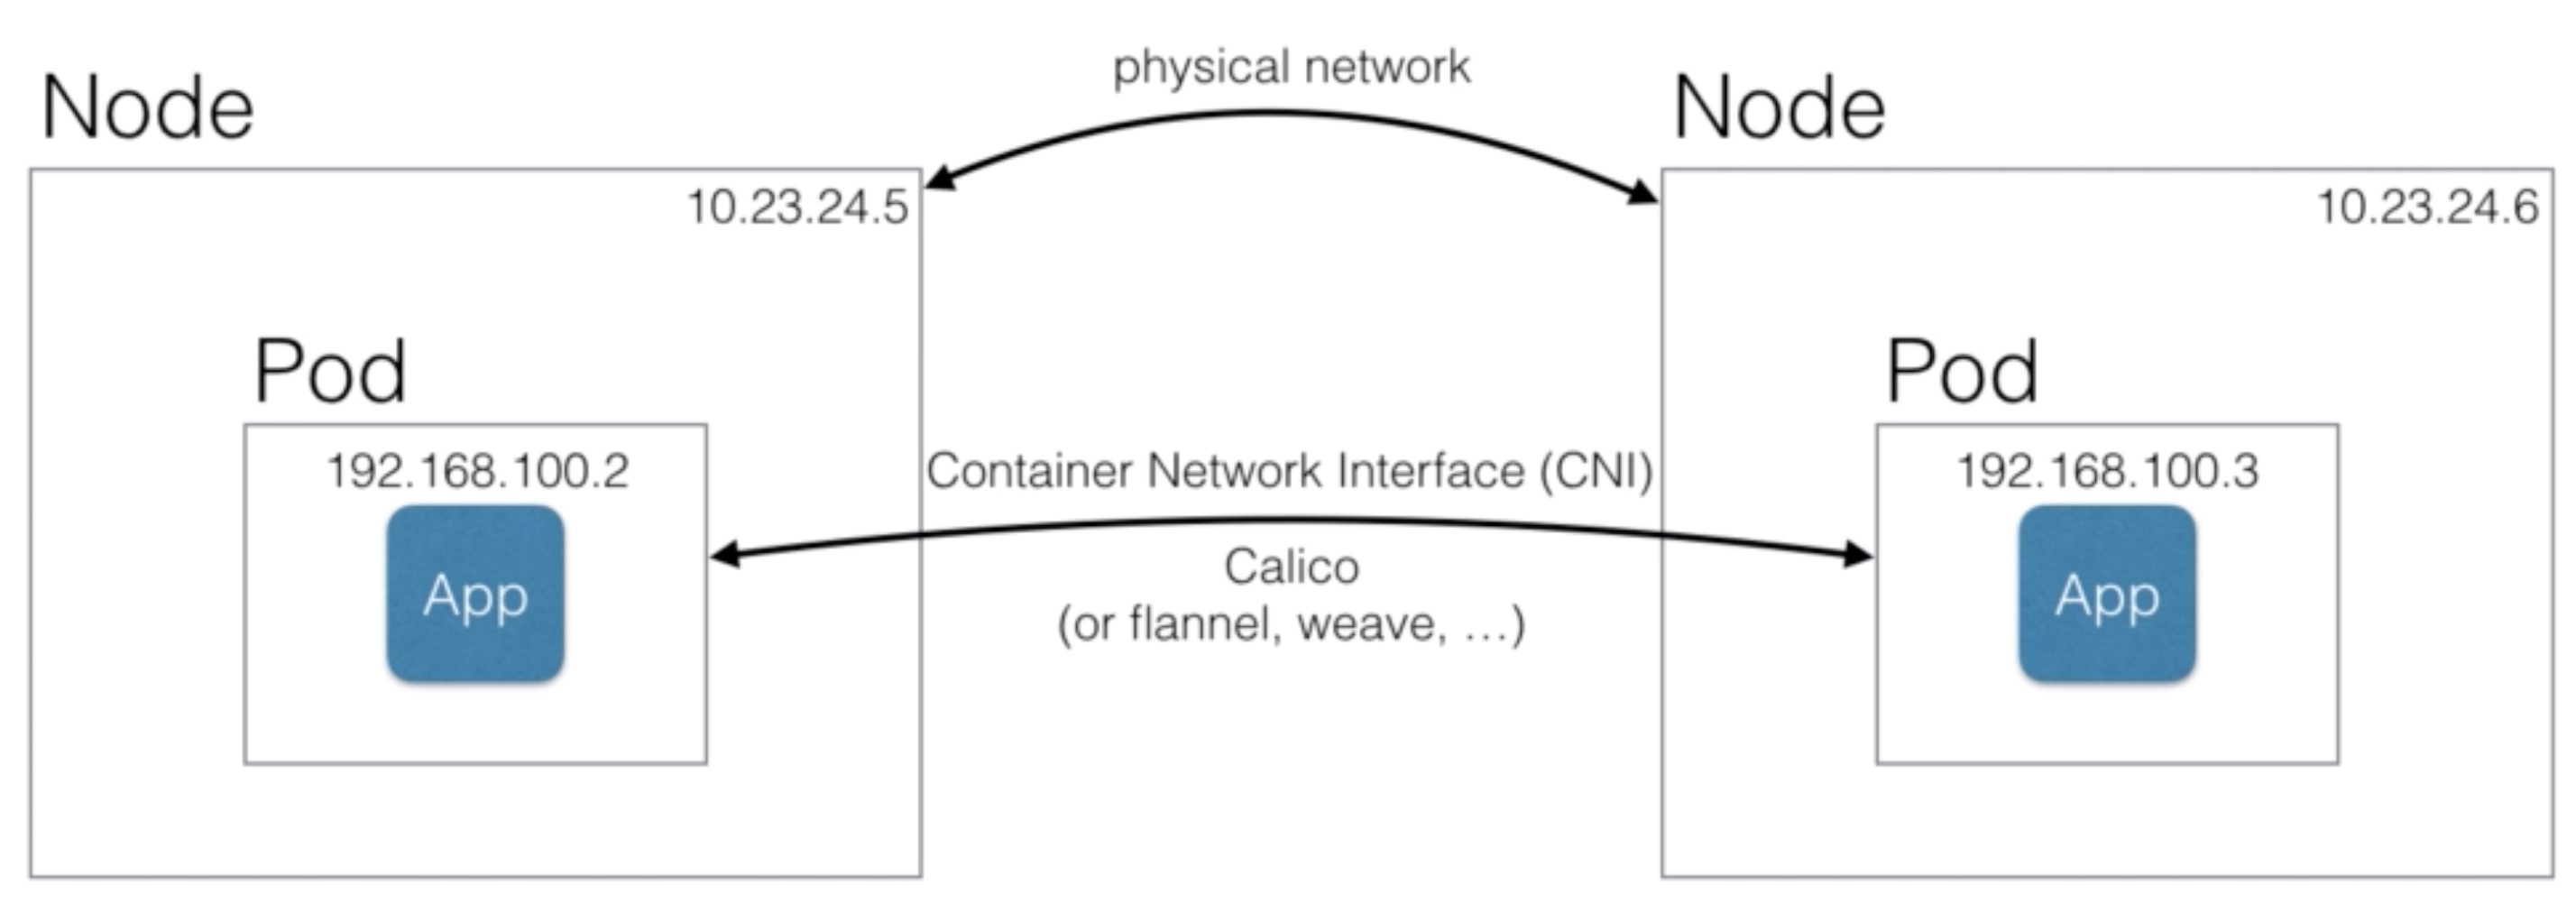
- Calico is a Software Defined Network, with a simplified model, with cloud-native in mind
- Calico creates a flat Layer 3 network using BGP (Border Gateway Protocol) as routing mechanism
- BGP is also used as the “internet routing protocol” to route between providers (it’s a proven, scalable technology)
- Policy driven network security using the Kubernetes Network Policy API
- Fine-grain control over the network, using the same Kubernetes API (using yaml files) as you’re used to
- Only use overlay if necessary, reducing overhead and increasing performance
- An overlay network does IP encapsulation, but often those IP packets can be routed without adding those extra headers to IP packets
- Works with Kubernetes, but also with OpenStack, Mesos, and others
- Uses etcd as backend (Kubernetes also uses etcd - a distributed key value store using Raft consensus)
- Works on major cloud providers like AWS, GCE (also Kubernetes Engine), Azure (ACS)
- Will also support the hosted kubernetes services AWS EKS and Azure AKS when they’ll be GA
- Works well within enterprise environments
- Either without overlay
- With IP-in-IP tunneling
- Or using an overlay (VxLAN) network like Flannel
Architecture
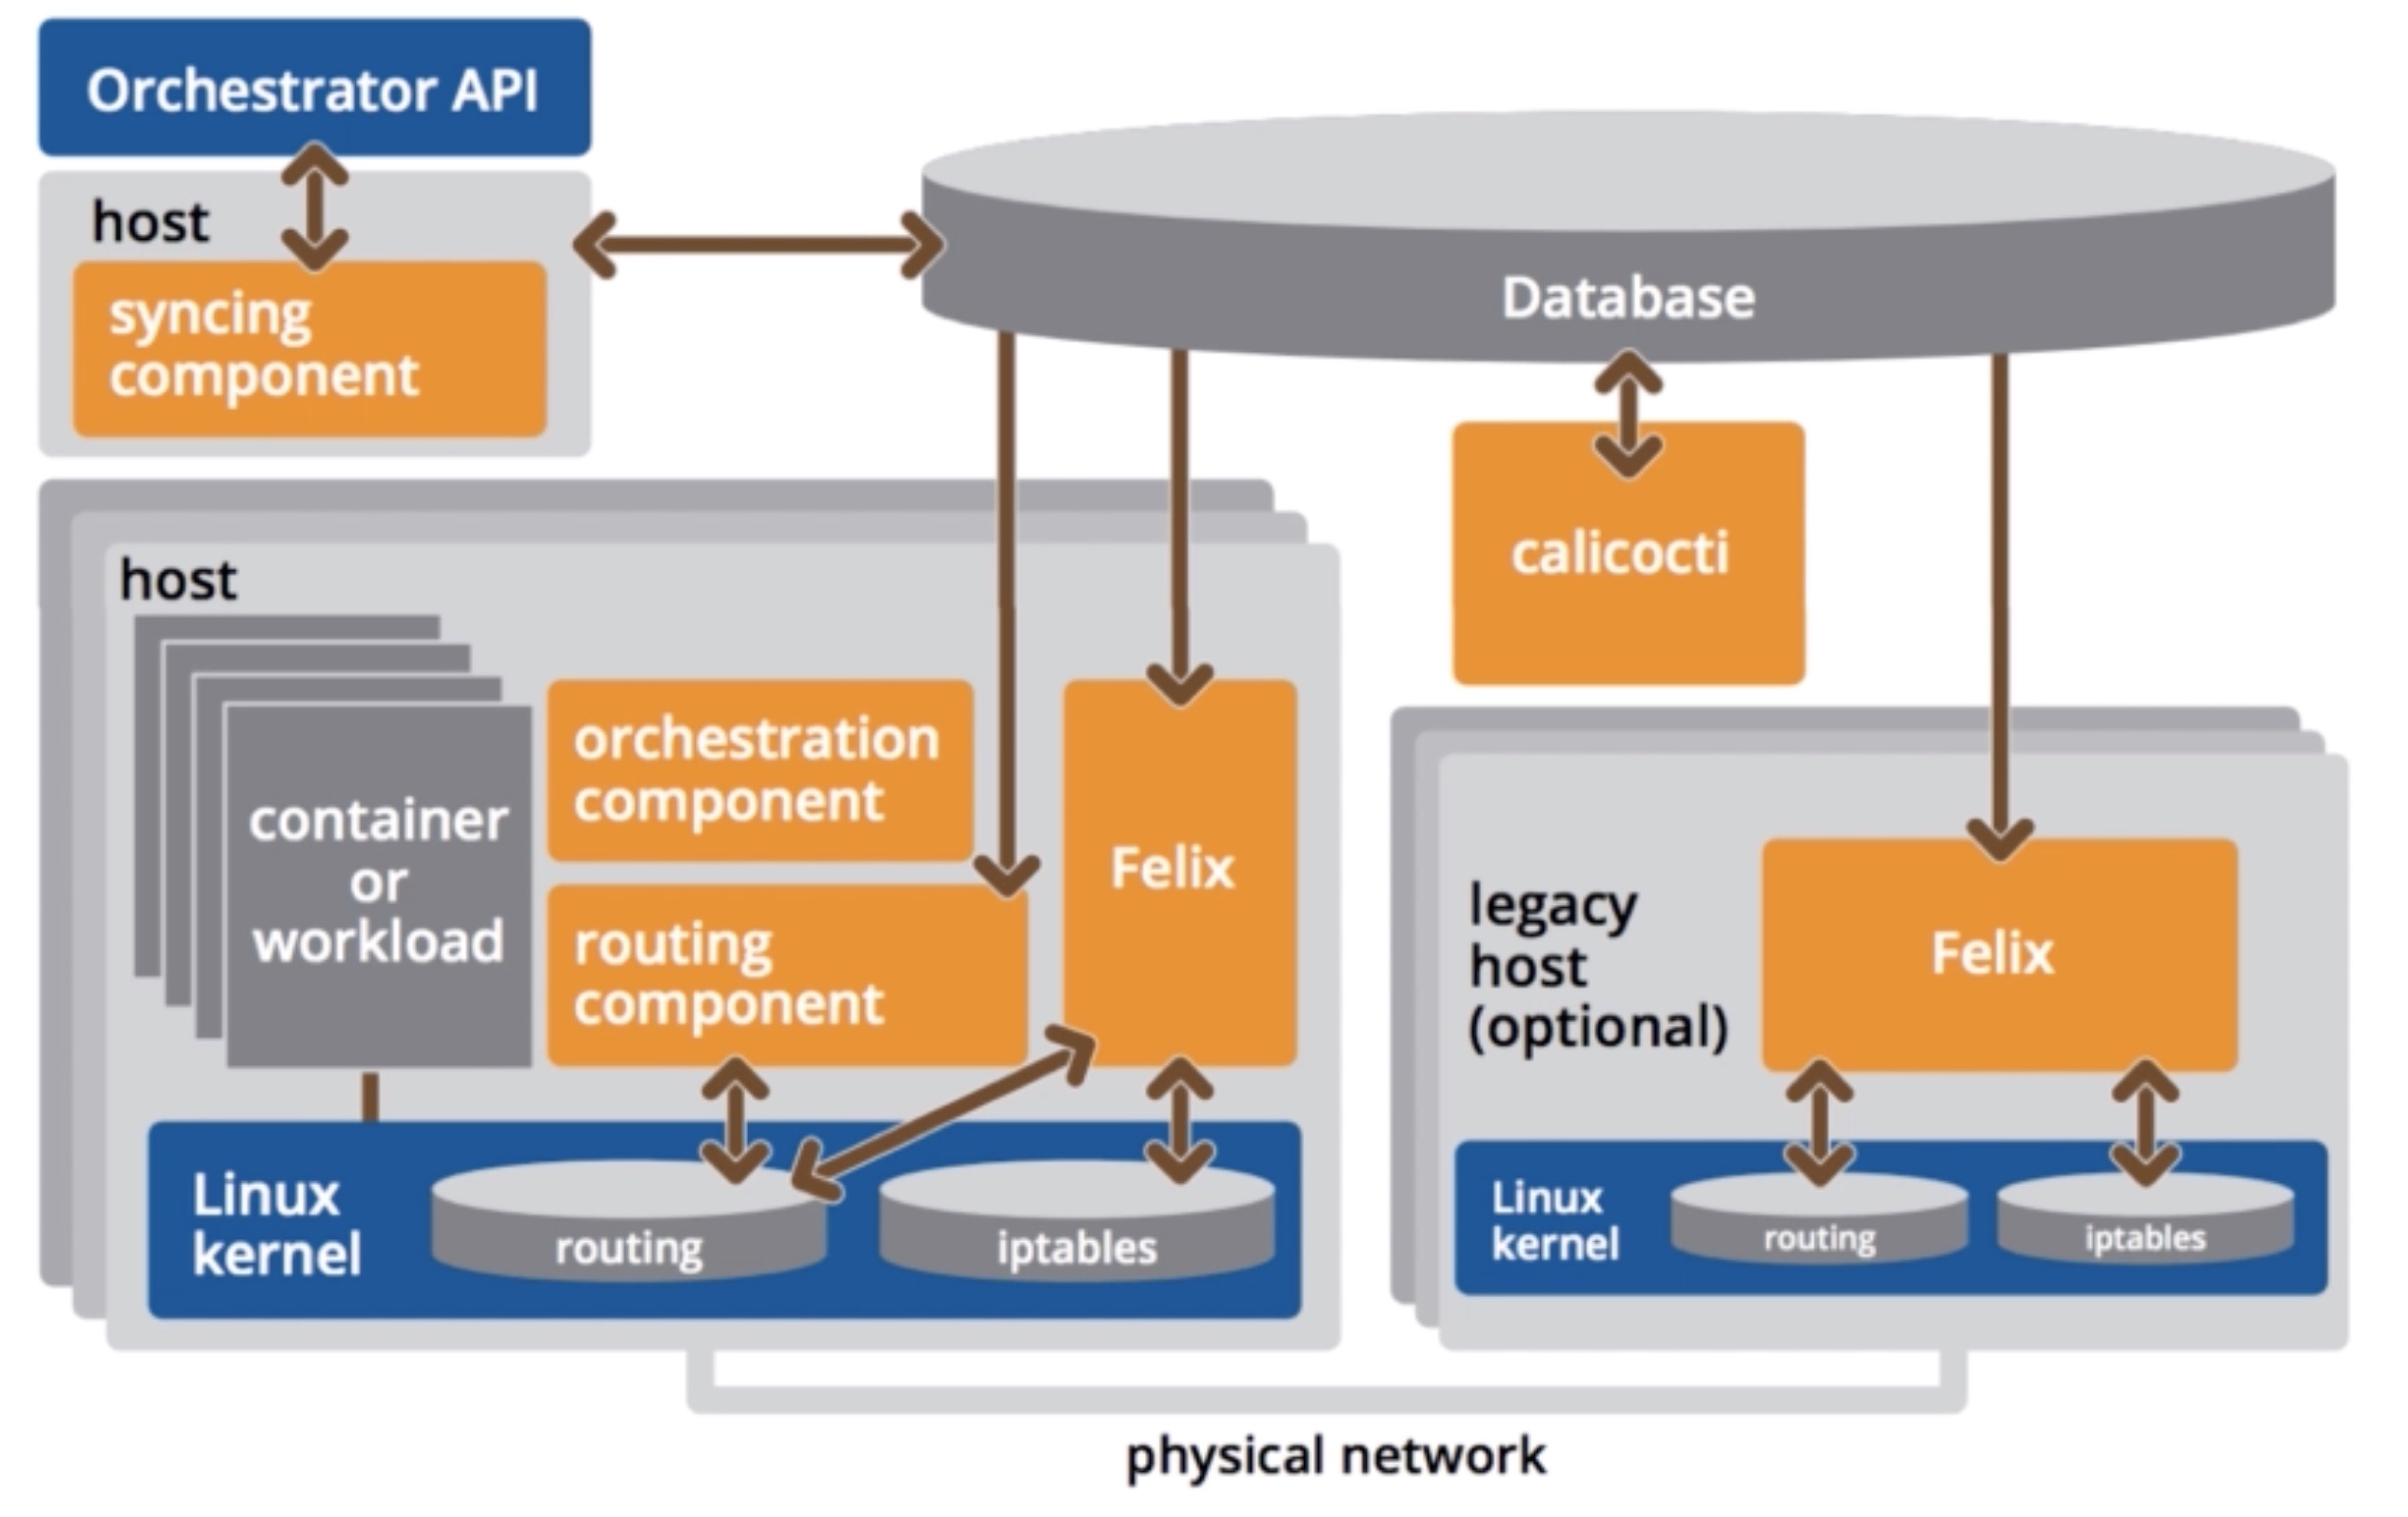
- Calicoctl
- Allows you to manage the Calico network and security policy
- Felix
- Daemon that runs on every machine (calico-node DaemonSet)
- Responsible for
- programming routes and ACL on the nodes itself
- Interface management (interacts with kernel - think about MAC address / IP level configuration)
- Reports on health and state of the network
- BGP Client (BIRD)
- Runs next to Felix (still within the calico-node DaemonSet)
- Reads routing state that Felix programmed and distributes this information to other nodes
- Basically that’s what BGP needs to do, it needs to make the other nodes aware of routing information to ensure traffic is efficiently routed
- BGP Route Reflector
- All BGP clients are connected to each other, which may become a limiting factor
- In larger deployments, a BGP route reflector might be setup, which acts as a central point where BGP clients connect to (instead of having a mesh topology)
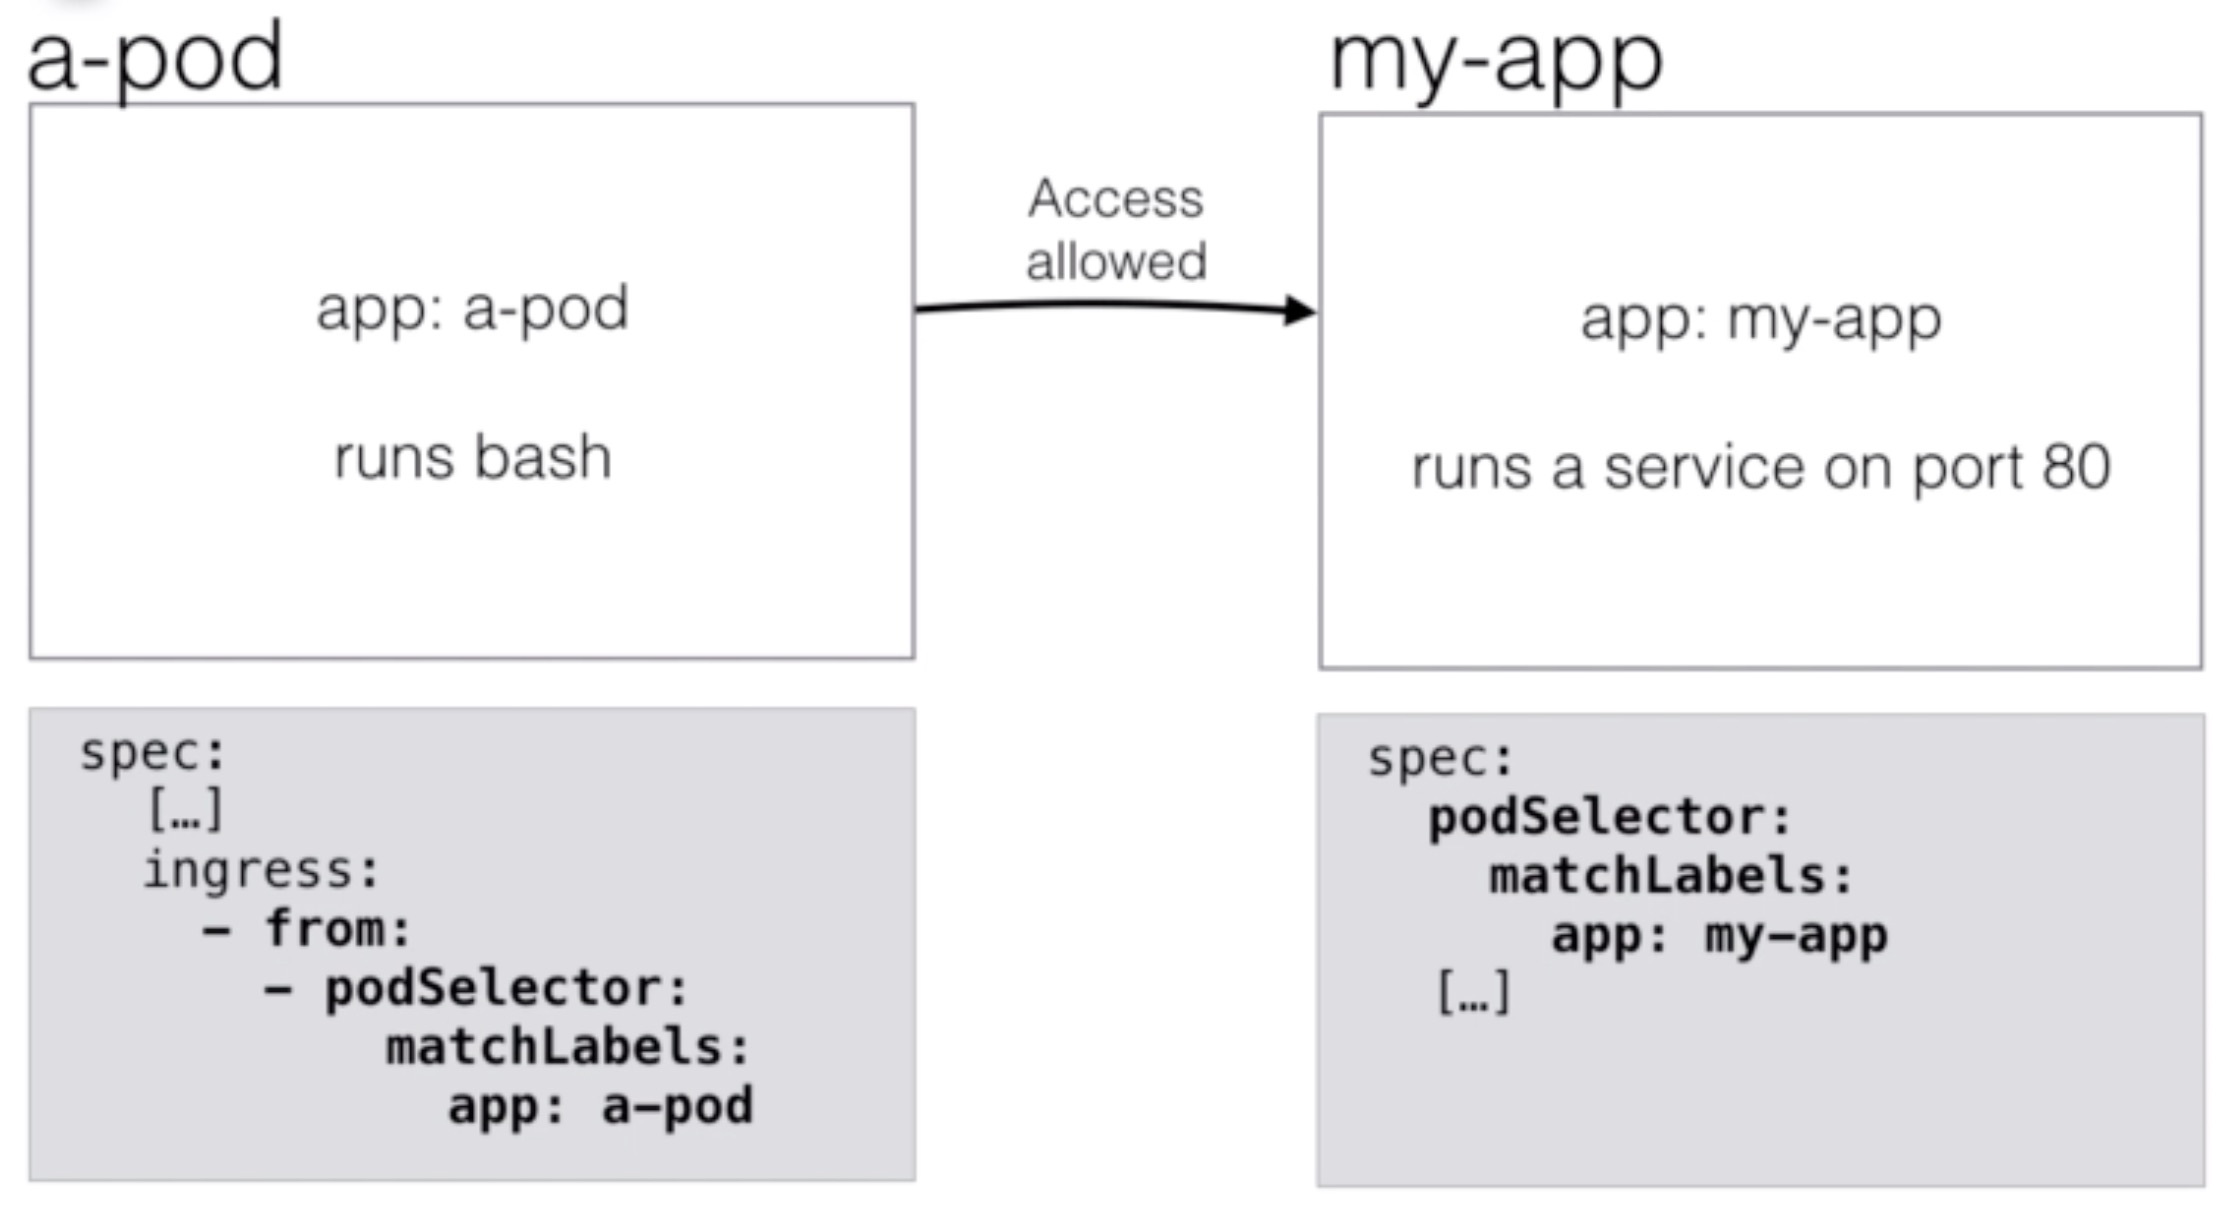
- Once Calico is setup, you can create a network policy in Kubernetes
- You can first create a network policy to deny all access to all pods (then afterwards you can open the ports that are needed):
kind: NetworkPolicy
apiVersion: networking.k8s.io/v1
metadata:
  name: deny-all
  namespace: apps
spec:
  podSelector:
    matchLabels: {}
- At this point the pods are isolated, you’ll not be able to connect from one pod to another anymore
- Isolated vs non-isolated
- By default pods are non-isolated
- Pods accept traffic from any source
- By having a network policy with a selector that selects them (the previous one selects all pods), network access
is denied by default
- The pod now becomes isolated
- Only connections that are defined in the network policy are allowed
- This is on a namespace basis
- By default pods are non-isolated
- You can now add a new rule to enable network access to a pod:
kind: NetworkPolicy
apiVersion: networking.k8s.io/v1
metadata:
  name: allow-my-app
  namespace: apps
spec:
  podSelector:
    matchLabels:
      app: my-app
  ingress:
    - from:
      - podSelector:
          matchLabels:
            app: a-pod
Demo Calico example
- Install an Nginx deployment and service on your cluster
nginx.yml
apiVersion: extensions/v1beta1
kind: Deployment
metadata:
  name: nginx
spec:
  replicas: 3
  template:
    metadata:
      labels:
        app: nginx
    spec:
      containers:
      - name: nginx
        image: nginx
        ports:
        - name: http-port
          containerPort: 80
---
apiVersion: v1
kind: Service
metadata:
  name: nginx
  labels:
    app: nginx
spec:
  ports:
  - port: 80
    nodePort: 31001
    targetPort: http-port
    protocol: TCP
  selector:
    app: nginx
  type: NodePort
kubectl create -f nginx.yml
- Implement network-policy to isolate pods from being accessed
networkpolicy-isolation.yml
kind: NetworkPolicy
apiVersion: networking.k8s.io/v1
metadata:
  name: default-deny
  namespace: default
spec:
  podSelector:
    matchLabels: {}
kubectl create -f networkpolicy-isolation.yml
- Now no connections are allowed to our Nginx, not from outside nor from inside the cluster.
- Allow ingress to Nginx now from inside the cluster but only by a pod with label
access-nginx
networkpolicy-nginx.yml
kind: NetworkPolicy
apiVersion: networking.k8s.io/v1
metadata:
  name: access-nginx
  namespace: default
spec:
  podSelector:
    matchLabels:
      app: nginx
  ingress:
    - from:
    #- ipBlock:
    #    cidr: 172.17.0.0/16
      - podSelector:
          matchLabels:
            app: access-nginx
      ports:
      - protocol: TCP
        port: 80
kubectl create -f networkpolicy-nginx.yml
Demo Calico egress example
- Implement egress isolation
networkpolicy-isolation-egress.yml
apiVersion: networking.k8s.io/v1
kind: NetworkPolicy
metadata:
  name: default-deny
spec:
  podSelector: {}
  policyTypes:
  - Ingress
  - Egress
kubectl replace -f networkpolicy-isolation-egress.yml
- Define egress policy to allow access
network-policy-allow-egress.yml
apiVersion: networking.k8s.io/v1
kind: NetworkPolicy
metadata:
  name: allow-google
spec:
  podSelector:
    matchLabels:
      app: egress
  policyTypes:
  - Egress
  egress:
  - to:
    - ipBlock:
        cidr: 8.8.8.8/32
---
apiVersion: networking.k8s.io/v1
kind: NetworkPolicy
metadata:
  name: allow-dns
spec:
  podSelector:
    matchLabels:
      app: egress
  policyTypes:
  - Egress
  egress:
  - to:
    # allow DNS resolution
    ports:
      - port: 53
        protocol: UDP
      - port: 53
        protocol: TCP
kubectl create -f network-policy-allow-egress.yml
Vault Managing credentials in a distributed environment
- Vault is a tool for managing secrets
- For example: passwords, API keys, SSH keys, certificates
- It’s opensource and released by HashiCorp (like Vagrant, terraform, and other well known tools)
- Some use cases are:
- General Secret Storage
- Employee Credential Storage (Sharing credentials, but using audit log, with ability to roll over credentials)
- API key generation for scripts (Dynamic Secrets)
- Data Encryption / Decryption
Vault Features
- Secure Secret Storage
- Encrypted key-value pairs can be stored in Vault
- Dynamic Secrets
- Vault can create on-demand secrets and revoke them after a period of time (when the client lease is up)
- For example AWS credentials to access an S3 bucket
- Data Encryption
- Vault can encrypt / decrypt data without storing it
- Leasing and Renewal
- Secrets in Vault have a lease (a time to live)
- When the lease is up, the secret will be revoked (deleted)
- Clients can ask for a renewal (a new secret) using an API
- Revocation
- Easy revocation features
- For example, all secrets of a particular user can be removed
- In April 2018 CoreOS released the Vault Operator
- It allows you to easily deploy Vault on Kubernetes
- It allows you to configure and maintain Vault using the Kubernetes API (using yaml files and kubectl)
- It gives you a good alternative to secret management tools on public cloud (like the AWS Secrets Manager or AWS Parameter store)
Demo Vault
- Setup RBAC for etcd
etcd-rbac.yml
apiVersion: v1
kind: ServiceAccount
metadata:
  name: etcd
  namespace: default
---
apiVersion: rbac.authorization.k8s.io/v1beta1
kind: Role
metadata:
  name: etcd
  namespace: default
rules:
- apiGroups:
  - etcd.database.coreos.com
  resources:
  - etcdclusters
  - etcdbackups
  - etcdrestores
  verbs:
  - "*"
- apiGroups:
  - ""
  resources:
  - pods
  - services
  - endpoints
  - persistentvolumeclaims
  - events
  verbs:
  - "*"
- apiGroups:
  - apps
  resources:
  - deployments
  verbs:
  - "*"
# The following permissions can be removed if not using S3 backup and TLS
- apiGroups:
  - ""
  resources:
  - secrets
  verbs:
  - get
---
apiVersion: rbac.authorization.k8s.io/v1beta1
kind: RoleBinding
metadata:
  name: etcd
  namespace: default
roleRef:
  apiGroup: rbac.authorization.k8s.io
  kind: Role
  name: etcd
subjects:
- kind: ServiceAccount
  name: etcd
  namespace: default
kubectl create -f etcd-rbac.yml
- Create the CRDs for etcd (Custom Resource Definitions)
etcd-crds.yml
apiVersion: apiextensions.k8s.io/v1beta1
kind: CustomResourceDefinition
metadata:
  name: etcdclusters.etcd.database.coreos.com
spec:
  group: etcd.database.coreos.com
  names:
    kind: EtcdCluster
    listKind: EtcdClusterList
    plural: etcdclusters
    shortNames:
    - etcd
    singular: etcdcluster
  scope: Namespaced
  version: v1beta2
---
apiVersion: apiextensions.k8s.io/v1beta1
kind: CustomResourceDefinition
metadata:
  name: etcdbackups.etcd.database.coreos.com
spec:
  group: etcd.database.coreos.com
  names:
    kind: EtcdBackup
    listKind: EtcdBackupList
    plural: etcdbackups
    singular: etcdbackup
  scope: Namespaced
  version: v1beta2
---
apiVersion: apiextensions.k8s.io/v1beta1
kind: CustomResourceDefinition
metadata:
  name: etcdrestores.etcd.database.coreos.com
spec:
  group: etcd.database.coreos.com
  names:
    kind: EtcdRestore
    listKind: EtcdRestoreList
    plural: etcdrestores
    singular: etcdrestore
  scope: Namespaced
  version: v1beta2
- Deploy an etcd operator to use in our cluster
etc-operator-deploy.yml
apiVersion: extensions/v1beta1
kind: Deployment
metadata:
  name: etcd-operator
  labels:
    name: etcd-operator
spec:
  replicas: 1
  template:
    metadata:
      labels:
        name: etcd-operator
    spec:
      serviceAccountName: etcd
      containers:
      - name: etcd-operator
        image: quay.io/coreos/etcd-operator:v0.8.3
        command:
        - etcd-operator
        - "--create-crd=false"
        env:
        - name: MY_POD_NAMESPACE
          valueFrom:
            fieldRef:
              fieldPath: metadata.namespace
        - name: MY_POD_NAME
          valueFrom:
            fieldRef:
              fieldPath: metadata.name
      - name: etcd-backup-operator
        image: quay.io/coreos/etcd-operator:v0.8.3
        command:
        - etcd-backup-operator
        - "--create-crd=false"
        env:
        - name: MY_POD_NAMESPACE
          valueFrom:
            fieldRef:
              fieldPath: metadata.namespace
        - name: MY_POD_NAME
          valueFrom:
            fieldRef:
              fieldPath: metadata.name
      - name: etcd-restore-operator
        image: quay.io/coreos/etcd-operator:v0.8.3
        command:
        - etcd-restore-operator
        - "--create-crd=false"
        env:
        - name: MY_POD_NAMESPACE
          valueFrom:
            fieldRef:
              fieldPath: metadata.namespace
        - name: MY_POD_NAME
          valueFrom:
            fieldRef:
              fieldPath: metadata.name
kubectl create -f etcd-operator-deploy.yml
- Setup RBAC for Vault
vault-rbac.yml
apiVersion: v1
kind: ServiceAccount
metadata:
  name: vault
  namespace: default
---
kind: Role
apiVersion: rbac.authorization.k8s.io/v1beta1
metadata:
  name: vault-operator-role
rules:
- apiGroups:
  - etcd.database.coreos.com
  resources:
  - etcdclusters
  - etcdbackups
  - etcdrestores
  verbs:
  - "*"
- apiGroups:
  - vault.security.coreos.com
  resources:
  - vaultservices
  verbs:
  - "*"
- apiGroups:
  - storage.k8s.io
  resources:
  - storageclasses
  verbs:
  - "*"
- apiGroups:
  - "" # "" indicates the core API group
  resources:
  - pods
  - services
  - endpoints
  - persistentvolumeclaims
  - events
  - configmaps
  - secrets
  verbs:
  - "*"
- apiGroups:
  - apps
  resources:
  - deployments
  verbs:
  - "*"

---

kind: RoleBinding
apiVersion: rbac.authorization.k8s.io/v1beta1
metadata:
  name: vault-operator-rolebinding
subjects:
- kind: ServiceAccount
  name: vault
  namespace: default
roleRef:
  kind: Role
  name: vault-operator-role
  apiGroup: rbac.authorization.k8s.io
kubectl create -f vault-rbac.yml
- Setup CRDs for Vault
vault-crds.yml
apiVersion: apiextensions.k8s.io/v1beta1
kind: CustomResourceDefinition
metadata:
  name: vaultservices.vault.security.coreos.com
spec:
  group: vault.security.coreos.com
  names:
    kind: VaultService
    listKind: VaultServiceList
    plural: vaultservices
    shortNames:
    - vault
    singular: vaultservice
  scope: Namespaced
  version: v1alpha1
kubectl create -f vault-crds.yml
- Deploy Vault Operator
vault-deployment.yml
apiVersion: extensions/v1beta1
kind: Deployment
metadata:
  name: vault-operator
spec:
  replicas: 1
  template:
    metadata:
      labels:
        name: vault-operator
    spec:
      serviceAccountName: vault
      containers:
      - name: vault-operator
        image: quay.io/coreos/vault-operator:latest
        env:
        - name: MY_POD_NAMESPACE
          valueFrom:
            fieldRef:
              fieldPath: metadata.namespace
        - name: MY_POD_NAME
          valueFrom:
            fieldRef:
              fieldPath: metadata.name
kubectl create -f vault-deployment.yml
- Create a Vault cluster
example-vault.yml
apiVersion: "vault.security.coreos.com/v1alpha1"
kind: "VaultService"
metadata:
  name: "example"
spec:
  nodes: 2
  version: "0.9.1-0"
kubectl create -f example-vault.yml
- Install vault cli
wget https://releases.hashicorp.com/vault/1.0.1/vault_1.0.1_linux_amd64.zip
sudo yum -y install unzip
unzip vault_1.0.1_linux_amd64.zip
chmod +x vault
sudo mv vault /usr/local/bin
- Initialize Vault cluster
kubectl get vault example -o jsonpath='{.status.vaultStatus.sealed[0]}' | xargs -0 -I {} kubectl -n default port-forward {} 8200
export VAULT_ADDR='https://localhost:8200'
export VAULT_SKIP_VERIFY="true"
vault status                # This will give you the error that Vault is not initialized
vault operator init         # Initializing Vault will give you the unseal keys and the root token. Save them!
vault operator unseal       # provide one of the 5 keys to unseal
vault operator unseal       # repeat with another key
vault operator unseal       # repeat a third time with another of the keys
vault login <key>           # login to Vault with the root token provided
- Write a secret
# we need to make sure to write to the master node....
kubectl -n default get vault example -o jsonpath='{.status.vaultStatus.active}' | xargs -0 -I {} kubectl -n default port-forward {} 8200
vault write secret/myapp/mypassword value=pass123
- Create a policy to create non-root token
policy.hcl
path "secret/myapp/*" {
  capabilities = ["read"]
}
vault write sys/policy/my-policy policy=@policy.hcl
vault token create -policy=my-policy
- Now you can use the token generated to connect from a pod and read any secret under
secret/myapp/
kubectl run --image ubuntu -it --rm ubuntu
apt-get update && apt-get -y install curl
curl -k -H 'X-Vault-Token: <token>' https://example:8200/v1/secret/myapp/mypassword
Openshift Origin
- OpenShift Origin is a distribution of Kubernetes
- It is optimized for continuous application development and multi-tenancy
- It adds developer and operations centric tools
- OpenShift Origin is the upstream community project that powers Openshift
- It uses Kubernetes, Docker, and Project Atomic (a container operating system)
- Definitions: https://www.openshift.org/
Architecture
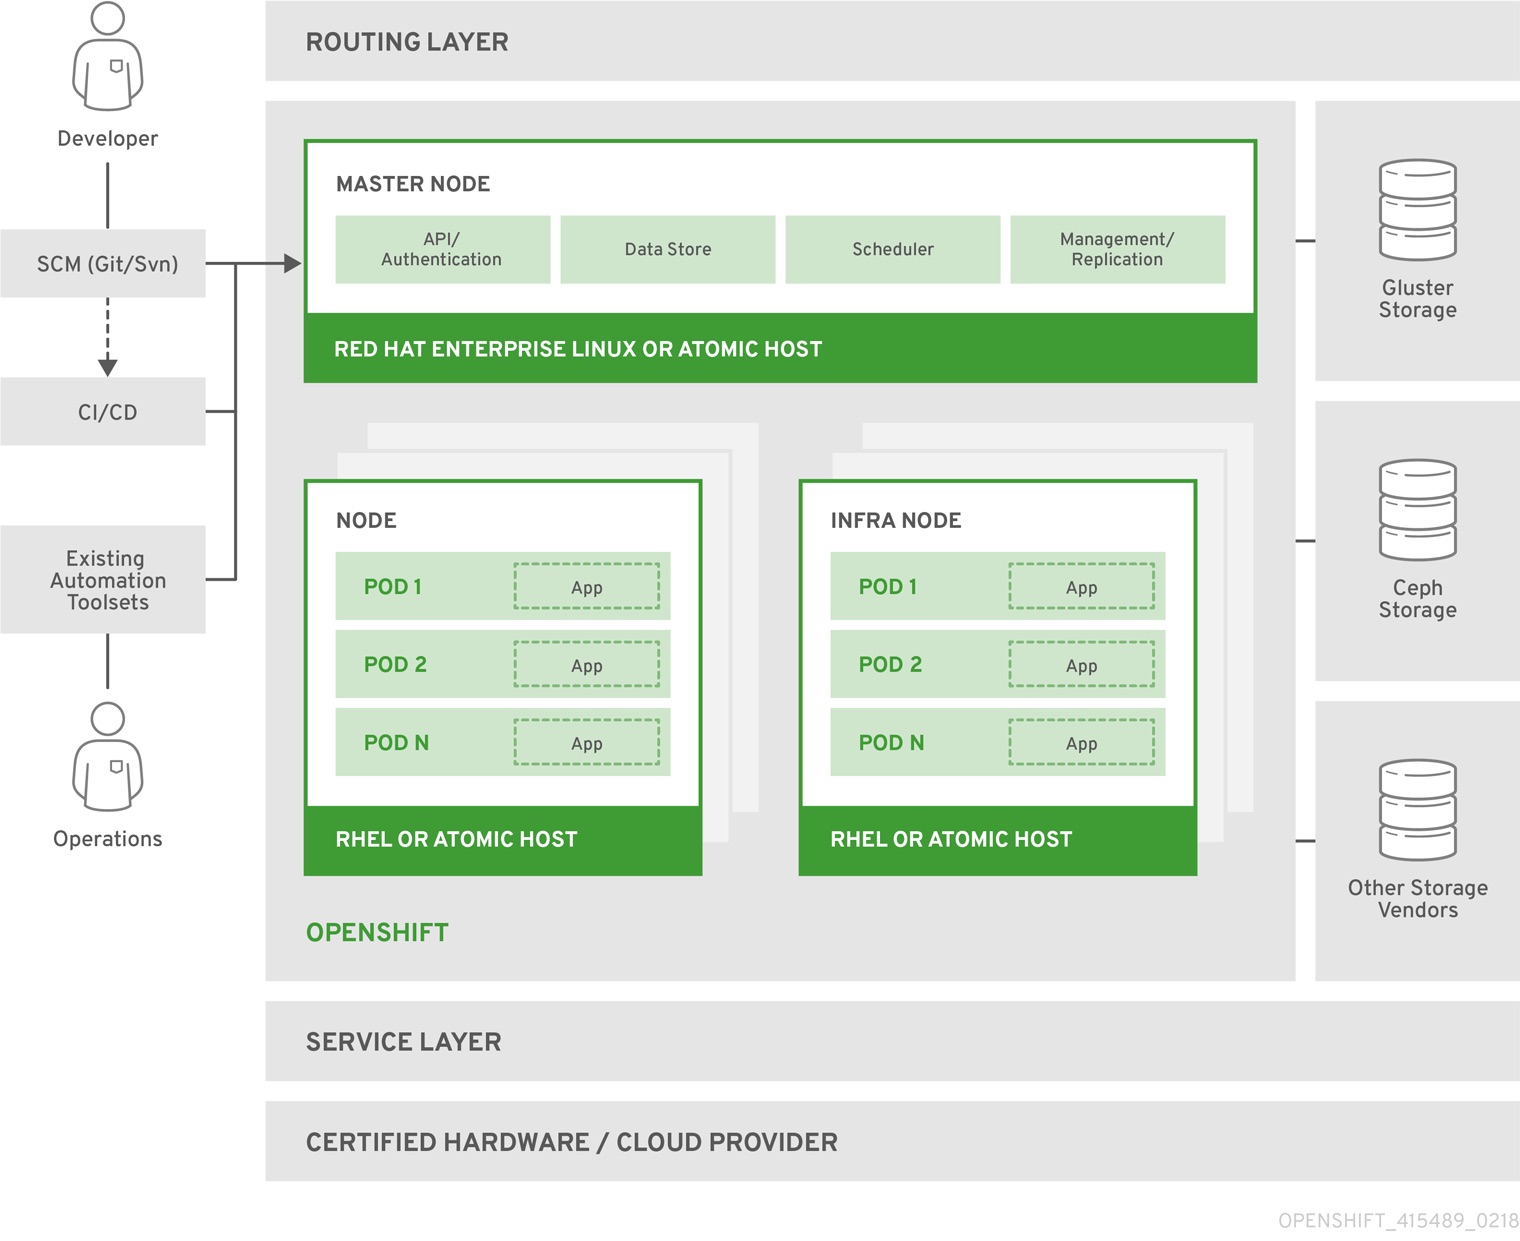
Source: https://docs.openshift.org/latest/architecture/
- Openshift also has a quick setup by running openshift in a container
- With “oc cluster up” you can bring up the Kubernetes cluster with the Openshift frontend
- Using the web frontend, you can create projects and applications
- For example, you can start a NodeJS project or a MySQL database
- Those projects will use a git repository to build and push the docker image
- Everything happens behind the scenes, it’s very developer focussed
- You can also integrate with Jenkins by putting Jenkinsfiles in your project
- The Developer experience is great, because it hides the complexities of Kubernetes
- That means that Openshift has its own implementation of:
- Handling storage (for example ceph)
- Handling authentication (you plugin into Openshift)
- Integrating CI, Ingress, loadbalancing, etc
- This can be a pro or a con (you don’t have to worry about the implementation, but you also have to follow Openshift’s way of doing things)
- When to use Openshift?
- If you need a complete system that integrates CI/CD and Kubernetes (and hosted platforms are no option)
- If you don’t want to design and develop a custom delivery platform for your developers, but are OK with using Openshift’s way of doing things
- If you “just want to let your developers run apps on Kubernetes”
- If you already are using Redhat, and you’d like to get a on-prem PaaS offering with the support Redhat provides
Demo Installing OpenShift
- Install oc, cluster up
curl -o ~/openshift-origin-client-tools-v3.9.0-191fece-linux-64bit.tar.gz -L https://github.com/openshift/origin/releases/download/v3.9.0/openshift-origin-client-tools-v3.9.0-191fece-linux-64bit.tar.gz
cd ~
tar -xzvf openshift-origin-client-tools-v3.9.0-191fece-linux-64bit.tar.gz
export PATH=$PATH:~/openshift-origin-client-tools-v3.9.0-191fece-linux-64bit
echo 'export PATH=$PATH:~/openshift-origin-client-tools-v3.9.0-191fece-linux-64bit' >> .bash_profile
oc cluster up --public-hostname=$(curl -s ifconfig.co) --host-data-dir=/data