Learn DevOps - Kubernetes
Why Kubernetes
- The average salary of a DevOps / Automation engineer goes up to $146,000 in San Fransisco
- Containerization is happening, which means Kubernetes is the next big thing to learn!
- Employers are looking for people with Docker & Kubernetes skills to start using Kubernetes
- Containerization and Kubernetes will only gain more importance in the future
Kubernetes
- If you are in a Ops or DevOps role, you’ll want to start using containers to deliver software more efficient, easier, and faster
- Kubernetes is a great tool to run and manage your containers:
- You can use Kubernetes on your desktop, on-premise, and in the cloud
- It gives you all the flexibility and cost savings that you always wanted within one framework
- It makes you more independent of cloud vendors
- It’s a must to consider containerization and Kubernetes within your organization
What is included in this course?
- Cluster Setup lectures using minikube (for desktop usage) and production cluster setup on AWS using kops
- Kubernetes Basics + Advanced topics
- Lots of demos
- Including demos showing you how to run Wordpress + MySQL on Kubernetes
- Kubernetes administration topics
Course Overview
| Introduction | Kubernetes Basics | Advanced topics | Administration | 3rd party |
| What is Kubernetes | Node Architecture | Service auto-discovery | Master Services | Flannel |
| Cloud / On-premise setup | Scaling pods | ConfigMap | Quotas and Limits | Calico |
| Cluster Setup | Deployments | Ingress | Namespaces | Linkerd |
| Building Containers | Services | Volumes | User Management | |
| Running your first app | Labels | StatefulSets | Networking | |
| Building Container Images | Healthchecks Secrets WebUI | Daemon Sets Monitoring Autoscaling | Node Maintenance High Availability Federation / Security |
Course objectives
- To be able to understand, deploy and use Kubernetes
- To get started with Containerization and run those containers on Kubernetes
- To use Kubernetes as a single node and on AWS
- To be able to run stateless and stateful applications on Kubernetes
- To be able to administer Kubernetes
What is Kubernetes
- Kubernetes is an open source orchestration system for Docker containers
- It lets you schedule containers on a cluster of machines
- You can run multiple containers on one machine
- You can run long running services (like web applications)
- Kubernetes will manage the state of these containers
- Can start the container on specific nodes
- Will restart a container when it gets killed
- Can move containers from one node to another node
- Instead of just running a few docker containers on one host manually, Kubernetes is a platform that will manage the containers for you
- Kubernetes clusters can start with one node until thousands of nodes
- Some other popular docker orchestrators are:
- Docker Swarm
- Mesos
Kubernetes Advantages
- You can run Kubernetes anywhere:
- On-premise (own datacenter)
- Public (Google cloud, AWS)
- Hybrid: public & private
- Highly modular
- Open source
- Great community
- Backed by Google
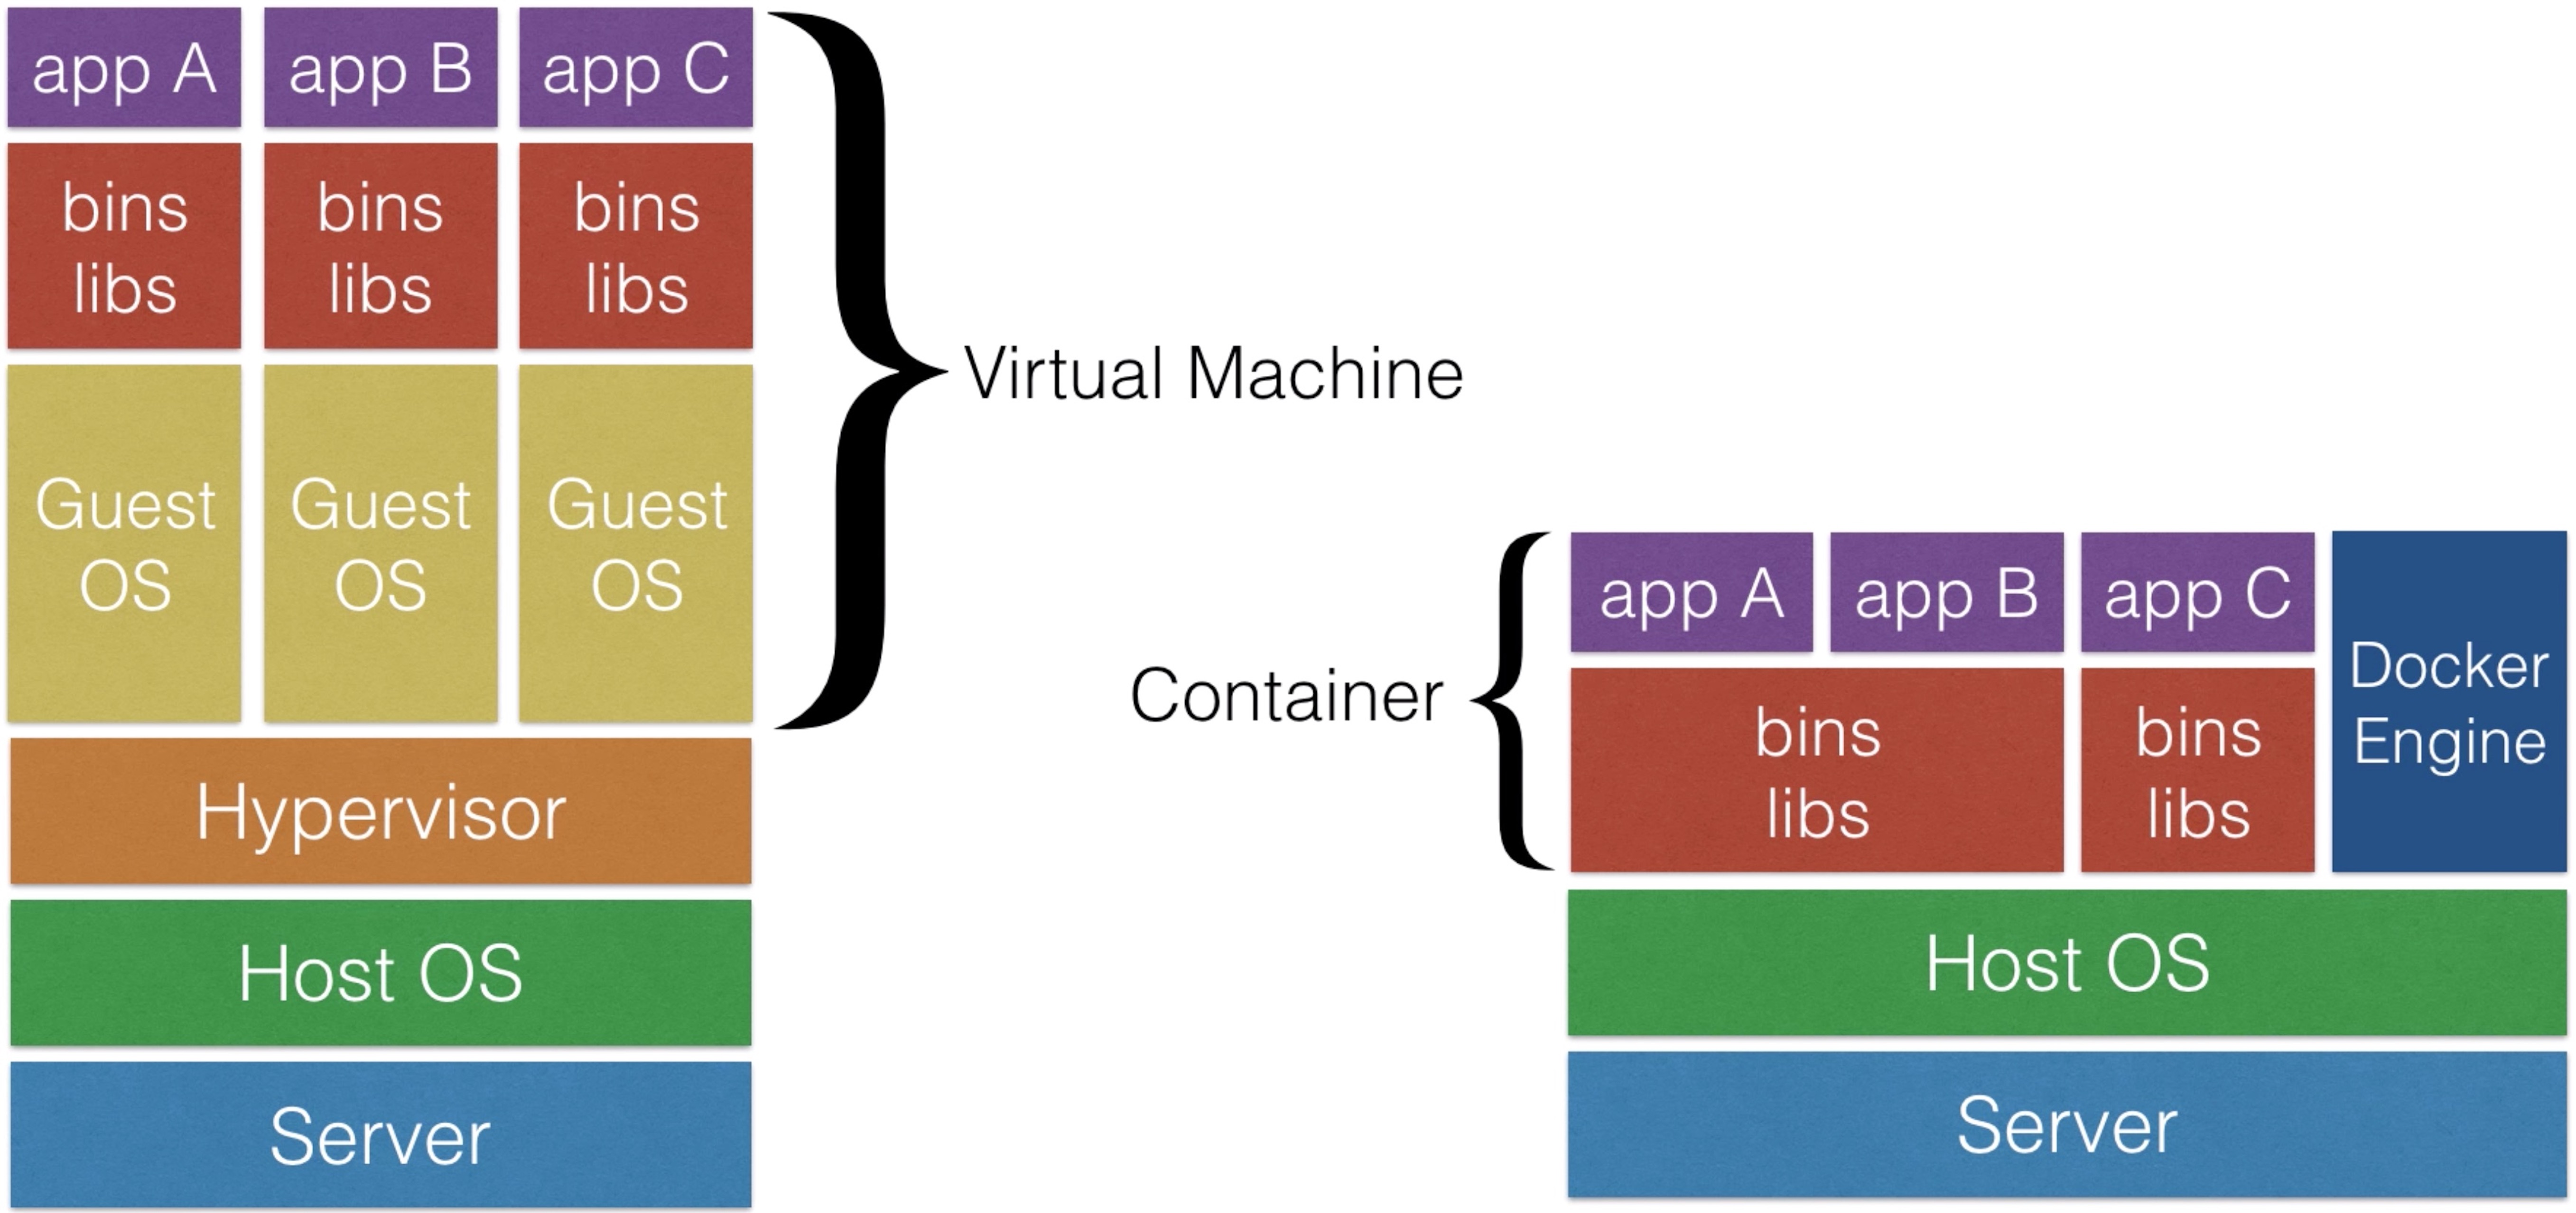
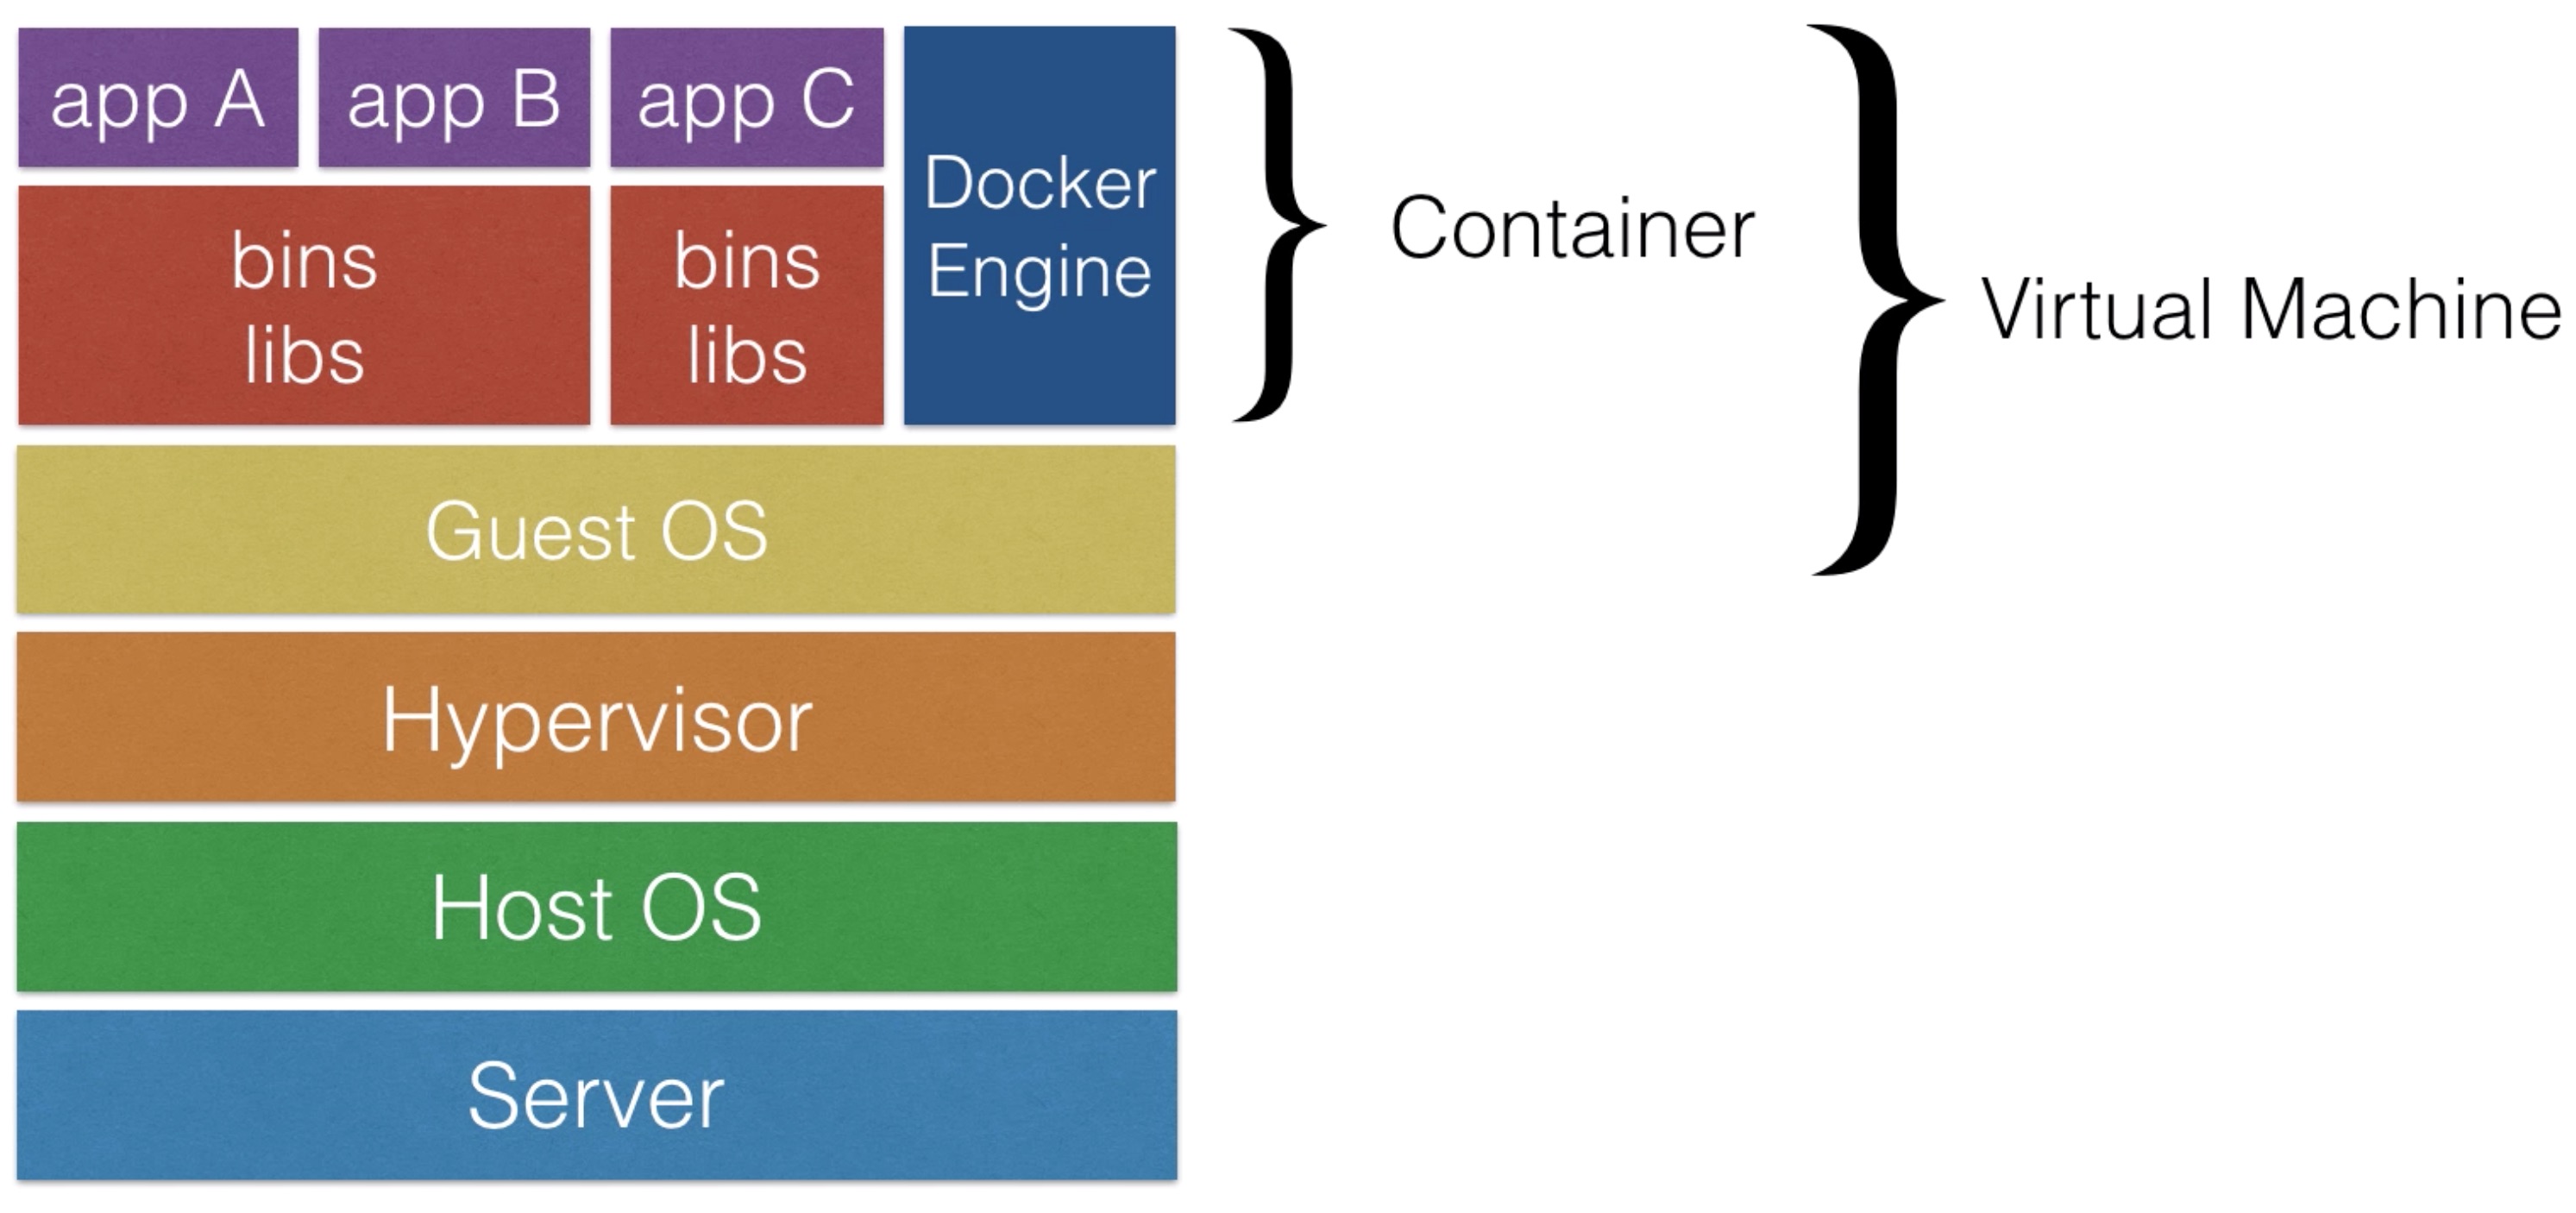
Docker
- Docker is the most popular container software
- An alternative to Docker is rkt - which also works with Kubernetes
- Docker Engine
- The Docker runtime
- Software to make run docker images
- Docker Hub • Online service to store and fetch docker images • Also allows you to build docker images online
Docker Benefits
- Isolation: you ship a binary with all the dependencies
- no more it works on my machine, but not in production
- Closer parity between dev, QA, and production environments
- Docker makes development teams able to ship faster
- You can run the same docker image, unchanged, on laptops, data center VMs, and Cloud providers.
- Docker uses Linux Containers (a kernel feature) for operating system-level isolation
Kubernetes Setup
The difference ways of setting up Kubernetes
- Kubernetes should really be able to run anywhere
- But, there are more integrations for certain Cloud Providers, like AWS & GCE
- Things like Volumes and External Load Balancers work only with supported Cloud Providers
- I will first use minikube to quickly spin up a local single machine with a Kubernetes cluster
- I’ll then show you how to spin up a cluster on AWS using kops
- This tool can be used to spin up a highly available production cluster
Kubernetes Setups
- Doing the labs yourself is possible (and highly recommended):
- Using the AWS Free tier (gives you 750 hours of t2.micro’s / month)
- Using your local machine
- Use minikube from https://github.com/kubernetes/minikube
- Using DigitalOcean
- Use https://m.do.co/c/007f99ffb902 to get a $10 coupon
Setup Set up Kubernetes locally
Minikube Setup
- Minikube is a tool that makes it easy to run Kubernetes locally
- Minikube runs a single-node Kubernetes cluster inside a Linux VM
- It’s aimed on users who want to just test it out or use if for development
- It cannot spin up a production cluster, it’s a one node machine with no high availability
- It works on Windows, Linux, and MacOS
- You will need Virtualization Software installed to run minikube:
- VirtualBox is free and can be downloaded from www.virtualbox.org
- You can download minikube from https://github.com/kubernetes/minikube
- To launch your cluster you just need to enter (in a shell / terminal / powershell):
$ minikube start
Building Containers
- Dockerizing a simple nodeJS app only needs a few files:
Dockerfile
FROM node:4.6
WORKDIR /app
ADD . /app
RUN npm install
EXPOSE 3000
CMD npm start
index.js
var express = require('express');
var app = express();
app.get('/', function (req, res) {
  res.send('Hello World!');
});
var server = app.listen(3000, function () {
  var host = server.address().address;
  var port = server.address().port;

  console.log('Example app listening at http:// %s:%s', host, port);
});
package.json
{
  "name": "myapp",
  "version": "0.0.1",
  "private": true,
  "scripts": {
    "start": "node index.js"
  },
  "engines": {
    "node": “^4.6.1”
  },
  "dependencies": {
    "express": "^4.14.0",
  }
}
- To build this project,
docker buildcan be used - Docker build can be executed manually or by CI/CD software
- To build the docker image from the above documents:
$ cd <directory where you created the files>
$ ls
Dockerfile index.js package.json
$ docker build .
[...]
$
- After the docker build process you have built an image that can run the nodejs app
Docker Registry
Push containers to Docker Hub
- You can run the docker app by executing
docker runlocally - Docker can be run locally for development purposes
- To make an image available to Kubernetes, you need to push the image to a Docker Registry, like Docker Hub
- The first step will be to make an account on Docker Hub
- Then you can push any locally built images to the Docker Registry (where docker images can be stored in)
- To push an image to Docker Hub:
$ docker login
$ docker tag imageid your-login/docker-demo
$ docker push your-login/docker-demo
Or, to immediately tag an image during the build process:
$ cd docker-demo
$ ls
Dockerfile index.js package.json
$ docker build -t your-login/docker-demo .
[...]
$ docker push your-login/docker-demo
[...] $
Docker remarks
- You can build and deploy any application you want using Docker and Kubernetes, if you just take into account a few limitations:
- You should only run one process in one container
- Don’t try to create one giant docker image for you app, but split it up if necessary
- All the data in the container is not preserved, when a container stops, all the changes within a container are lost
- You can preserve data, using volumes, which is covered later in this course
- For more tips, check out the 12-factor app methodology at 12factor.net
- You should only run one process in one container
Running first app
- Let’s run our newly built application on the new Kubernetes cluster
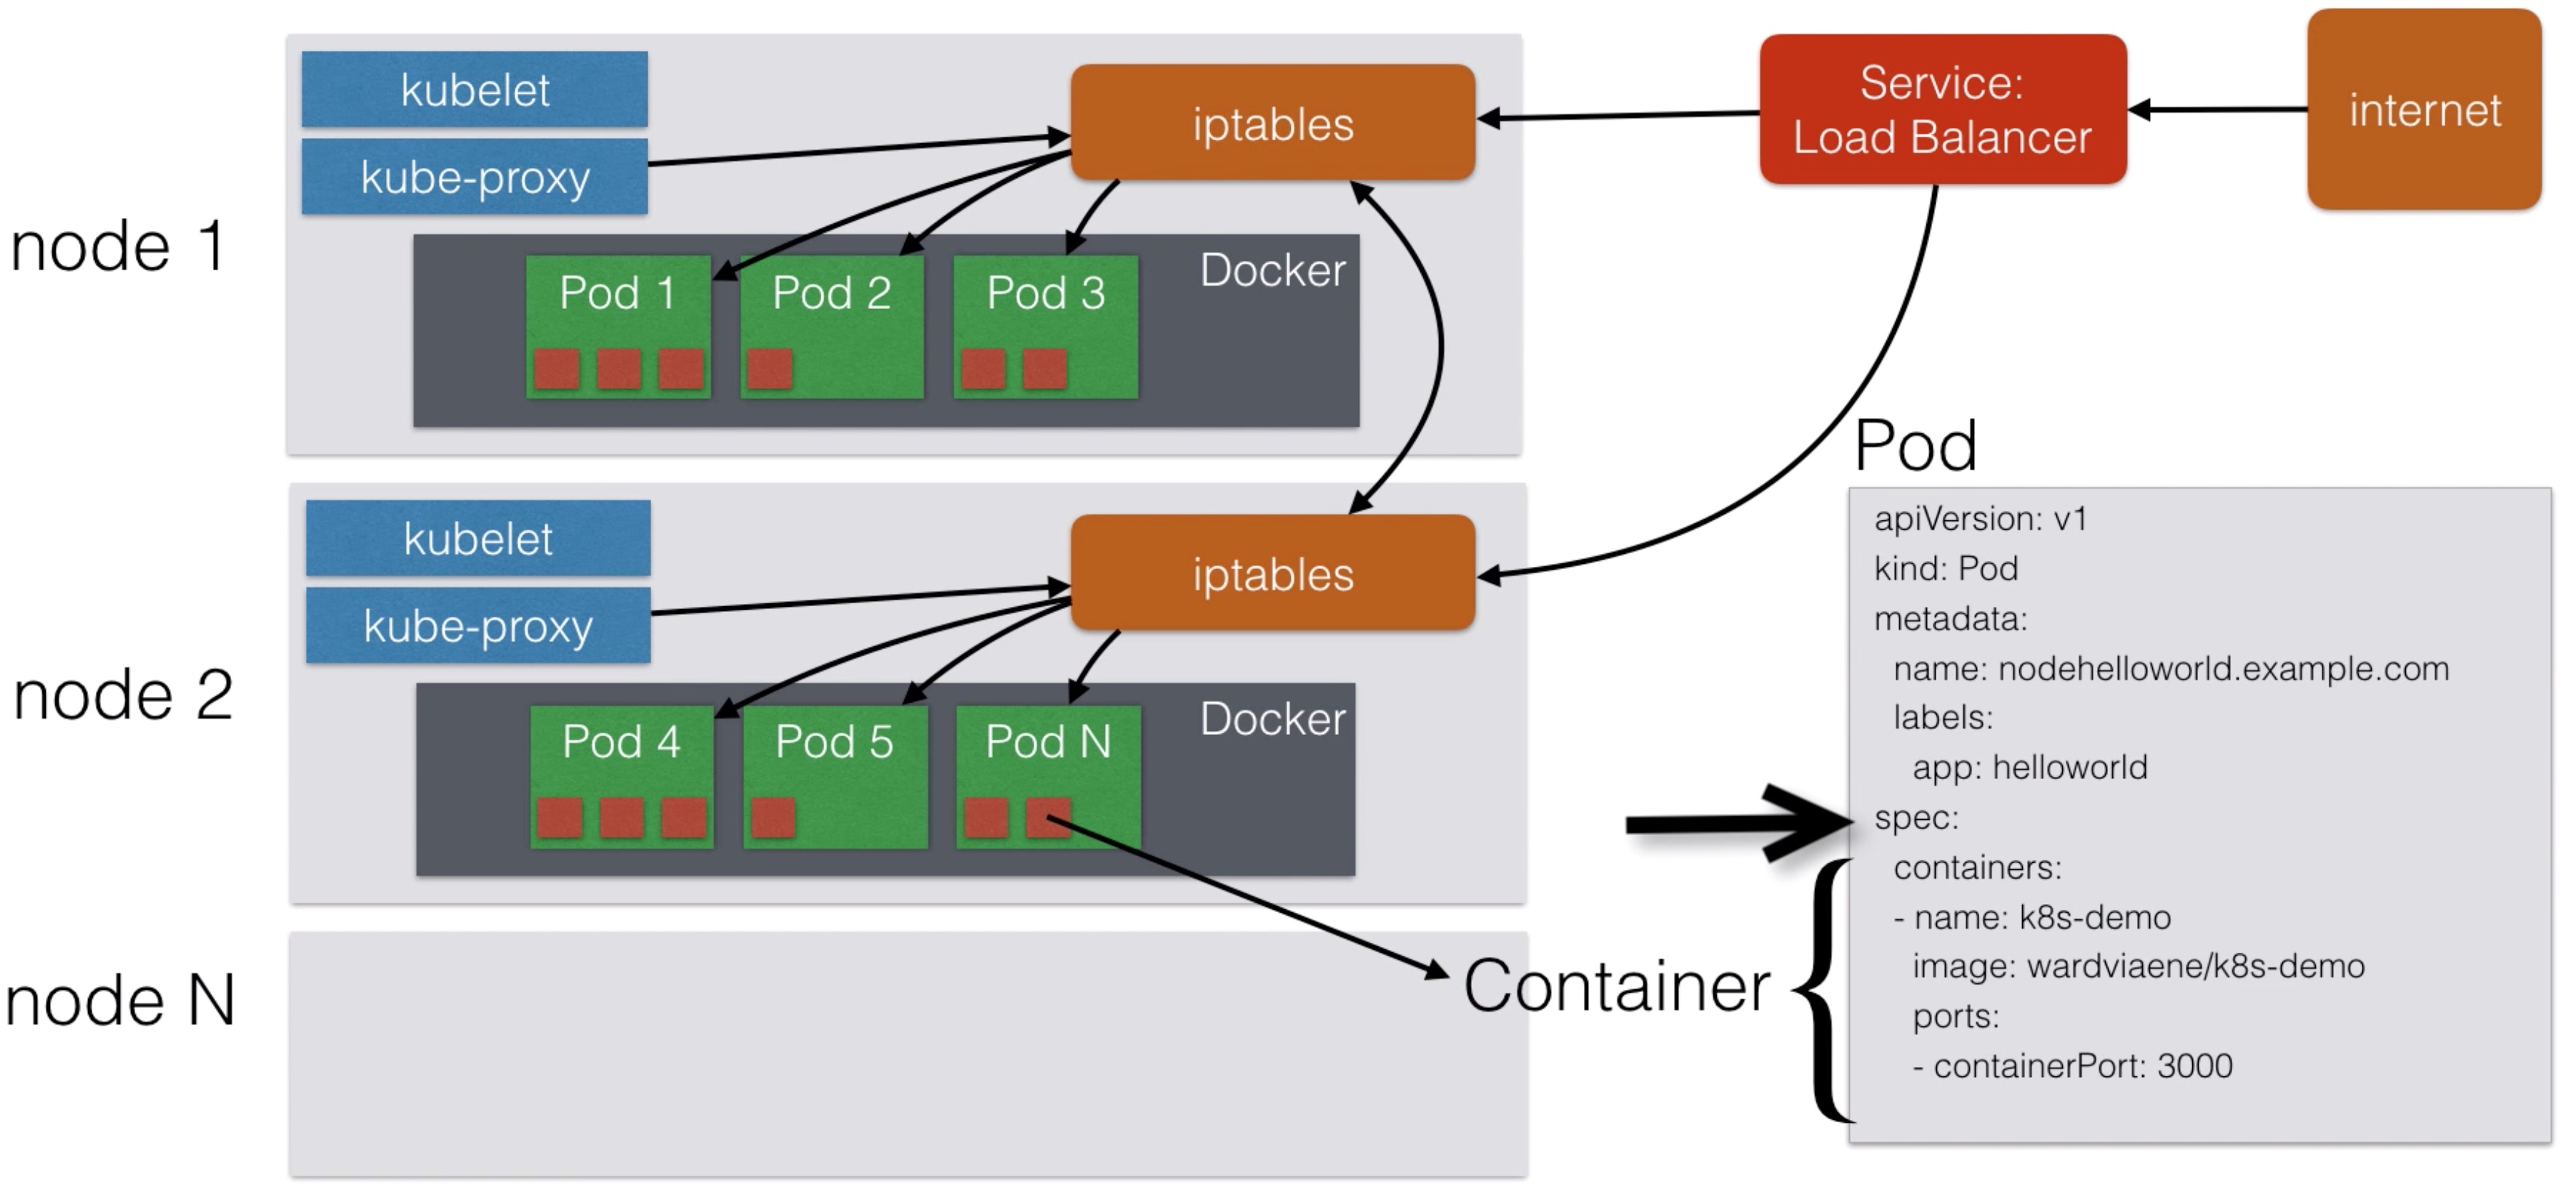
- Before we can launch a container based on the image, we need to create a pod definition
- A pod describes an application running on Kubernetes
- A pod can contain one or more tightly coupled containers, that make up the app
- Those apps can easily communicate which each other using their local port numbers
- Our app only has one container
Create a pod
- Create a file pod-helloworld.yml with the pod definition:
apiVersion: v1
kind: Pod
metadata:
  name: nodehelloworld.example.com
  labels:
    app: helloworld
spec:
  containers:
  - name: k8s-demo
    image: your-login/docker-demo
    ports:
    - containerPort: 3000
- Use kubectl to create the pod on the kubernetes cluster:
$ kubectl create -f pod-helloworld.yml
$
Setting up a LoadBalancer for our first app
- In a real world scenario, you need to be able to access the app from outside the cluster
- On AWS, you can easily add an external Load Balancer
- This AWS Load Balancer will route the traffic to the correct pod in Kubernetes
- There are other solutions for other cloud providers that don’t have a Load Balancer
- Your own haproxy / nginx load balancer in front of your cluster
- Expose ports directly
pod: helloworld.yml
apiVersion: v1
kind: Pod
metadata:
  name: nodehelloworld.example.com
  labels:
    app: helloworld
spec:
  containers:
  - name: k8s-demo
    image: your-login/docker-demo
    ports:
    - name: nodejs-port
      containerPort: 3000
service: helloworld-service.yml
apiVersion: v1
kind: Service
metadata:
  name: helloworld-service
spec:
  ports:
  - port: 80
    targetPort: nodejs-port
    protocol: TCP
  selector:
    app: helloworld
  type: LoadBalancer
- You could now point a hostname like www.example.com to the ELB to reach your pod from the internet
Kubernetes Basics
Node Architecture
Scaling pods
- If your application is stateless you can horizontally scale it
- Stateless = your application does’t have a state, it doesn’t write any local files / keeps local sessions
- All traditional databases (MySQL, Postgres) are stateful, they have database files that can’t be split over multiple instances
- Most web applications can be made stateless:
- Session management needs to be done outside the container
- Any files that need to be saved can’t be saved locally on the container
- Our example app is stateless, if the same app would run multiple times, it doesn’t change state
- For more information about best practices, have a look at 12factor.net
- Later in this course I’ll explain how to use volumes to still run stateful apps
- Those stateful apps can’t horizontally scale, but you can run them in a single container and vertically scale (allocate more CPU / Memory / Disk)
- Scaling in Kubernetes can be done using the Replication Controller
- The replication controller will ensure a specified number of pod replicas will run at all time
- A pod created with the replica controller will automatically be replaced if they fail, get deleted, or are terminated
- Using the replication controller is also recommended if you just want to make sure 1 pod is always running, even after reboots
- You can then run a replication controller with just 1 replica
- This makes sure that the pod is always running
- To replicate our example app 2 times
apiVersion: v1
kind: ReplicationController
metadata:
  name: helloworld-controller
spec:
  replicas: 2
  selector:
    app: helloworld
  template:
    metadata:
      labels:
        app: helloworld
    spec:
      containers:
      - name: k8s-demo
        image: your-login/docker-demo
        ports:
        - containerPort: 3000
Deployments
Replication Set
- Replica Set is the next-generation Replication Controller
- It supports a new selector that can do selection based on filtering according a set of values
- e.g. “environment” either “dev” or “qa”
- not only based on equality, like the Replication Controller
- e.g. “environment” == “dev”
- This Replica Set, rather than the Replication Controller, is used by the Deployment object
- A deployment declaration in Kubernetes allows you to do app deployments and updates
- When using the deployment object, you define the state of your application
- Kubernetes will then make sure the clusters matches your desired state
- Just using the replication controller or replication set might be cumbersome to deploy apps
- The Deployment Object is easier to use and gives you more possibilities
- With a deployment object you can:
- Create a deployment (e.g. deploying an app)
- Update a deployment (e.g. deploying a new version)
- Do rolling updates (zero downtime deployments)
- Roll back to a previous version
- Pause / Resume a deployment (e.g. to roll-out to only a certain percentage)
- This is an example of a deployment:
apiVersion: extensions/v1beta1
kind: Deployment
metadata:
  name: helloworld-deployment
spec:
  replicas: 3
  template:
    metadata:
      labels:
        app: helloworld
    spec:
      containers:
      - name: k8s-demo
        image: your-login/docker-demo
        ports:
        - containerPort: 3000
Services
- Pods are very dynamic, they come and go on the Kubernetes cluster
- When using a Replication Controller, pods are terminated and created during scaling operations
- When using Deployments, when updating the image version, pods are terminated and new pods take the place of older pods
- That’s why Pods should never be accessed directly, but always through a Service
- A service is the logical bridge between the “mortal” pods and other services or end-users
- When using the “kubectl expose” command earlier, you created a new Service for your pod, so it could be accessed externally
- Creating a service will create an endpoint for your pod(s):
- a ClusterIP: a virtual IP address only reachable from within the cluster (this is the default)
- a NodePort: a port that is the same on each node that is also reachable externally
- a LoadBalancer: a LoadBalancer created by the cloud provider that will route external traffic to every node on the NodePort (ELB on AWS)
- The options just shown only allow you to create virtual IPs or ports
- There is also a possibility to use DNS names
- ExternalName can provide a DNS name for the service
- e.g. for service discovery using DNS
- This only works when the DNS add-on is enabled
- I will discuss this later in a separate lecture
- This is an example of a Service definition (also created using kubectl expose):
apiVersion: v1
kind: Service
metadata:
  name: helloworld-service
spec:
  ports:
  - port: 31001
    nodePort: 31001
    targetPort: nodejs-port
    protocol: TCP
  selector:
    app: helloworld
  type: NodePort
- Note: by default service can only run between ports 30000-32767, but you could change this behavior by adding the –service-node-port-range= argument to the kube-apiserver (in the init scripts)
Labels
- Labels are key/value pairs that can be attached to objects
- Labels are like tags in AWS or other cloud providers, used to tag resources
- You can label your objects, for instance your pod, following an organizational structure
- Key: environment - Value: dev / staging / qa / prod
- Key: department - Value: engineering / finance / marketing
- In our previous examples I already have been using labels to tag pods:
metadata:
  name: nodehelloworld.example.com
  labels:
    app: helloworld
- Labels are not unique and multiple labels can be added to one object
- Once labels are attached to an object, you can use filters to narrow down results
- This is called Label Selectors
- Using Label Selectors, you can use matching expressions to match labels
- For instance, a particular pod can only run on a node labeled with “environment” equals “development”
- More complex matching: “environment” in “development” or “qa”
Node Labels
- You can also use labels to tag nodes
- Once nodes are tagged, you can use label selectors to let pods only run on specific nodes
- There are 2 steps required to run a pod on a specific set of nodes:
- First you tag the node
- Then you add a nodeSelector to your pod configuration
- First step, add a label or multiple labels to your nodes:
$ kubectl label nodes node1 hardware=high-spec
$ kubectl label nodes node2 hardware=low-spec
- Secondly, add a pod that uses those labels:
apiVersion: v1
kind: Pod
metadata:
  name: nodehelloworld.example.com
  labels:
    app: helloworld
spec:
  containers:
  - name: k8s-demo
    image: your-login/docker-demo
    ports:
    - containerPort: 3000
  nodeSelector:
    hardware: high-spec
Health Checks
- If your application malfunctions, the pod and container can still be running, but the application might not work anymore
- To detect and resolve problems with your application, you can run health checks
- You can run 2 different type of health checks
- Running a command in the container periodically
- Periodic checks on a URL (HTTP)
- The typical production application behind a load balancer should always have health checks implemented in some way to ensure availability and resiliency of the app
- This is how a health check looks like on our example container:
apiVersion: v1
kind: Pod
metadata:
  name: nodehelloworld.example.com
  labels:
    app: helloworld
spec:
  containers:
  - name: k8s-demo
    image: your-login/docker-demo
    ports:
    - containerPort: 3000
    livenessProbe:
      httpGet:
        path: /
        port: 3000
      initialDelaySeconds: 15
      timeoutSeconds: 30
Secrets
- Secrets provides a way in Kubernetes to distribute credentials, keys, passwords or “secret” data to the pods
- Kubernetes itself uses this Secrets mechanism to provide the credentials to access the internal API
- You can also use the same mechanism to provide secrets to your application
- Secrets is one way to provide secrets, native to Kubernetes
- There are still other ways your container can get its secrets if you don’t want to use Secrets (e.g. using an external vault services in your app)
- Secrets can be used in the following ways:
- Use secrets as environment variables
- Use secrets as a file in a pod
- This setup uses volumes to be mounted in a container
- In this volume you have files
- Can be used for instance for dotenv files or your app can just read this file
- Use an external image to pull secrets (from a private image registry)
- To generate secrets using files:
$ echo -n "root" > ./username.txt
$ echo -n "password" > ./password.txt
$ kubectl create secret generic db-user-pass --from-file=./username.txt —from-file=./password.txt
secret "db-user-pass" created
- A secret can also be an SSH key or an SSL certificate
$ kubectl create secret generic ssl-certificate --from-file=ssh-privatekey=~/.ssh/id_rsa --ssl-cert-=ssl-cert=mysslcert.crt
- To generate secrets using yaml definitions:
$ echo -n "root" | base64
cm9vdA==
$ echo -n "password" | base64
cGFzc3dvcmQ=
secrets-db-secret.yml
apiVersion: v1
kind: Secret
metadata:
  name: db-secret
type: Opaque
data:
  password: cm9vdA==
  username: cGFzc3dvcmQ=
- After creating the yml file, you can use kubectl create:
$ kubectl create -f secrets-db-secret.yml
secret “db-secret" created
$
Using secrets
- You can create a pod that exposes the secrets as environment variables
apiVersion: v1
kind: Pod
metadata:
  name: nodehelloworld.example.com
  labels:
    app: helloworld
spec:
  containers:
  - name: k8s-demo
    image: your-login/docker-demo
    ports:
    - containerPort: 3000
    env:
      - name: SECRET_USERNAME
        valueFrom:
          secretKeyRef:
            name: db-secret
            key: username
      - name: SECRET_PASSWORD
        [...]
- Alternatively, you can provide the secrets in a file:
apiVersion: v1
kind: Pod
metadata:
  name: nodehelloworld.example.com
  labels:
    app: helloworld
spec:
  containers:
  - name: k8s-demo
    image: your-login/docker-demo
    ports:
    - containerPort: 3000
    volumeMounts:
    - name: credvolume
      mountPath: /etc/creds
      readOnly: true
  volumes:
  - name: credvolume
    secret:
      secretName: db-secrets
The secrets will be stored in: /etc/creds/db-secrets/username /etc/creds/db-secrets/password
Web UI
- Kubernetes comes with a Web UI you can use instead of the kubectl commands
- You can use it to:
- Get an overview of running applications on your cluster
- Creating and modifying individual Kubernetes resources and workloads (like kubectl create and delete)
- Retrieve information on the state of resources (like kubectl describe pod)
- In general, you can access the kubernetes Web UI at https://<kubernetes-master>/ui
- If you cannot access it (for instance if it is not enabled on your deploy type), you can install it manually using:
$ kubectl create -f https://rawgit.com/kubernetes/dashboard/master/src/deploy/kubernetes-dashboard.yaml
- If a password is asked, you can retrieve the password by entering:
$ kubectl config view
- If you are using minikube, you can use the following command to launch the dashboard:
$ minikube dashboard
- Or if you just want to know the url:
$ minikube dashboard --url
Advanced topics
Service Discovery Using DNS
- As of Kubernetes 1.3, DNS is a built-in service launched automatically using the addon manager
- The addons are in the /etc/kubernetes/addons directory on master node
- The DNS service can be used within pods to find other services running on the same cluster
- Multiple containers within 1 pod don’t need this service, as they can contact each other directly
- A container in the same pod can connect the the port of the other container directly using localhost:port
- To make DNS work, a pod will need a Service definition
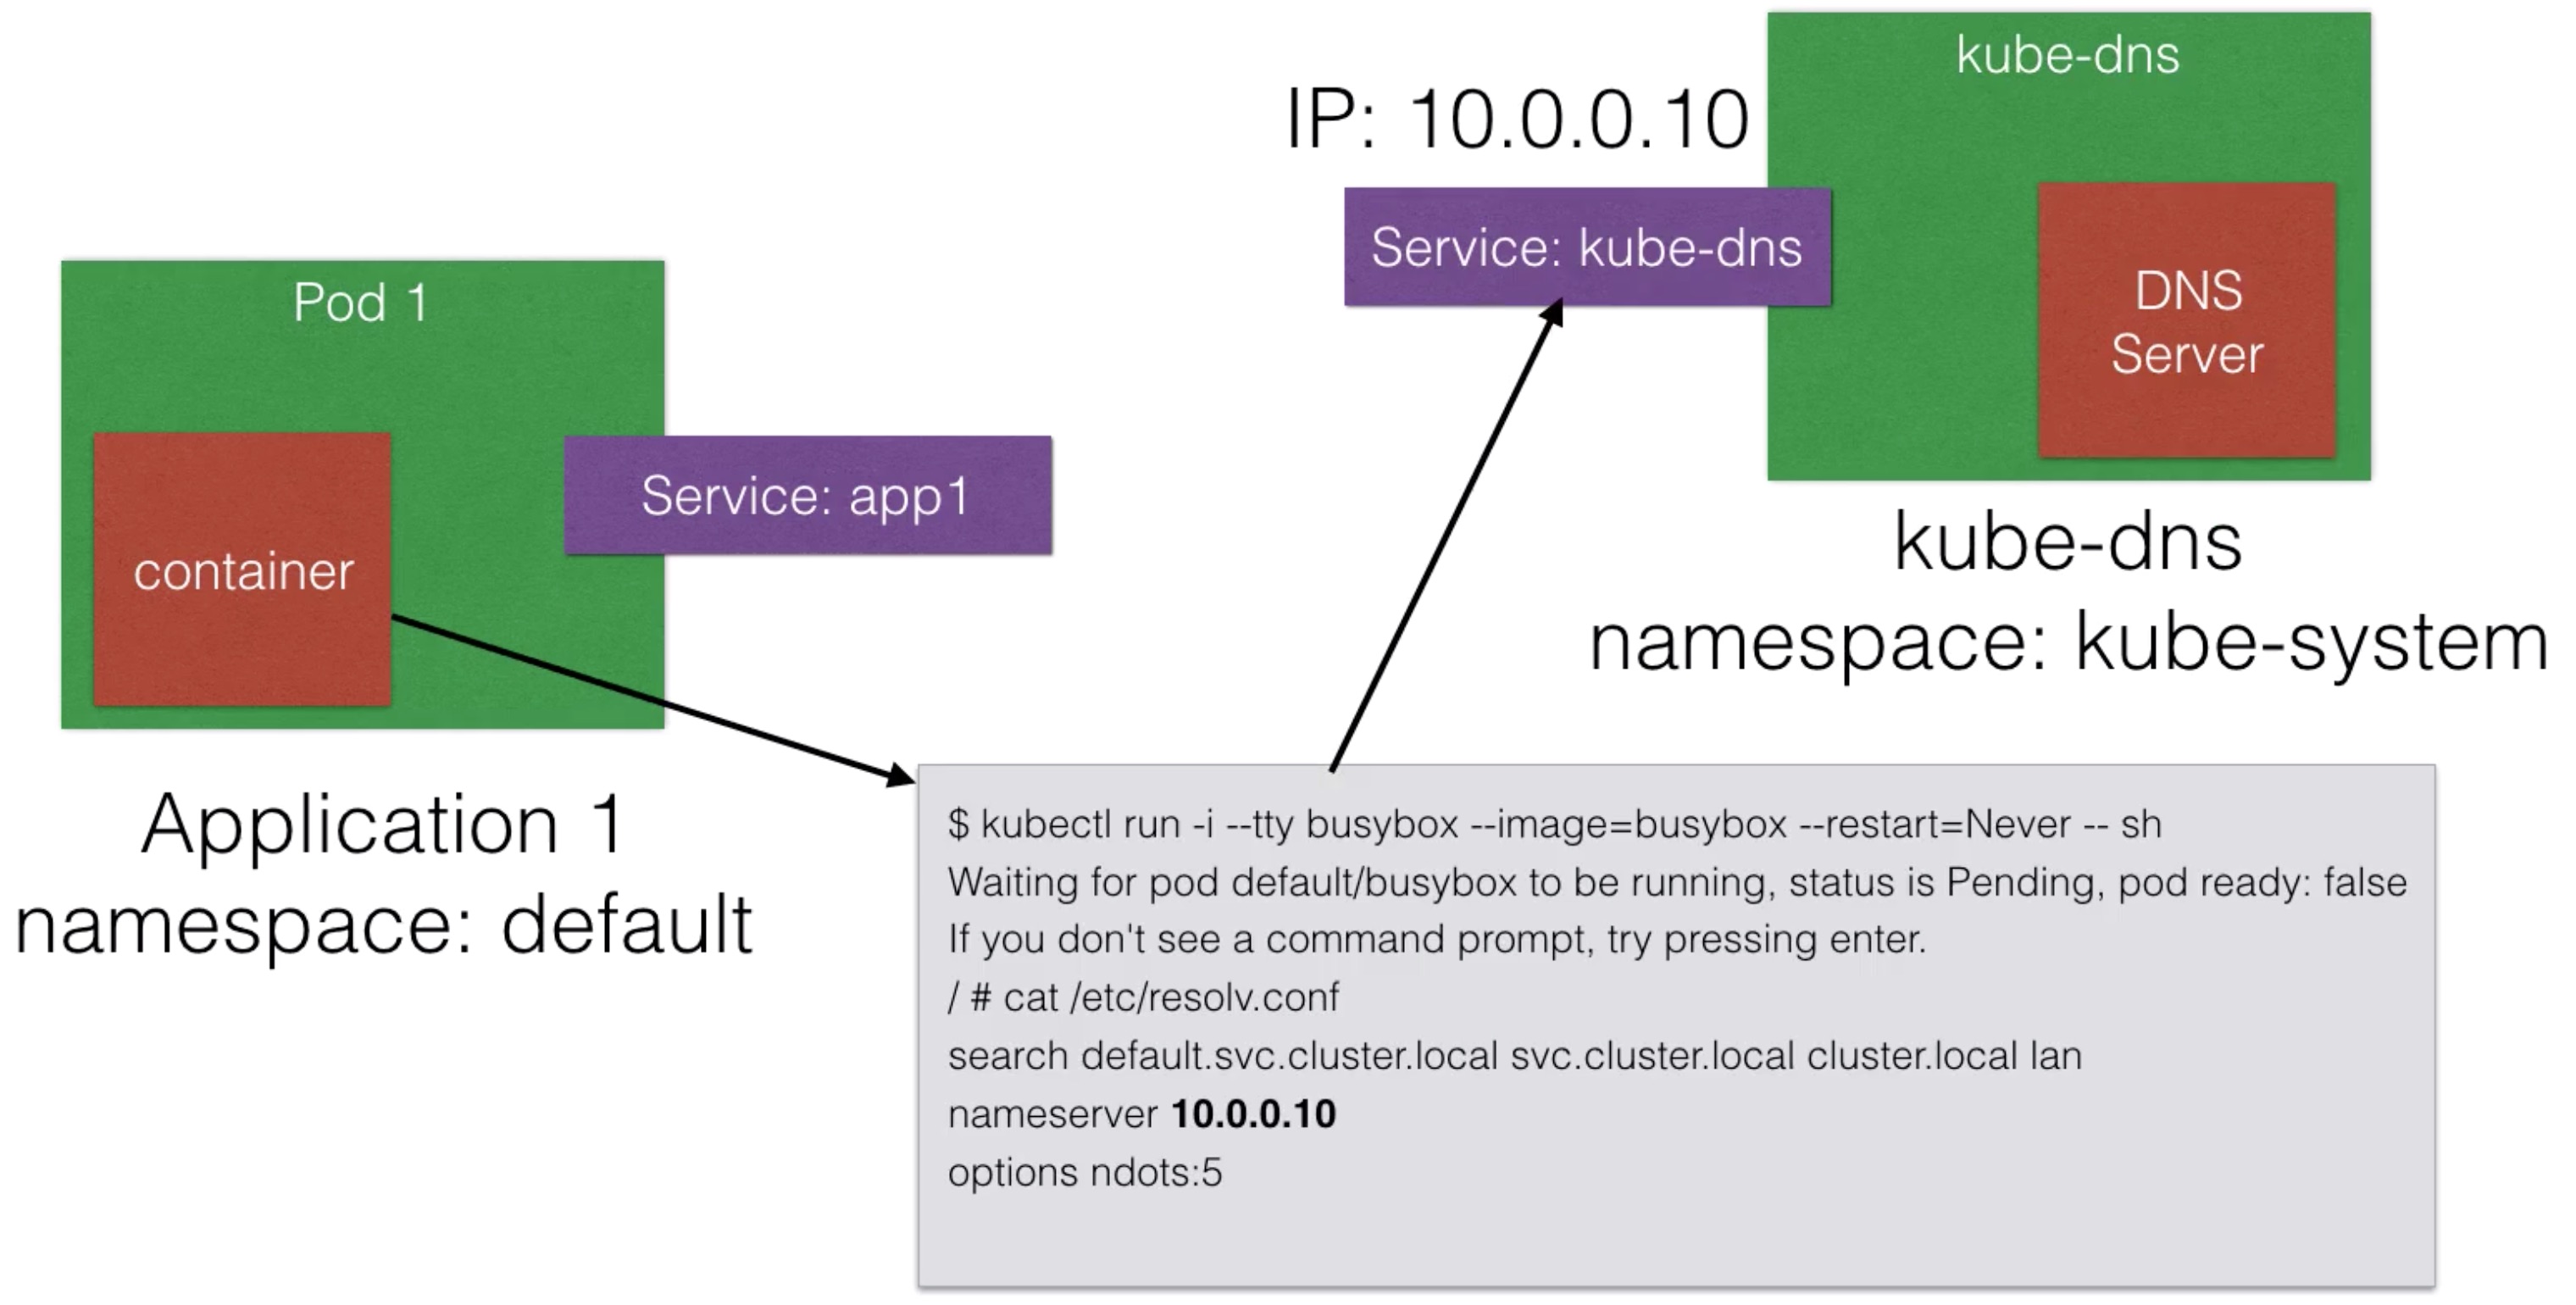
- An example of how app 1 could reach app 2 using DNS:
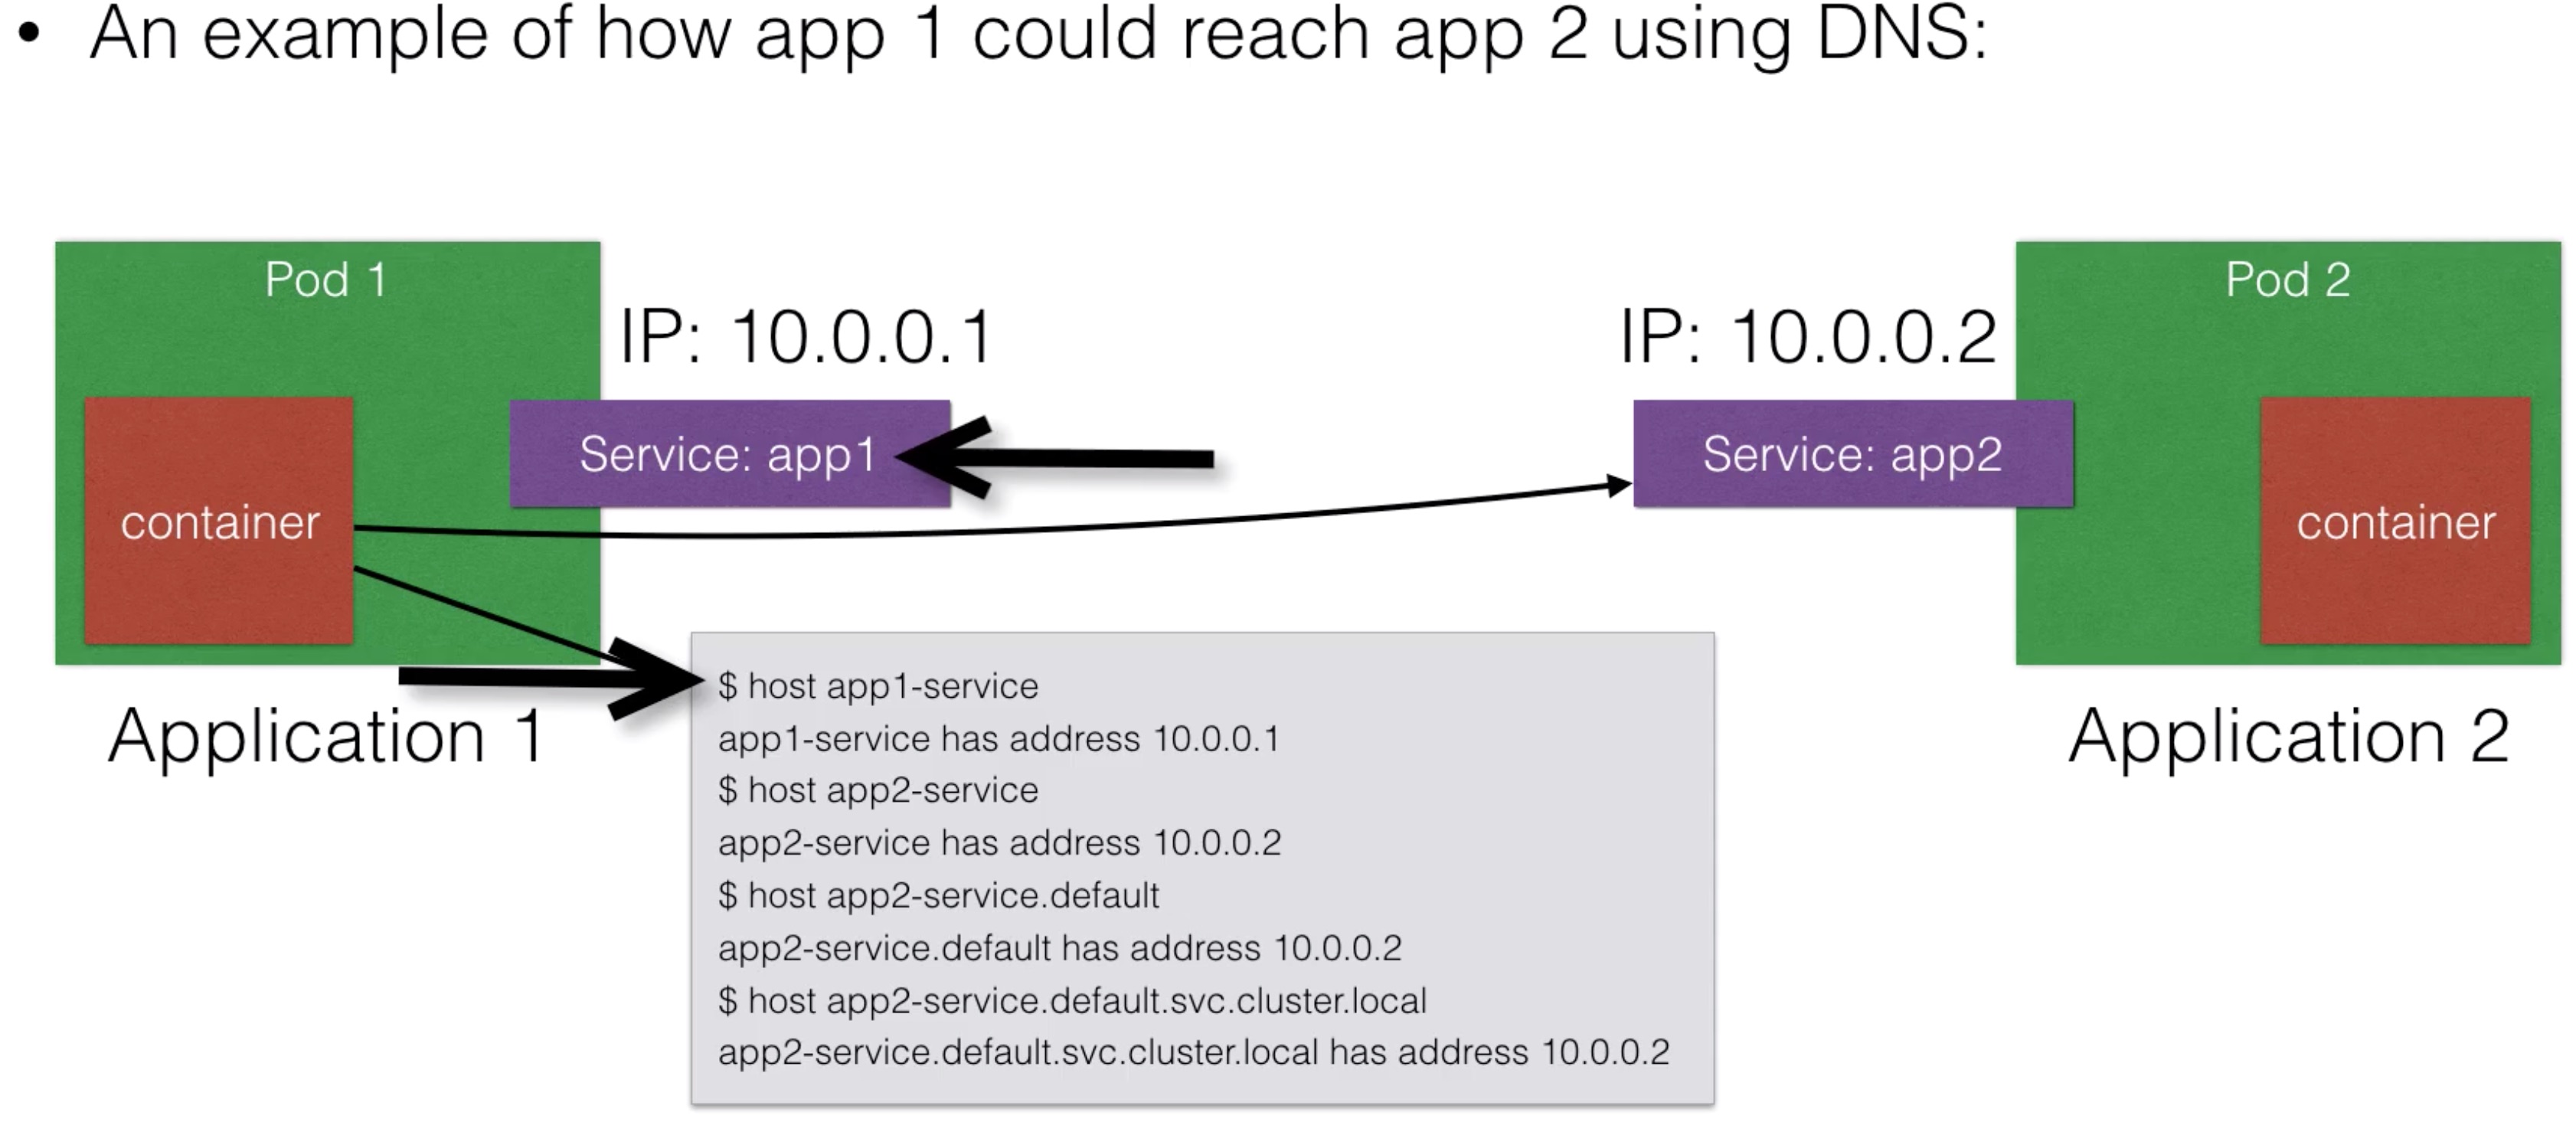
Default stands for the default namespace Pods and services can be launched in different namespaces (to logically separate your cluster)
DNS - How does it work?
ConfigMap
- Configuration parameters that are not secret, can be put in a ConfigMap
- The input is again key-value pairs
- The ConfigMap key-value pairs can then be read by the app using:
- Environment variables
- Container commandline arguments in the Pod configuration
- Using volumes
- A ConfigMap can also contain full configuration files
- e.g. an webserver config file
- This file can then be mounted using volumes where the application expects its config file
- This way you can “inject” configuration settings into containers without changing the container itself
- To generate configmap using files:
$ cat <<EOF > app.properties
driver=jdbc
database=postgres
lookandfeel=1
otherparams=xyz
param.with.hierarchy=xyz
EOF
$ kubectl create configmap app-config —from-file=app.properties
$
Using ConfigMap
- You can create a pod that exposes the ConfigMap using a volume
apiVersion: v1
kind: Pod
metadata:
  name: nodehelloworld.example.com
  labels:
    app: helloworld
spec:
  containers:
  - name: k8s-demo
    image: your-login/docker-demo
    ports:
    - containerPort: 3000
    volumeMounts:
    - name: config-volume
      mountPath: /etc/config
  volumes:
    - name: config-volume
      configMap:
        name: app-config
The config values will be stored in files: /etc/config/driver /etc/config/param/with/hierarchy
- You can create a pod that exposes the ConfigMap as environment variables
apiVersion: v1
kind: Pod
metadata:
  name: nodehelloworld.example.com
  labels:
    app: helloworld
spec:
  containers:
  - name: k8s-demo
    image: your-login/docker-demo
    ports:
    - containerPort: 3000
    env:
      - name: DRIVER
        valueFrom:
          configMapKeyRef:
            name: app-config
            key: driver
      - name: DATABASE
        [...]
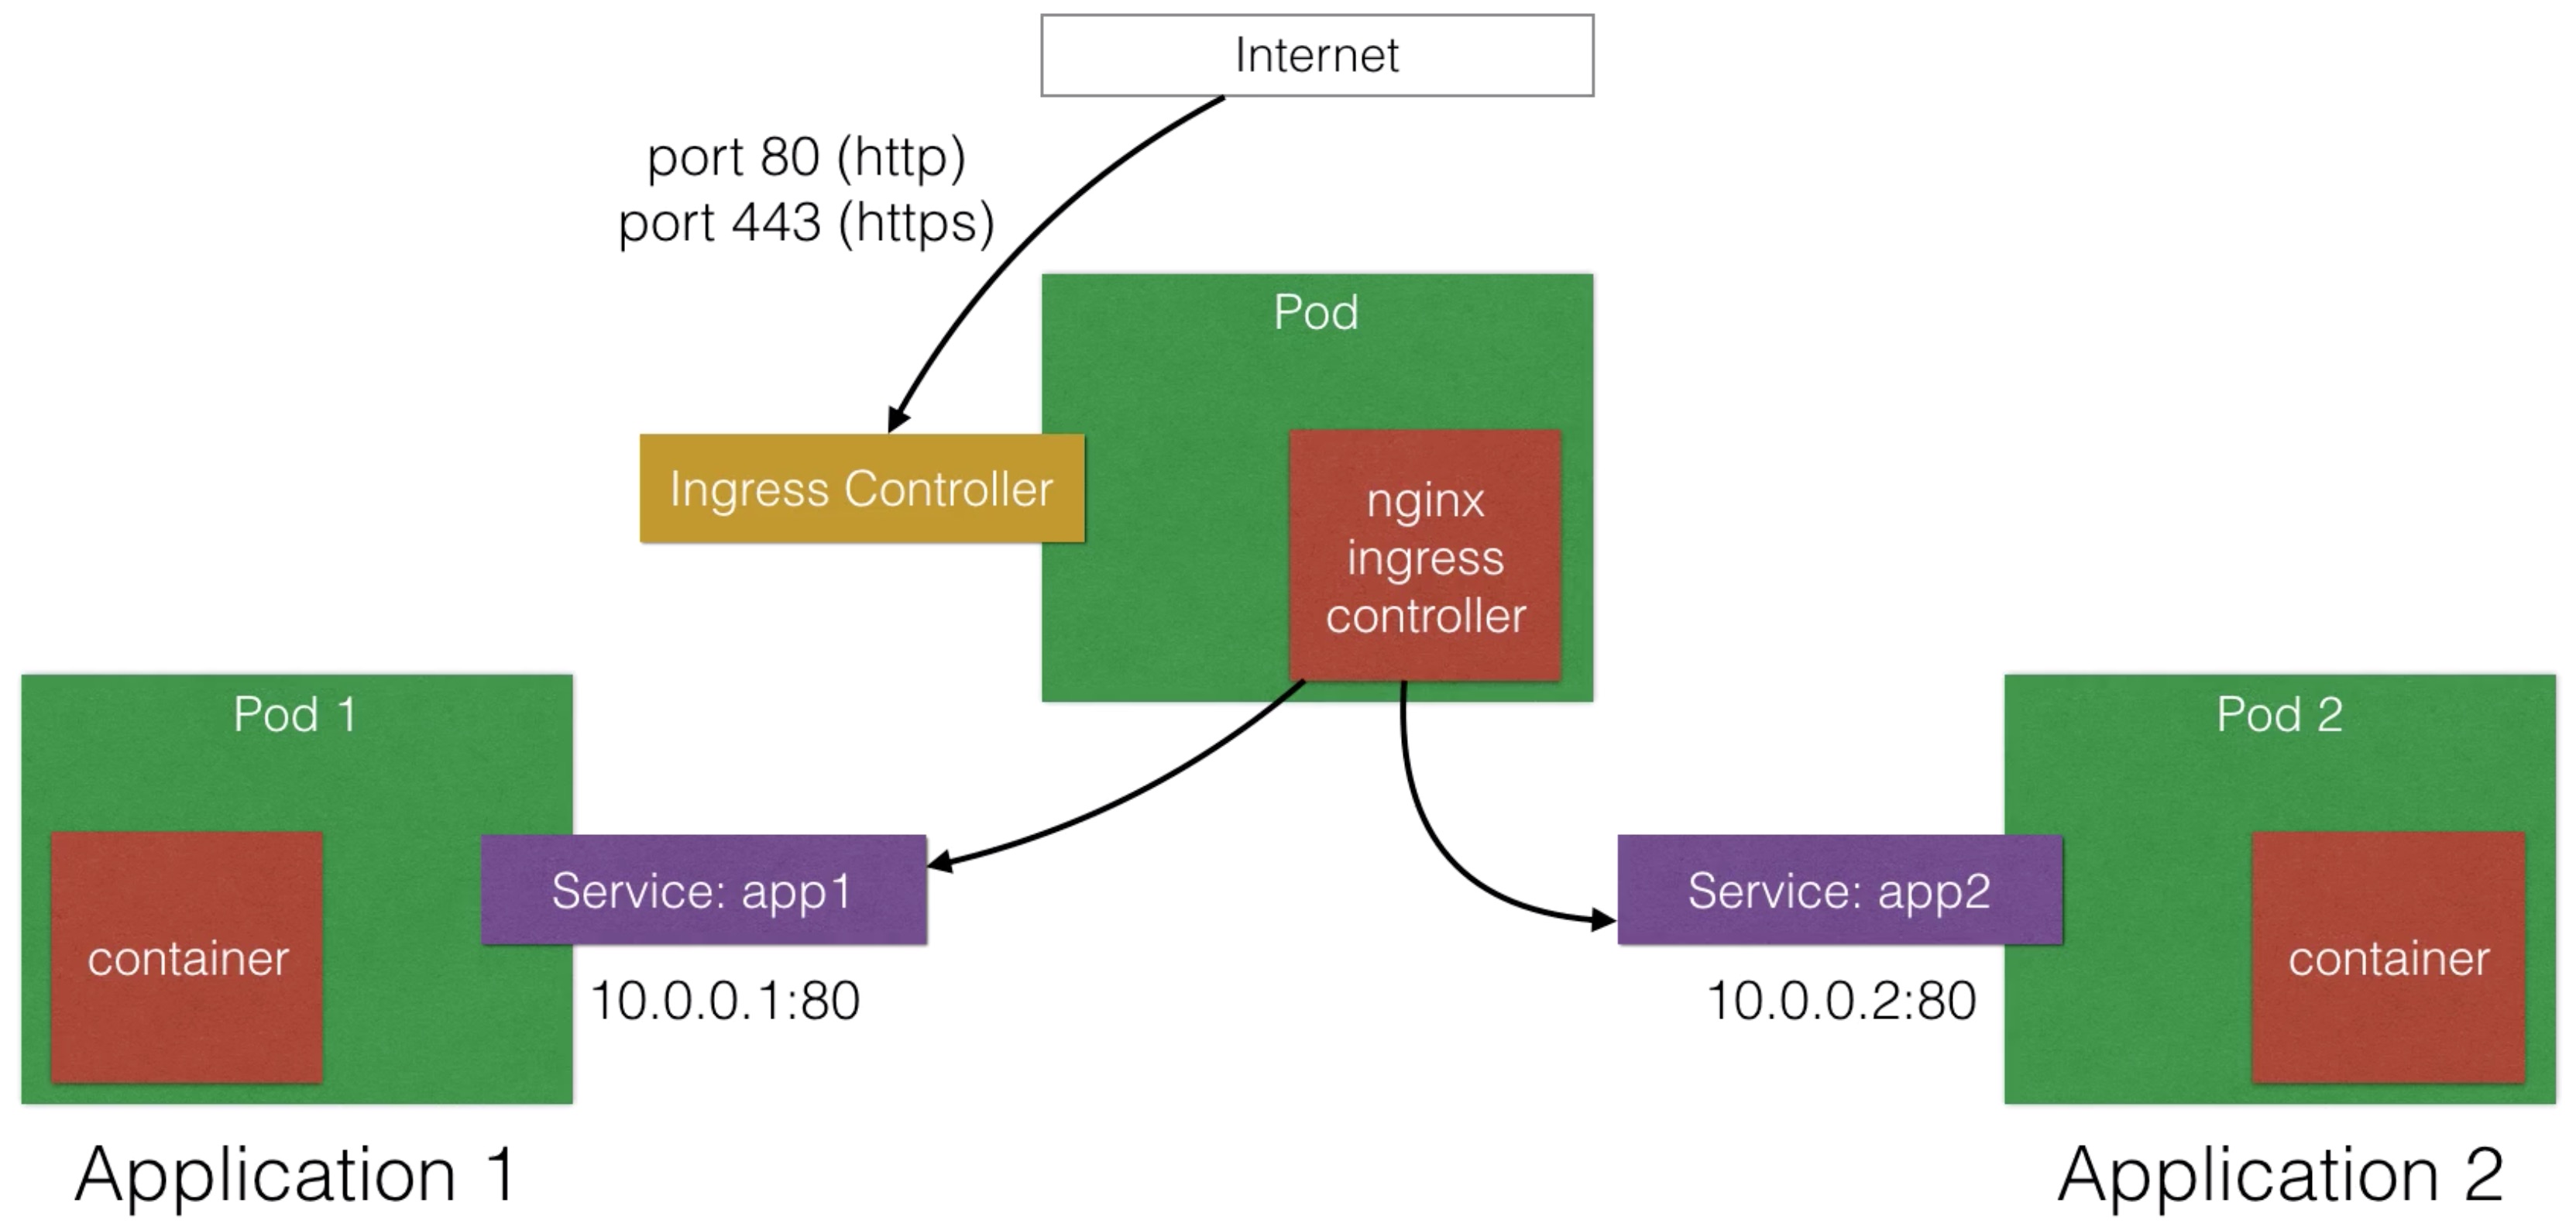
Ingress
- Ingress is a solution available since Kubernetes 1.1 that allows inbound connections to the cluster
- It’s an alternative to the external Loadbalancer and nodePorts
- Ingress allows you to easily expose services that need to be accessible from outside to the cluster
- With ingress you can run your own ingress controller (basically a loadbalancer) within the Kubernetes cluster
- There are a default ingress controllers available, or you can write your own ingress controller
- You can create ingress rules using the ingress object
apiVersion: extensions/v1beta1
kind: Ingress
metadata:
  name: helloworld-rules
spec:
  rules:
  - host: helloworld-v1.example.com
    http:
      paths:
      - path: /
        backend:
          serviceName: helloworld-v1
          servicePort: 80
  - host: helloworld-v2.example.com
    http:
      paths:
      - path: /
        backend:
          serviceName: helloworld-v2
          servicePort: 80
Volumes
- Volumes in Kubernetes allow you to store data outside the container
- When a container stops, all data on the container itself is lost
- That’s why up until now I’ve been using stateless apps: apps that don’t keep a local state, but store their state in an external service
- External Service like a database, caching server (e.g. MySQL, AWS S3)
- That’s why up until now I’ve been using stateless apps: apps that don’t keep a local state, but store their state in an external service
- Persistent Volumes in Kubernetes allow you attach a volume to a container that will exists even when the container stops
- Volumes can be attached using different volume plugins:
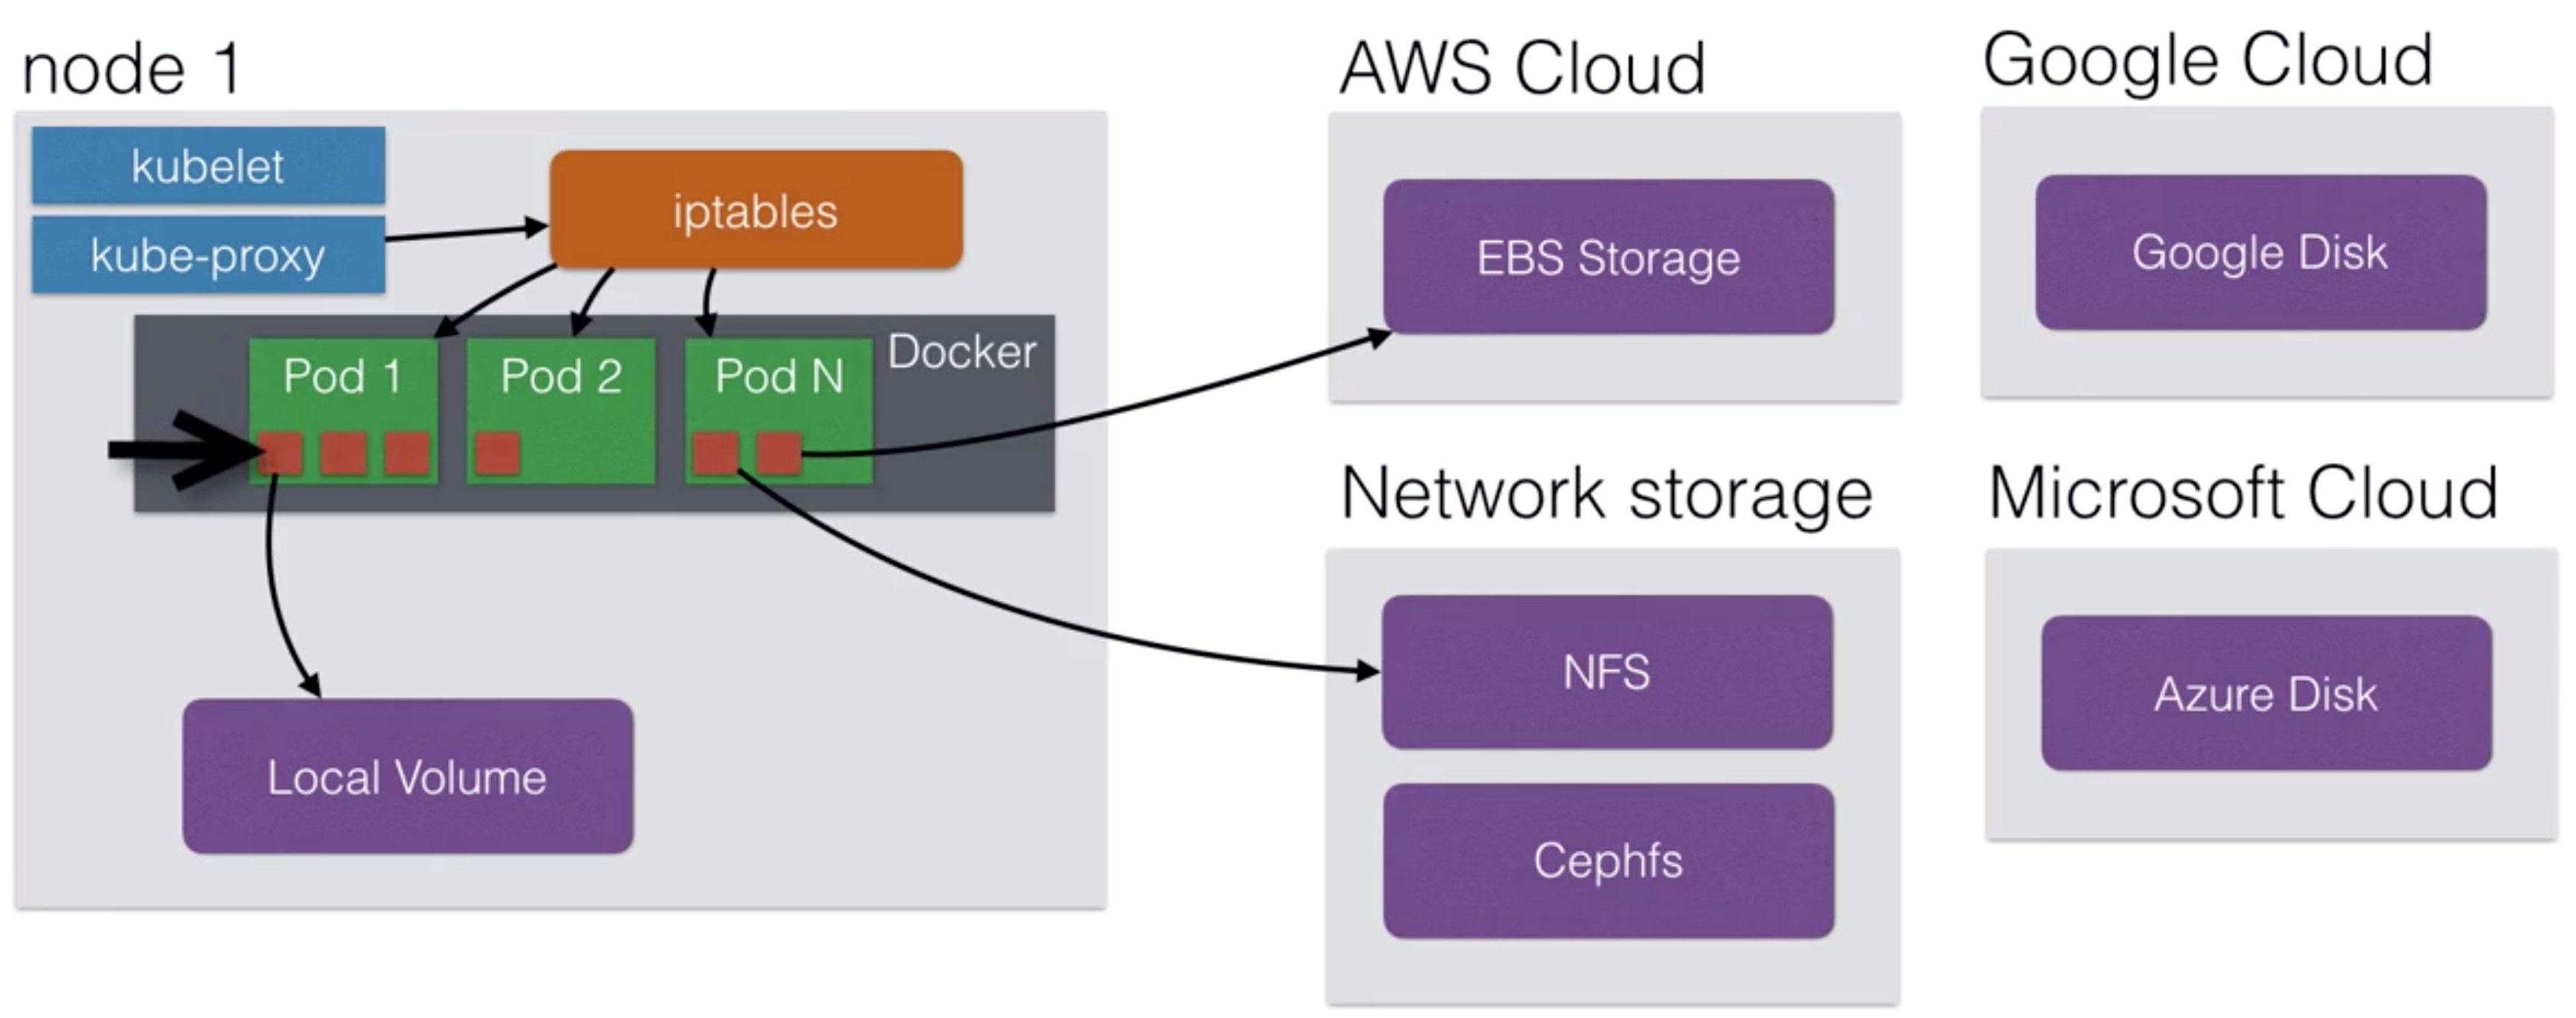
- Using volumes, you could deploy applications with state on your cluster
- Those applications need to read/write to files on the local filesystem that need to be persistent in time
- You could run a MySQL database using persistent volumes
- Although this might not be ready for production (yet)
- Volumes are new since the June 2016 release in Kubernetes, so depending when you’re taking this course - you still might want to be careful about this
- If your node stops working, the pod can be rescheduled on another node, and the volume can be attached to the new node
- To use volumes, you need to create the volume first
$ aws ec2 create-volume --size 10 --region us-east-1 --availability-zone us-east-1a --volume-type gp2
{
  "VolumeId": "vol-055681138509322ee",
  "VolumeType": "gp2",
  "Encrypted": false,
  "CreateTime": "2016-11-08T13:51:33.317Z",
  "AvailabilityZone": "eu-west-1a",
  "Size": 10,
  "SnapshotId": "",
  "Iops": 100,
  "State": "creating"
}
- This will create a 10 GB volume in us-east-1a
- Tip: the nodes where your pod is going to run on also need to be in the same availability zone
- To use volumes, you need to create a pod with a volume definition
[...]
spec:
  containers:
  - name: k8s-demo
    image: your-login/docker-demo
    volumeMounts:
    - mountPath: /myvol
      name: myvolume
    ports:
    - containerPort: 3000
  volumes:
  - name: myvolume
    awsElasticBlockStore:
      volumeID: vol-055681138509322ee
Volumes Provisioning
- The Kubernetes plugins have the capability to provision storage for you
- The AWS Plugin can for instance provision storage for you by creating the volumes in AWS before attaching them to a node
- This is done using the StorageClass object
- It’s best to double check the correct definitions in the documentation (http://kubernetes.io/docs/user-guide/persistent-volumes/)
- To use auto provisioned volumes, you can create the following yaml file:
storage.yml
kind: StorageClass
apiVersion: storage.k8s.io/v1
metadata:
  name: standard
provisioner: kubernetes.io/aws-ebs
parameters:
  type: gp2
  zone: us-east-1
- This will allow you to create volume claims using the aws-ebs provisioner
- Kubernetes will provision volumes of the type gp2 for you (General Purpose - SSD)
- Next, you can create a volume claim and specify the size:
my-volume-claim.yml
kind: PersistentVolumeClaim
apiVersion: v1
metadata:
  name: myclaim
  annotations:
    volume.beta.kubernetes.io/storage-class: "standard"
spec:
  accessModes:
    - ReadWriteOnce
  resources:
    requests:
      storage: 8Gi
- Finally, you can launch a pod using a volume:
my-pod.yml
kind: Pod
apiVersion: v1
metadata:
  name: mypod
spec:
  containers:
    - name: myfrontend
      image: nginx
      volumeMounts:
      - mountPath: "/var/www/html"
        name: mypd
  volumes:
    - name: mypd
      persistentVolumeClaim:
        claimName: myclaim
StatefulSet
Stateful distributed apps on a Kubernetes cluster
- StatefulSet replaces the old PetSet which was a feature starting from Kubernetes 1.3
- It is introduced to be able to run stateful applications that need:
- A stable pod hostname (instead of podname-randomstring)
- Your podname will have an index when having multiple instances of a pod (e.g. podname-0 podname-1 and podname-2)
- A stateful app that requires multiple pods with volumes based on their ordinal number (podname-x) or hostname
- Currently deleting and/or scaling a StatefulSet down will not delete the volumes associated with the StatefulSet.
- A stable pod hostname (instead of podname-randomstring)
- A StatefulSet will allow your stateful app to use DNS to find other peers
- Cassandra clusters, ElasticSearch clusters, use DNS to find other members of the cluster
- One running node of your StatefulSet is called a Set (e.g. 1 node in Cassandra)
- Using StatefulSets you can run for instance 5 cassandra nodes on Kubernetes named cassandra-1 until cassandra-5
- If you wouldn’t use StatefulSets, you would get a dynamic hostname, which you wouldn’t be able to use in your configuration files, as the name can always change
- A pet set will also allow your stateful app to order your startup and teardown of the pets:
- Instead of randomly terminating on Set (one instance of your app), you’ll know which one that will go
- This is useful if you first need to drain the data from a node before it can be shut down
Daemon Sets
- Daemon Sets ensure that every single node in the Kubernetes cluster runs the same pod resource
- This is useful if you want to ensure that a certain pod is running on every single Kubernetes node
- When a node is added to the cluster, a new pod will be started automatically
- Same when a node is removed, the pod will not be rescheduled on another node
- Typical use cases:
- Logging aggregators
- Monitoring
- Load Balancers / Reverse Proxies / API Gateways
- Running a daemon that only needs one instance per physical instance
- This is an example Daemon Set specification:
apiVersion: extensions/v1beta1
kind: DaemonSet
metadata:
  name: monitoring-agent
  labels:
    app: monitoring-agent
spec:
  template:
    metadata:
      labels:
        name: monitor-agent
    spec:
      containers:
      - name: k8s-demo
        image: your-login/docker-demo
        ports:
        - name: nodejs-port
          containerPort: 3000
Resource Usage Monitoring
metrics-serverenables Container Cluster Monitoring and Performance Analysis- It’s providing a monitoring platform for Kubernetes
- It’s a prerequisite if you want to do pod auto-scaling in Kubernetes
metrics-serverexports clusters metrics via REST endpoints- You can use different backends with
metrics-server - Visualizations (graphs) can be shown using Grafana
- The Kubernetes dashboard will also show graphs once monitoring is enabled
Autoscaling
- Kubernetes has the possibility to automatically scale pods based on metrics
- Kubernetes can automatically scale a Deployment, Replication Controller or ReplicaSet
- Autoscaling will periodically query the utilization for the targeted pods
- By default 30 sec, can be changed using the “—horizontal-pod- autoscaler-sync-period” when launching the controller-manager
- Autoscaling will use
metrics-server, the monitoring tool, to gather its metrics and make scaling decisions - An example:
- You run a deployment with a pod with a CPU resource request of 200m
- 200m = 200 millicpu (or also 200 millicores)
- 200m = 0.2, which is 20% of a CPU core of the running node
- If the node has 2 cores, it’s still 20% of a single core
- You introduce auto-scaling at 50% of the CPU usage (which is 100m)
- Horizontal Pod Autoscaling will increase/decrease pods to maintain a target CPU utilization of 50% (or 100m / 10% of a core within this pod)
- This is a pod that you can use to test autoscaling:
apiVersion: extensions/v1beta1
kind: Deployment
metadata:
  name: hpa-example
spec:
  replicas: 3
  template:
    metadata:
      labels:
        app: hpa-example
    spec:
      containers:
      - name: hpa-example
        image: gcr.io/google_containers/hpa-example
        ports:
        - name: http-port
          containerPort: 80
        resources:
          requests:
            cpu: 200m
- This is an example autoscaling specification:
apiVersion: autoscaling/v1
kind: HorizontalPodAutoscaler
metadata:
  name: hpa-example-autoscaler
spec:
  scaleTargetRef:
    apiVersion: extensions/v1beta1
    kind: Deployment
    name: hpa-example
  minReplicas: 1
  maxReplicas: 10
  targetCPUUtilizationPercentage: 50
Affinity and anti-affinity
- Previously we used nodeSelector to make sure pods get scheduled on specific nodes:
apiVersion: extensions/v1beta1
kind: Deployment
metadata:
  name: helloworld-deployment
spec:
  replicas: 3
  template:
    metadata:
      labels:
        app: helloworld
    spec:
      containers:
      - name: k8s-demo
        image: docker-login/your-demo
        [...]
      nodeSelector:
        hardeware: high-spec
The affinity/anti-affinity feature allows you to do more complex scheduling than the nodeSelector and also works on Pods
The language is more expressive
You can create rules that are not hard requirements, but rather a preferred rule, meaning that the scheduler will still be able to schedule your pod, even if the rules cannot be met
You can create rules that take other pod labels into account
- For example, a rule that makes sure 2 different pods will never be on the same node
Kubernetes can do node affinity and pod affinity/anti-affinity
- Node affinity is similar to the nodeSelector
- Pod affinity/anti-affinity allows you to create rules how pods should be scheduled taking into account other running pods
- Affinity/anti-affinity mechanism is only relevant during scheduling. Once a pod is running, it’ll need to be recreated to apply the rules again
There are currently 2 types you can use for node affinity:
- requiredDuringSchedulingIgnoredDuringExecution
- preferedDuringSchedulingIgnoredDuringExecution
The first one sets a hard requirement (like the nodeSelector)
- The rules must be met before the pod can be scheduled
The second type will try to enforce the rule, but it will not guarantee it
- Even if the rule is not met, the pod can still be scheduled, it’s a soft requirement, a preference
spec:
  affinity:
    nodeAffinity:
      requiredDuringSchedulingIgnoredDuringExecution:
        nodeSelectorTerms:
        - matchExpressions:
          - key: env
            operator: In
            values:
            - dev
      preferredDuringSchedulingIgnoredDuringExecution:
      - weight: 1
        preference:
          matchExpressions:
          - key: team
            operator: In
            values:
            - engineering-project1
  containers:
  [...]
The weighting is just to indicate/calculate a score
The higher the weighting, the more weight is given to that rule
When scheduling, Kubernetes will score every node by summarizing the weightings per node
- For example if you have two different rules with weights 1 and 5
- If both rules match, the node will have a score of 6
- If only the rule with weight 1 matches, then the score will be 1
The node that has the highest total score is th one where the pod will be scheduled on
In addition to the labels you can add yourself to nodes, there are pre-populated labels that you can use:
- kubernetes.io/hostname
- failure-domain.beta.kubernetes.io/zone
- failure-domain.beta.kubernetes.io/region
- beta.kubernetes.io/instance-type
- beta.kubernetes.io/os
- beta.kubernetes.io/arch
To see the labels configured on a node:
kubectl describe node <nodename>
- To create a label:
kubectl label node <nodename> key=value (for example env=dev)
Interpod affinity and anti-affinity
This mechanism allows you to influence scheduling based on the labels of other pods that are already running on the cluster
Pods belong to a namespace, so your affinity rules will apply to a specific namespace. If no namespace is given in the specification, it defaults to the namespace of the pod
Similar to node affinity, you have two types of pod affinity/anti-affinity:
- requiredDuringSchedulingIgnoredDuringExecution
- preferedDuringSchedulingIgnoredDuringExecution
The required type creates rules that must be met for the pod to be scheduled, the preferred type is a ‘soft’ type and the rules may be met
A good use case for pod affinity is co-located pods:
- You might want a pod to always be co-located on the same node with another pod
- For example, you have an app that uses Redis as cache and you want to have the Redis pod on the same node as the app itself
Another use-case is to co-locate pods within the same availability zone
When writing your pod affinity and anti-affinity rules, you need to specify a topology domain, called topologyKey in the rules
The topologyKey refers to a node label
If the affinity rule matches, the new pod will only be scheduled on nodes that have the same topologyKey value as the current running pod
Contrary to affinity you might want to use pod anti-affinity
You can use anti-affinity to make sure a pod is only scheduled once on a node
- For example you have 3 nodes and you want to schedule 2 pods but they shouldn’t be scheduled on the same node
- Pod anti-affinity allows you to create a rule that says to not schedule on the same host if a pod label matches
When writing pod affinity rules, you can use the following operators:
- In, NotIn (does a label have one of the values)
- Exists, DoesNotExist (does a label exist or not)
Interpod affinity and anti-affinity currently requires a substantial amount of processing
- You might have to take this into account if you have a lot of rules and a larger cluster (e.g. 100+ nodes)
Taints and tolerations
Previously we talked about node affinity
Tolerations is the opposite of node affinity
- Tolerations allow a node to repel a set of pods
- Taints mark a node, tolerations are applied to pods to influence the scheduling of the pods
One use case for taints is to make sure that when you create a new pod, they are not scheduled on the master
- The master has a taint (node-role.kubernetes.io/master:NoSchedule)
To add a new taint to a node you can use kubectl taint
kubectl taint nodes node1 key=value:NoSchedule
- This will make sure that no pods are scheduled on node1, as long as they don’t have a matching toleration
- The following toleration would allow a new pod to be scheduled on the tainted node1
tolerations:
- key: "key"
  operator: "Equal"
  value: "value"
  effect: "NoSchedule"
Tolerations are added to the Pod specification
You can use the following operators:
- Equal: providing a key and a value
- Exists: only providing a key, checking only whether a key exists
Just like affinity, taints can also be a preference (or “soft”) rather than a requirement:
- NoSchedule: a hard requirement that a pod will not be scheduled unless there is a matching toleration
- PreferNoSchedule: Kubernetes will try and avoid placing a pod that doesn’t have a matching toleration, but it’s not a hard requirement
If the taint is applied while there are already running pods, these will not be evicted unless the following taint type is used:
- NoExecute: evict pods with non-matching tolerations
When using NoExecute, you can specify within your toleration how long the pod can run on a tainted node before being evicted:
tolerations:
- key: "key"
  operator: "Equal"
  value: "value"
  effect: "NoExecute"
  tolerationSeconds: 3600
If you don’t specify the tolerationSeconds, the toleration will match and the pod will keep on running on the node
In the above example, the toleration will only match for 1 hour, after that the pod will be evicted from the node
Example use cases for taints and tolerations are:
- The existing node taints for master nodes
- Taint nodes that are dedicated for a team or a user
- If you have a few nodes with specific hardware (for example GPUs), you can taint them to avoid running non-specific applications on those nodes
In version 1.12 a feature to taint nodes by condition is promoted to beta
- This will automatically taint nodes that have node problems, allowing you to add tolerations to time the eviction of pods from the nodes
Example of this feature:
tolerations:
- key: "node.beta.kubernetes.io/unreachable"
  operator: "Exists"
  effect: "NoExecute"
  tolerationSeconds: 3600
Some taints to take into consideration when you implement tolerations:
- node.kubernetes.io/not-ready: Node is not ready
- node.kubernetes.io/unreachable: Node is unreachable from the node controller
- node.kubernetes.io/out-of-disk: Node becomes out of disk
- node.kubernetes.io/memory-pressure: Node had memory pressure
- node.kubernetes.io/disk-pressure: Node has disk-pressure
- node.kubernetes.io/network-unavailable: Node’s network is unavailable
- node.kubernetes.io/unschedulable: Node is unschedulable
Custom Resource Definitions
Custom Resource Definitions lets you extend the Kubernetes API
Resources are the endpoints in the Kubernetes API that store collections of API objects
- For example, there’s a built-in Deployment resource that you can use to deploy applications
- In the yaml files yo describe the object, using the Deployment resource type
- You create the object on the cluster by using kubectl
A custom resource is a resource that you might add to your cluster, it’s not available on every cluster
It’s an extension of the Kubernetes API
Custom Resources are also described in yaml files
As an administrator you can dynamically add CRDs (Custom Resource Definitions) in order to add extra functionality to your cluster
Operators use these CRDs to extend the Kubernetes API with their own functionality
Operators
An Operator is a method of packaging, deploying and managing a Kubernetes Application (https://coreos.com/operators)
It puts operational knowledge in an application
- It brings the user closer to the experience of managed cloud services, rather than having to know all the specifics of an application deployed to Kubernetes
- Once an Operator is deployed, it can be managed using Custom Resource Definitions
It also provides a great way to deploy Stateful services on Kubernetes because a lot of complexities can be hidden from the end-user
Any third party can create operators that you can start using
There are operators for Prometheus, Vault, Rook, MySQL, PostgreSQL, and so on
If for example you would deploy a PostgresQL container it would only start the database
If, on the other hand, you would use the PostgreSQL Operator, it’ll allow you to also create replicas, initiate a failover, create backups, scale, …
- An operator contains a lot of the management logic that you as an administrator or user might want, rather than having to implement is yourself
Example yaml extract using a Custom Resource from a PostgreSQL operator
apiVersion: cr.client-go.k8s.io/v1
kind: Pgcluster
metadata:
  labels:
    archive: "false"
    archive-timeout: "60"
    crunchy_collect: "false"
    name: mycluster
    pg-cluster: mycluster
    primary: "true"
  name: mycluster
  namespace: default
Kubernetes Administration
Master Services

Resource Quotas
- When a Kubernetes cluster is used by multiple people or teams, resource management becomes more important
- You want to be able to manage the resources you give to a person or a team
- You don’t want one person or team taking up all the resources (e.g. CPU/Memory) of the cluster
- You can divide your cluster in namespaces (explained in next lecture) and enable resource quotas on it
- You can do this using the ResourceQuota and ObjectQuota objects
- Each container can specify request capacity and capacity limits
- Request capacity is an explicit request for resources
- The scheduler can use the request capacity to make decisions on where to put the pod on
- You can see it as a minimum amount of resources the pod needs
- Resource limit is a limit imposed to the container
- The container will not be able to utilize more resources than specified
- Request capacity is an explicit request for resources
- Example of resource quotas:
- You run a deployment with a pod with a CPU resource request of 200m
- 200m = 200 millicpu (or also 200 millicores)
- 200m = 0.2, which is 20% of a CPU core of the running node
- If the node has 2 cores, it’s still 20% of a single core
- You can also put a limit, e.g. on 400m
- Memory quotas are defined by MiB or GiB
- If a capacity quota (e.g. mem / cpu) has been specified by the administrator, then each pod needs to specify capacity quota during creation
- The administrator can specify default request values for pods that don’t specify any values for capacity
- The same is valid for limit quotas
- If a resource is requested more than the allowed capacity, the server API will give an error 403 FORBIDDEN - and kubectl will show an error
- The administrator can set the following resource limits within a namespace:
| Resource | Description |
| requests.cpu | The sum of CPU requests of all pods cannot exceed this value |
| requests.mem | The sum of MEM requests of all pods cannot exceed this value |
| requests.storage | The sum of storage requests of all persistent volume claims cannot exceed this value |
| limits.cpu | The sum of CPU limits of all pods cannot exceed this value |
| limits.memory | The sum of MEM limits of all pods cannot exceed this value |
- The administrator can set the following object limits:
| Resource | Description |
| configmaps | total number of configmaps that can exist in a namespace |
| persistentvolumeclaims | total number of persistent volume claims that can exist in a namespace |
| pods | total number of pods that can exist in a namespace |
| replicationcontrollers | total number of replicationcontrollers that can exist in a namespace |
| resourcequotas | total number of resource quotas that can exist in a namespace |
| services | total number of services that can exist in a namespace |
| services.loadbalancer | total number of load balancers that can exist in a namespace |
| services.nodeports | total number of nodeports that can exist in a namespace |
| secrets | total number of secrets that can exist in a namespace |
Namespaces
- Namespaces allow you to create virtual clusters within the same physical cluster
- Namespaces logically separates your cluster
- The standard namespace is called “default” and that’s where all resources are launched in by default
- There is also namespace for Kubernetes specific resources, called kube-system
- Namespaces are intended when you have multiple teams / projects using the Kubernetes cluster
- The name of resources need to be unique within a namespace, but not across namespaces
- e.g. you can have the deployment “helloworld” multiple times in different namespaces, but not twice in one namespace
- You can divide resources of a Kubernetes cluster using namespaces
- You can limit resources on a per namespace basis
- e.g. the marketing team can only use a maximum of 10 GiB of memory, 2 loadbalancers, 2 CPU cores
- First you need to create a new namespace
$ kubectl create namespace myspace
- You can list namespaces:
$ kubectl get namespaces
NAME        LABELS STATUS
default     <none> Active
kube-system <none> Active
myspace     <none> Active
- You can set a default namespace to launch resources in:
$ export CONTEXT=$(kubectl config view | awk '/current-context/ {print $2}’)
$ kubectl config set-context $CONTEXT —namespace=myspace
- You can then create resource limits within that namespace:
apiVersion: v1
kind: ResourceQuota
metadata:
  name: compute-resources
  namespace: myspace
spec:
  hard:
    requests.cpu: "1"
    requests.memory: 1Gi
    limits.cpu: "2"
    limits.memory: 2Gi
- You can also create object limits:
apiVersion: v1
kind: ResourceQuota
metadata:
  name: object-counts
  namespace: myspace
spec:
  hard:
    configmaps: "10"
    persistentvolumeclaims: "4"
    replicationcontrollers: "20"
    secrets: "10"
    services: "10"
    services.loadbalancers: "2"
- Note: All those quota limits are in absolute numbers
User Management
- There are 2 types of users you can create
- A normal user, which is used to access the user externally
- e.g. through kubectl
- This user is not managed using objects
- A Service user, which is managed by an object in Kubernetes
- This type of user is used to authenticate within the cluster
- e.g. from inside a pod, or from a kubelet
- These credentials are managed like Secrets
- A normal user, which is used to access the user externally
- There are multiple authentication strategies for normal users:
- Client Certificates
- Bearer Tokens
- Authentication Proxy
- HTTP Basic Authentication
- OpenID
- Webhooks
- Service Users are using Service Account Tokens
- They are stored as credentials using Secrets
- Those Secrets are also mounted in pods to allow communication between the services
- Service Users are specific to a namespace
- They are created automatically by the API or manually using objects
- Any API call not authenticated is considered as an anonymous user
- Independently from the authentication mechanism, normal users have the following attributes:
- a Username (e.g. user123 or user@email.com)
- a UID
- Groups
- Extra fields to store extra information
- After a normal users authenticates, it will have access to everything
- To limit access, you need to configure authorization
- There are again multiple offerings to choose from:
- AlwaysAllow / AlwaysDeny
- ABAC (Attribute-Based Access Control)
- RBAC (Role Based Access Control)
- Webhook (authorization by remote service)
- The ABAC needs to be configured manually
- RBAC uses the rbac.authorization.k8s.io API group
- This allows admins to dynamically configure permissions through the API
RBAC
After authentication, authorization controls what the user can do, where does the user have access to
The access controls are implemented on an API level (kube-apiserver)
When an API request comes in, e.g. when you enter kubectl get nodes, it will be checked to see whether you have permissions to execute this command
There are multiple authorization modules available:
Node: a special purpose authorization mode that authorizes API requests made by kubelets
ABAC: attribute-based access control
- Access rights are controlled by policies that combine attributes
- e.g. user “alice” can do anything in namespace “marketing”
- ABAC does not allow very granular permission control
RBAC: role based access control
- Regulates access using roles
- Allows admins to dynamically configure permission policies
Webhook: sends authorization request to an external REST interface
- Interesting option if you want to write your own authorization server
- You can parse the incoming payload (which is JSON) and reply with access granted or access denied
To enable an authorization mode, you need to pass –authorization-mode= to the API server at startup
Most tools now provision a cluster with RBAC enabled by default
You can add RBAC resources with kubectl to grant permissions
- You first describe them in yaml format, then apply them to the cluster
First you define a role, then you can assign users/groups to that role
You can create roles limited to a namespace or you can create roles where the access applies to all namespaces
- Role (single namespace) and ClusterRole (cluster-wide)
- RoleBinding (single namespace) and ClusterRoleBinding (cluster-wide)
RBAC Role granting read access to ods and secrets within default namespace
apiVersion: rbac.authorization.k8s.io/v1
kind: Role
metadata:
  namespace: default
  name: pod-reader
rules:
- apiGroups: [""]
  resources: ["pods", "secrets"]
  verbs: ["get", "watch", "list"]
- Next step is to assign users to the newly created role
apiVersion: rbac.authorization.k8s.io/v1
kind: RoleBinding
metadata:
  name: read-pods
  namespace: default
subjects:
- kind: User
  name: bob
  apiGroup: rbac.authorization.k8s.io
roleRef:
  kind: Role
  name: pod-reader
  apiGroup: rbac.authorization.k8s.io
- If you rather want to create a role that spans all namespaces, you can use the ClusterRole
apiVersion: rbac.authorization.k8s.io/v1
kind: ClusterRole
metadata:
  name: pod-reader-clusterwide
rules:
- apiGroups: [""]
  resources: ["pods", "secrets"]
  verbs: ["get", "watch", "list"]
- If you need to assign a user to a cluster-wide role you need to use the ClusterRoleBinding
apiVersion: rbac.authorization.k8s.io/v1
kind: ClusterRoleBinding
metadata:
  name: read-pods
subjects:
- kind: User
  name: alice
  apiGroup: rbac.authorization.k8s.io
roleRef:
  kind: Role
  name: pod-reader-clusterwide
  apiGroup: rbac.authorization.k8s.io
Networking
- The approach to networking is quite different than in a default Docker setup
- In this course I already covered:
- Container to container communication within a pod
- Through localhost and the port number
- Pod-To-Service communication
- Using NodePort, using DNS
- External-To-Service
- Using LoadBalancer, NodePort
- Container to container communication within a pod
- In Kubernetes, the pod itself should always be routable
- This is Pod-to-Pod communication
- Kubernetes assumes that pods should be able to communicate to other pods, regardless of which node they are running
- Every pod has its own IP address
- Pods on different nodes need to be able to communicate to each other using those IP addresses
- This is implemented differently depending on your networking setup
- On AWS: kubenet networking (kops default)
- Every pod can get an IP that is routable using the AWS Virtual Private Network (VPC)
- The Kubernetes master allocates a /24 subnet to each node (254 IP addresses)
- This subnet is added to the VPCs route table
- There is a limit of 50 entries, which means you can’t have more than 50 nodes in a single AWS cluster
- Although, AWS can raise this limit to 100, but it might have a performance impact
- Not every cloud provider has VPC-technology (although GCE, Azure does as well)
- There are alternatives available
- Container Network Interface (CNI)
- Software that provides libraries / plugins for network interfaces within containers
- Popular solutions are Calico, Weave (standalone or with CNI)
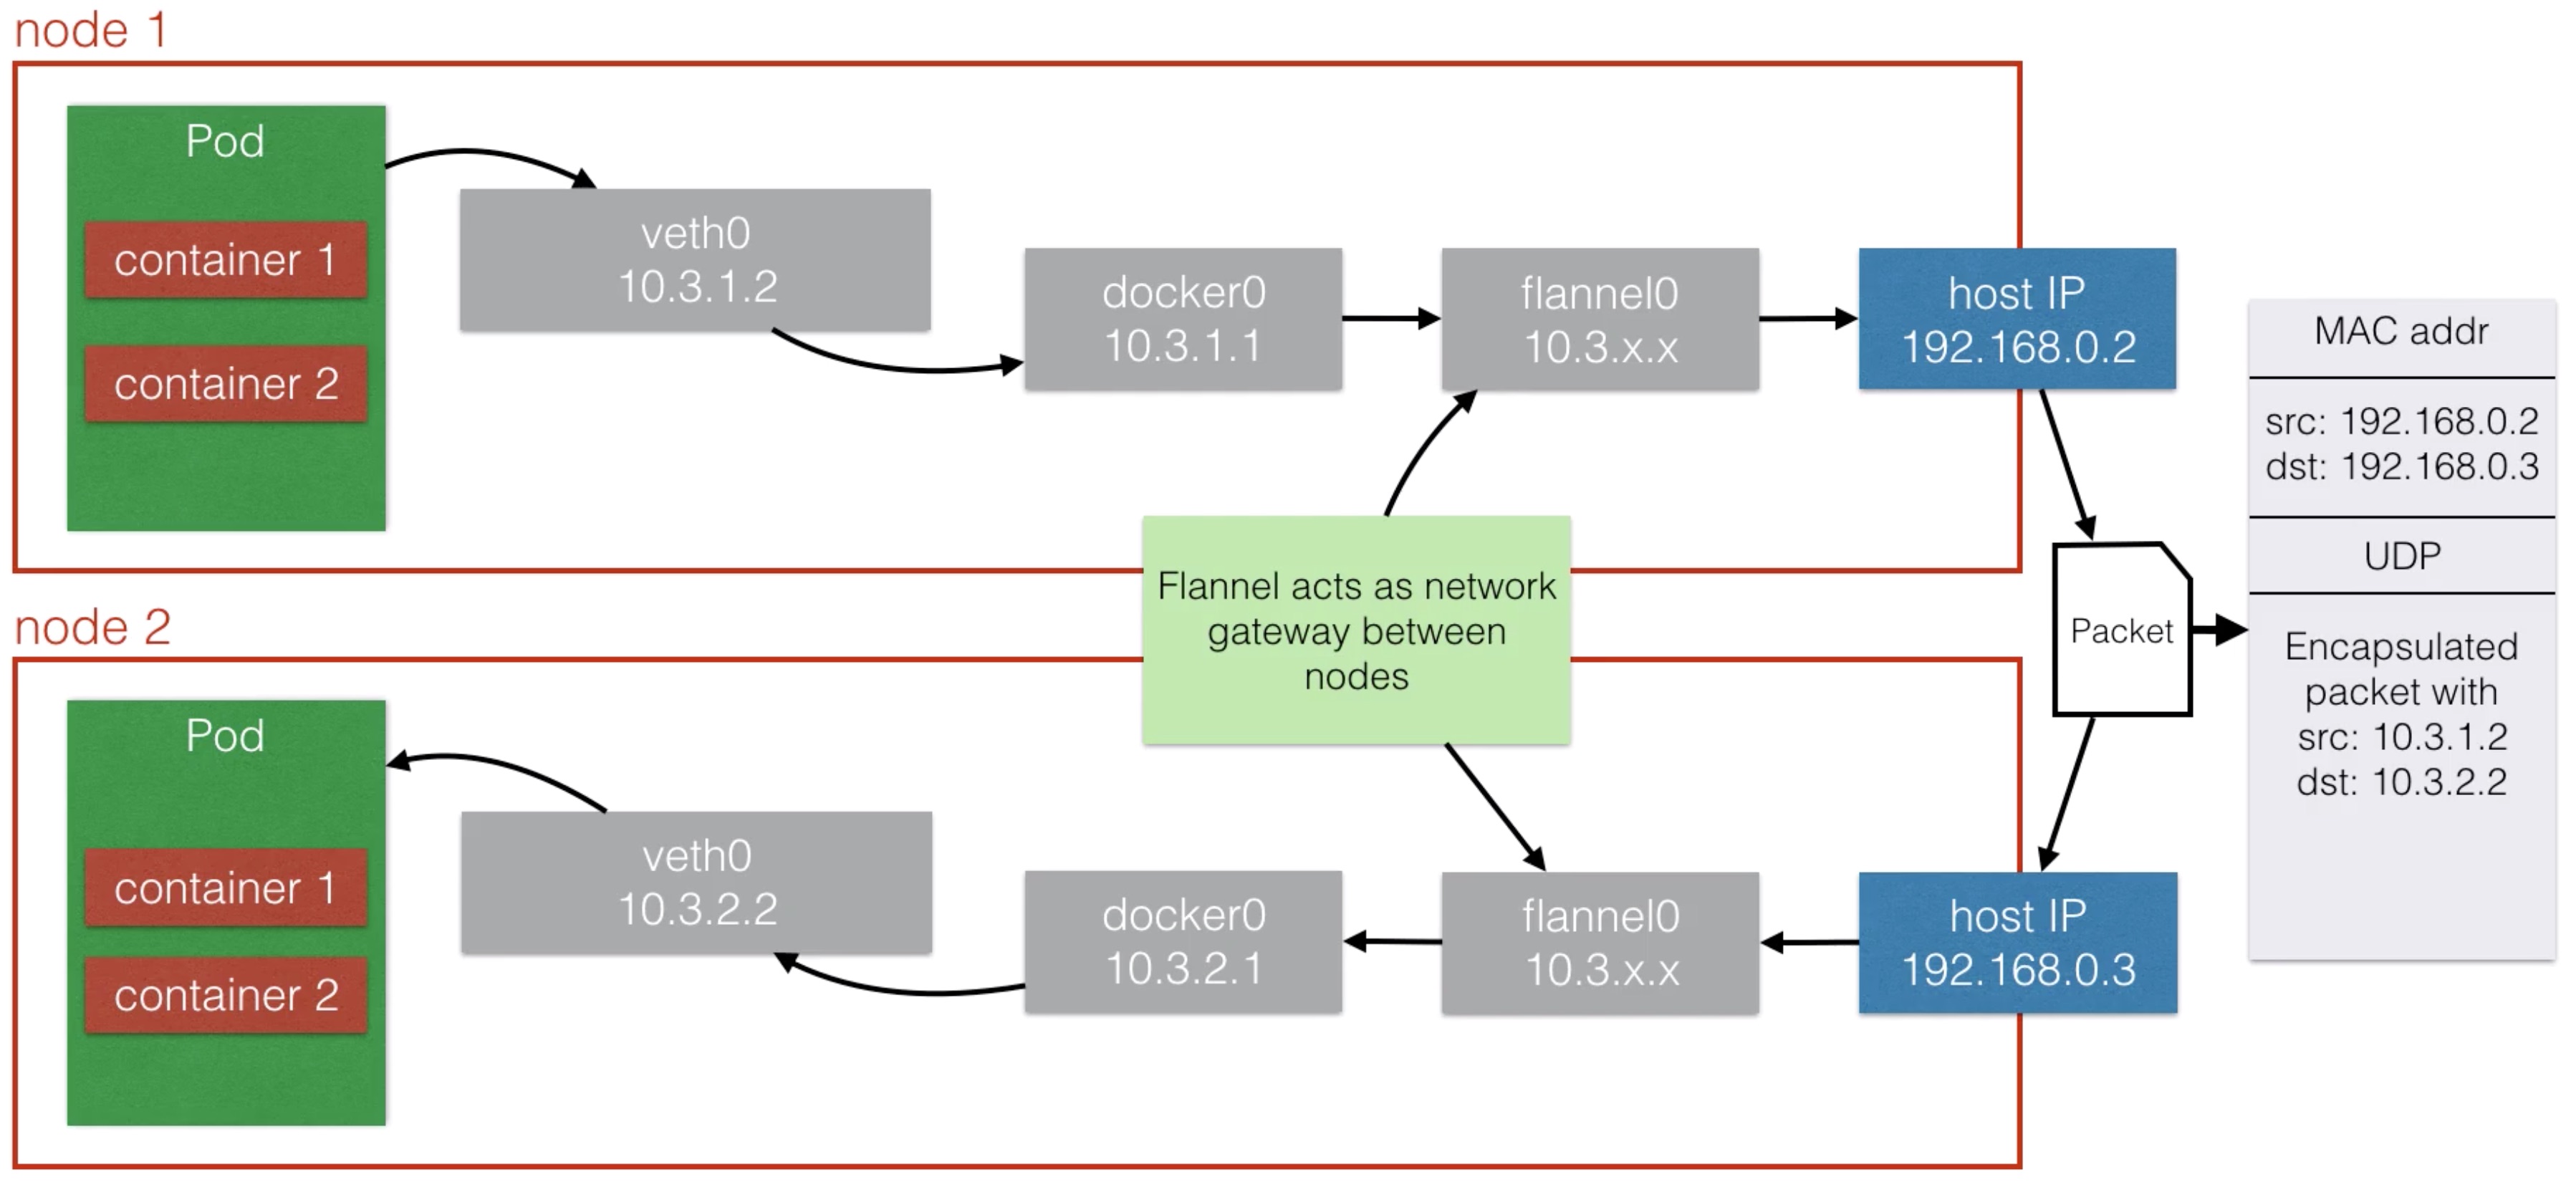
- An Overlay Network
- Flannel is an easy and popular way
- Container Network Interface (CNI)
Node Maintenance
- It is the Node Controller that is responsible for managing the Node objects
- It assigns IP space to the node when a new node is launched
- It keeps the node list up to date with the available machines
- The node controller is also monitoring the health of the node
- If a node is unhealthy it gets deleted
- Pods running on the unhealthy node will then get rescheduled
- When adding a new node, the kubelet will attempt to register itself
- This is called self-registration and is the default behavior
- It allows you to easily add more nodes to the cluster without making API changes yourself
- A new node object is automatically created with:
- The metadata (with a name: IP or hostname)
- Labels (e.g. cloud region / availability zone / instance size)
- A node also has a node condition (e.g. Ready, OutOfDisk)
- When you want to decommission a node, you want to do it gracefully
- You drain a node before you shut it down or take it out of the cluster
- To drain a node, you can use the following command:
$ kubectl drain nodename --grace-period=600
- If the node runs pods not managed by a controller, but is just a single pod:
$ kubectl drain nodename --force
High Availability
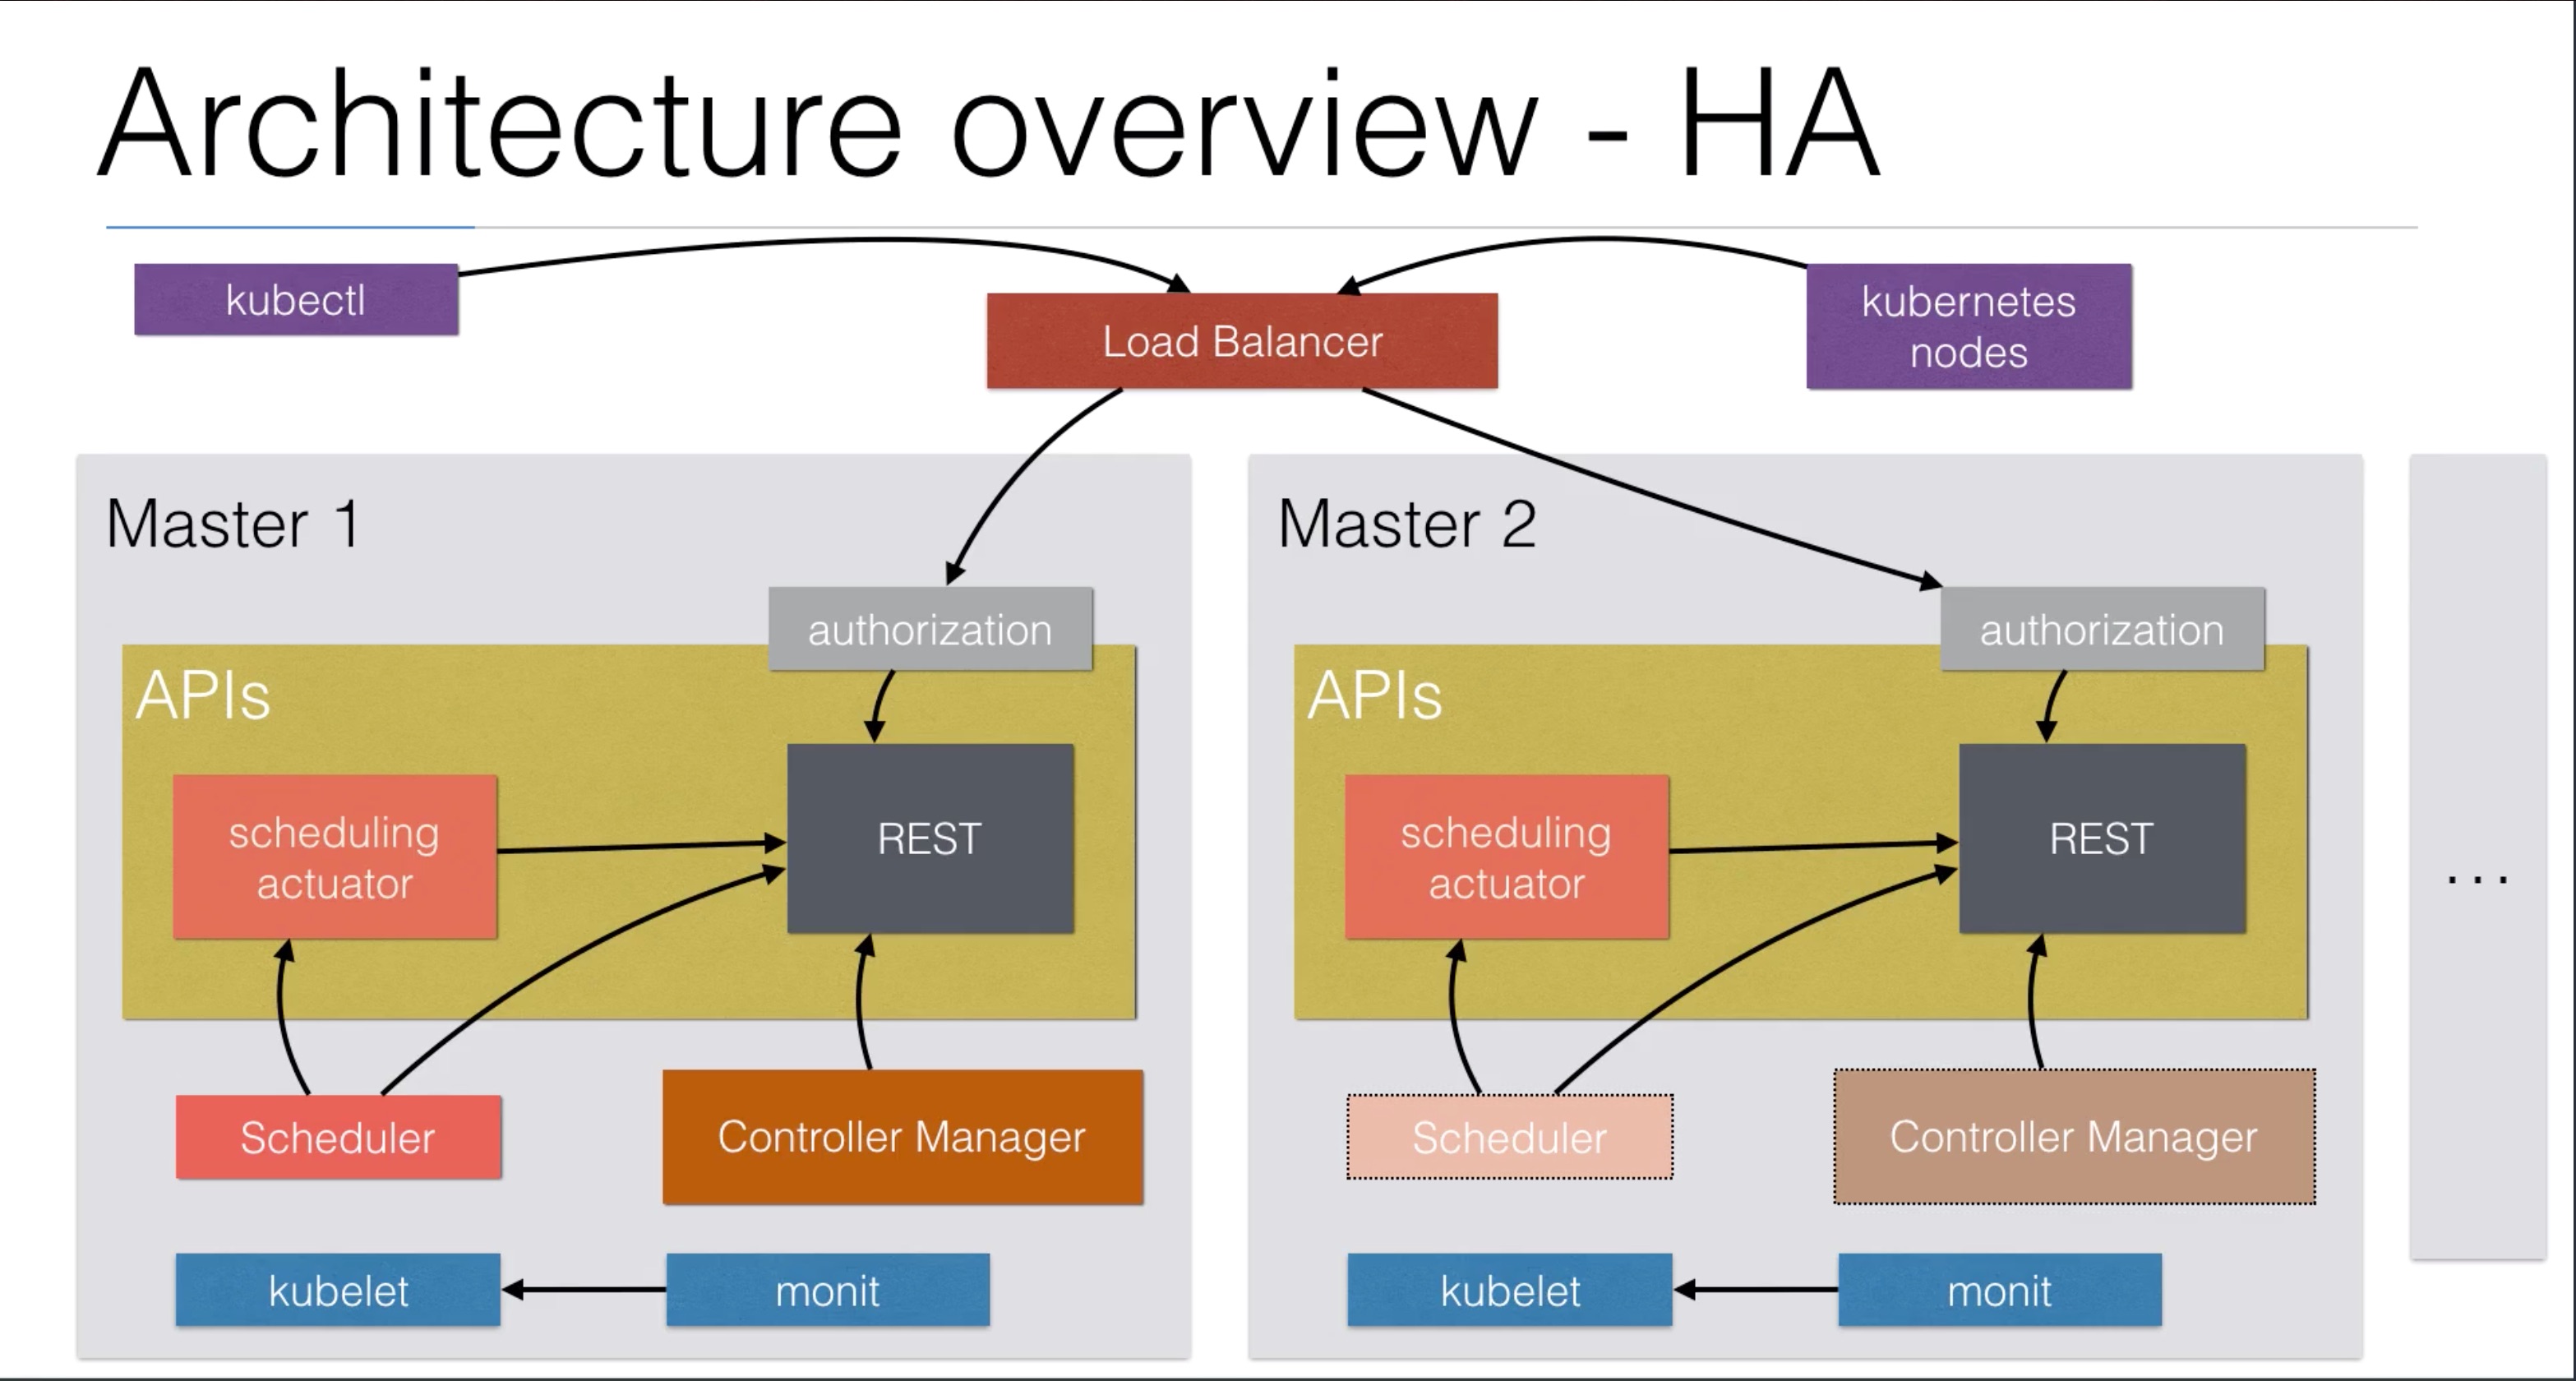
- If you’re going to run your cluster in production, you’re going to want to have all your master services in a high availability (HA) setup
- The setup looks like this:
- Clustering etcd: at least run 3 etcd nodes
- Replicated API servers with a LoadBalancer
- Running multiple instances of the scheduler and the controllers
- Only one of them will be the leader, the other ones are on stand-by
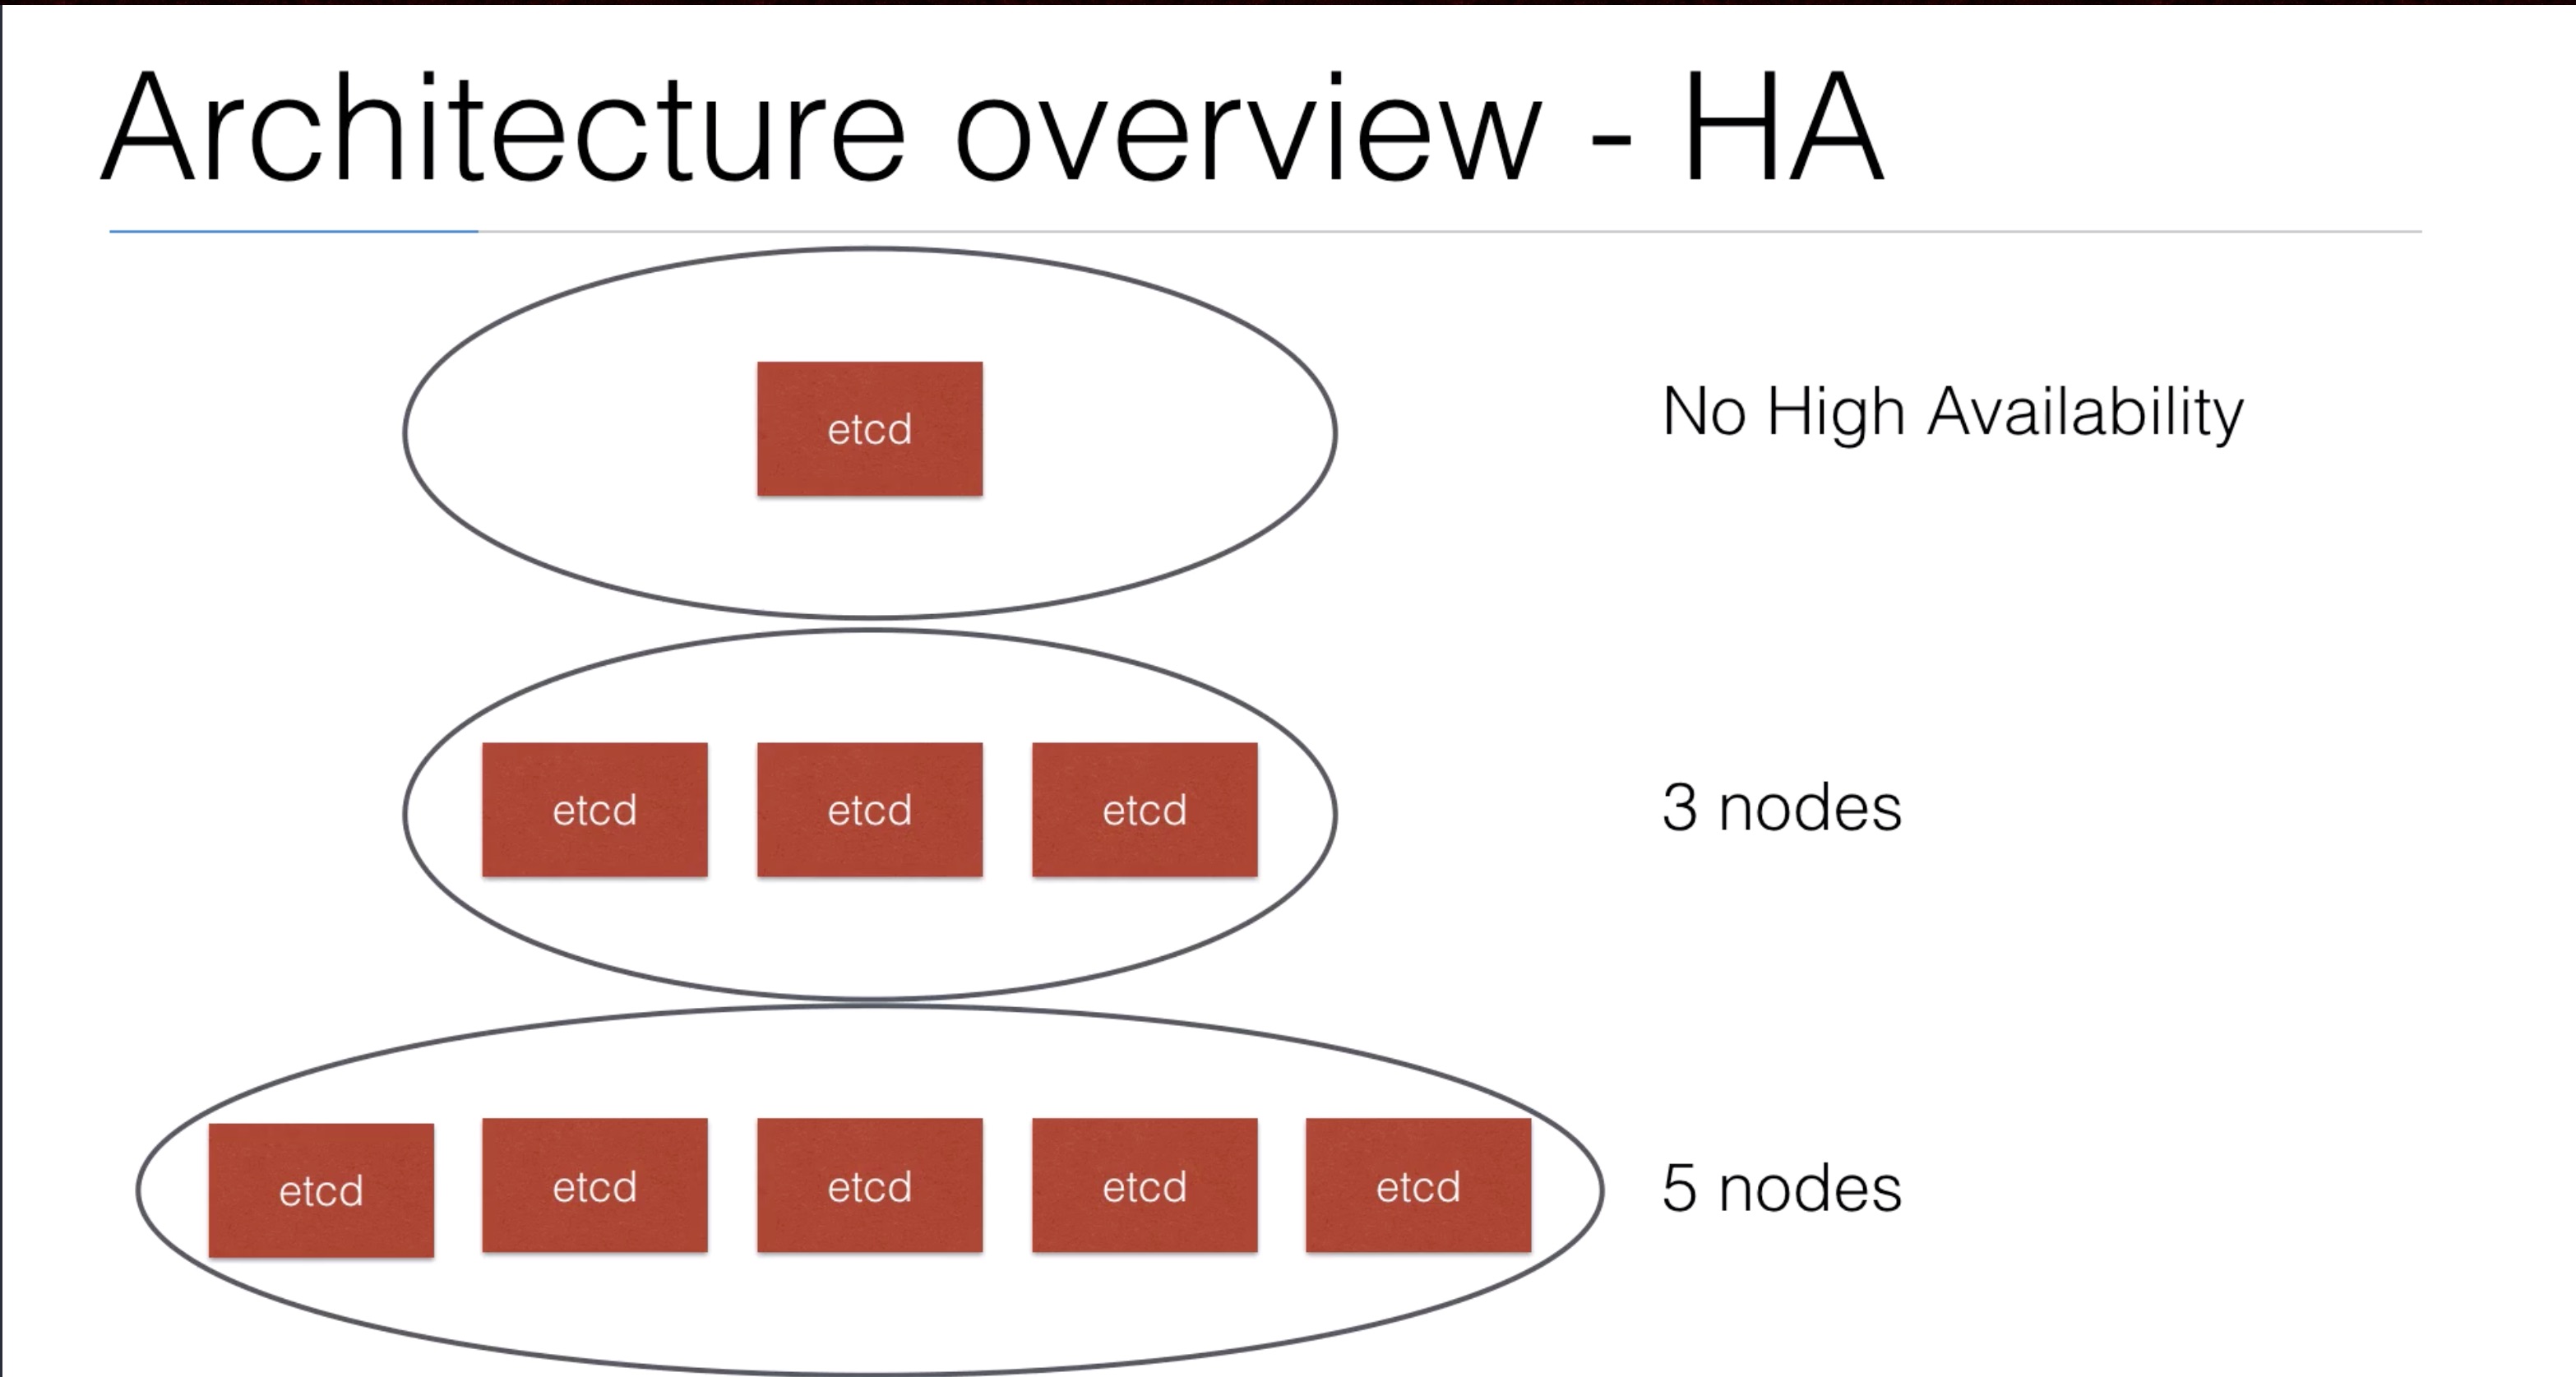
- A cluster like minikube doesn’t need HA - it’s only a one node cluster
- If you’re going to use a production cluster on AWS, kops can do the heavy lifting for you
- If you’re running on an other cloud platform, have a look at the kube deployment tools for that platform
- If you’re on a platform without any tooling, have a look at http://kubernetes.io/docs/admin/high-availability/ to implement it yourself
TLS on AWS ELB
- You can setup cloud specific features (like TLS termination) on AWS LoadBalancers that you create in Kubernetes using services of type LoadBalancer
- You can do this using annotations:
apiVersion: v1
kind: Service
metadata:
  name: example-service
  annotations:
    service.beta.kubernetes.io/aws-load-balancer-ssl-cert: arn:aws:acm:xx-xxxx-x:xxxxxxxx/xxxxx-xxxx-xxxx-xxxx-xxxxxxxxx
    service.beta.kubernetes.io/aws-load-balancer-backend-protocol: http
- In this lecture I’ll go over the possible annotations for the AWS Elastic Load Balancer (ELB)
| service.beta.kubernetes.io/aws-load-balancer-access-log-emit-interval | |
| service.beta.kubernetes.io/aws-load-balancer-access-log-enabled | Used to enable access logs |
| service.beta.kubernetes.io/aws-load-balancer-access-log-s3-bucket-name | on the load balancer |
| service.beta.kubernetes.io/aws-load-balancer-access-log-s3-bucket-prefix | |
| service.beta.kubernetes.io/aws-load-balancer-additional-resource-tags | Add tags |
| service.beta.kubernetes.io/aws-load-balancer-backend-protocol | Backend protocol to use |
| service.beta.kubernetes.io/aws-load-balancer-ssl-cert | Certificate ARN |
| service.beta.kubernetes.io/aws-load-balancer-connection-draining-enabled | Connection draining |
| service.beta.kubernetes.io/aws-load-balancer-connection-draining-timeout | Timeout backend node stop |
| service.beta.kubernetes.io/aws-load-balancer-connection-idle-timeout | Connection idle timeout |
| service.beta.kubernetes.io/aws-load-balancer-cross-zone-load-balancing-enabled | Cross-AZ load balancing |
| service.beta.kubernetes.io/aws-load-balancer-extra-security-groups | Extra security groups |
| service.beta.kubernetes.io/aws-load-balancer-internal | Set ELB to internal LB |
| service.beta.kubernetes.io/aws-load-balancer-proxy-protocol | Enable proxy protocol |
| service.beta.kubernetes.io/aws-load-balancer-ssl-ports | Listeners to enable (default all) |
Federation
- Federation allows you to manage multiple Kubernetes clusters
- They can be in different Regions at the same Cloud Provider
- It can be an on-site cluster + a cluster in the cloud (hybrid)
- It can be a cluster than spans multiple Cloud Providers
- The Setup
- It requires running the Federation plane:
- etcd cluster
- federation-apiserver
- federation-controller-manager
- You can run these binaries as pods on an existing cluster
- It requires running the Federation plane: